Building a Homelab on a $40 Dell Wyse 5070: Proxmox, AdGuard Home, and Tailscale
I picked up a Dell Wyse 5070 extended thin client with a Pentium Silver J5005, 8GB RAM, and a 64GB SSD for about $40 on eBay. These things were designed for enterprise thin-client deployments, which means they’re dead silent, sip power (~10W under load), and are built to run 24/7. Perfect homelab starter.
The goal: replace my Raspberry Pi 3B+ running Pi-hole with something more capable, move DNS to AdGuard Home, and set the foundation for expanding the lab later. Everything accessible over Tailscale, nothing exposed to the internet.
Here’s the full walkthrough from a stock Windows thin client to a working homelab.
The Architecture
The Wyse runs Proxmox VE as a bare-metal hypervisor. AdGuard Home lives in a lightweight LXC container with Unbound as the upstream recursive resolver. The Pi stays online as backup DNS so the household doesn’t lose internet when I’m tinkering.
- Hardware: Dell Wyse 5070 Extended (J5005, 8GB DDR4, 64GB SSD)
- Hypervisor: Proxmox VE 9.1 (Debian-based, free tier)
- DNS: AdGuard Home + Unbound in an LXC container
- Backup DNS: Raspberry Pi 3B+ running Pi-hole + Unbound
- Remote Access: Tailscale (AdGuard Home available from anywhere on the tailnet)
- Router: Primary DNS → Wyse, Secondary DNS → Pi
Why Proxmox Instead of Ubuntu Server
I debated this. Ubuntu Server with Docker Compose is simpler and has more beginner tutorials. But Proxmox won for a few reasons:
Isolation. Each service runs in its own LXC container with its own filesystem. If I break AdGuard experimenting with filter lists, Vaultwarden and everything else I add later doesn’t care. With Docker on bare metal, a bad daemon update or disk issue can take everything down at once.
Snapshots. One click before I tinker with anything. If it breaks, I roll back in seconds. On Ubuntu I’d need to set up Timeshift or ZFS snapshots myself.
Scalability. When I add a second node later, Proxmox clusters natively. I can migrate containers between machines from the web UI. With Ubuntu, I’m building orchestration from scratch.
It’s also just Debian under the hood. I can still SSH in and use the terminal like any Linux box. The web GUI at https://wyse-ip:8006 is a bonus, not a restriction.
Part 1: Prepare the Install Media
You need a USB drive (2GB minimum — it will be wiped) and a working PC.
Download Proxmox VE
Grab the latest ISO from proxmox.com/en/downloads. You want Proxmox VE 9.1 ISO Installer.
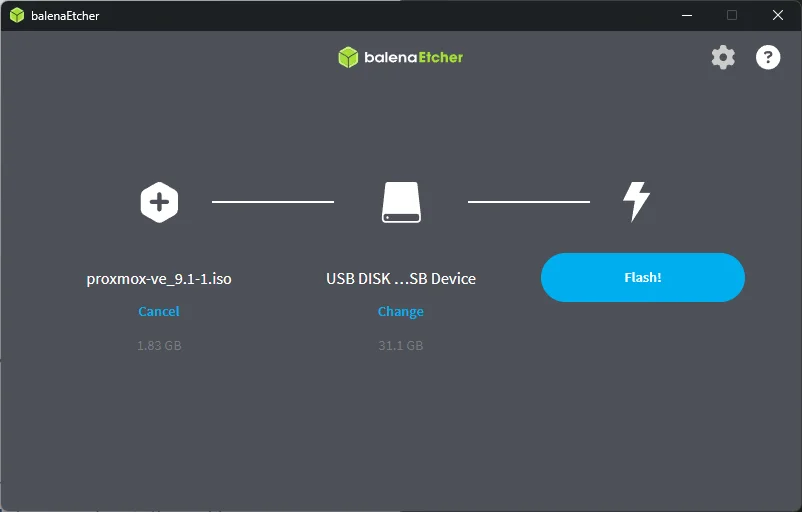
Flash the USB
Download balenaEtcher (works on Windows, Mac, and Linux). Open it and:
- Click Flash from file → select the Proxmox ISO
- Click Select target → choose your USB drive
- Click Flash! and wait for it to finish and verify
Write Down Your Network Info
You need a few details about your network before starting the install. Don’t bother with the Wyse for this — the drive might be wiped or Windows might not be set up. Just grab it from your router’s admin page or from any other device on your network.
If You Have an eero Router
eero is app-only — there’s no web admin page.
- Open the eero app
- Tap Settings (gear icon) → Network settings → DHCP & NAT
- Note whether you’re on Automatic or Manual IP
- If you’re on Automatic, leave it on Automatic. Don’t switch to Manual IP just for this project — changing that setting can shift your subnet configuration, reassign your DHCP range, and temporarily disconnect devices across your network. The static IPs for Proxmox and AdGuard are set at the Proxmox/LXC level, not in eero, so your router’s DHCP mode doesn’t matter for this.
- If you’re already on Manual IP, note the Lease range (Starting IP and Ending IP) so you can pick static IPs outside of it.
To find your gateway IP and current network details, just check from any device on your network (see below).
If You Have a Standard Router (Netgear, TP-Link, Asus, UniFi, etc.)
- Open a browser and go to your router’s admin page (usually
192.168.1.1or192.168.0.1) - Find the LAN or DHCP settings section
- Note the DHCP range (start and end IPs) so you can pick static IPs outside of it
- Some routers let you set a “static IP reservation” — you can use that too, but we’ll set the IPs at the Proxmox level regardless
From Any Device on Your Network
If you need to double-check your gateway IP or subnet:
- Windows:
ipconfig /allin Command Prompt - Mac:
ifconfig | grep inetin Terminal - Linux:
ip addrin Terminal
Pick Your Static IPs
Fill in this table — you’ll reference it throughout the guide:
| Detail | Example | Yours |
|---|---|---|
| Default Gateway (router IP) | 192.168.4.1 |
____ |
| Subnet Mask | 255.255.252.0 |
____ |
| Backup DNS IP (e.g., Pi-hole) | 192.168.4.118 |
____ |
| Wyse static IP (you choose) | 192.168.4.2 |
____ |
| AdGuard LXC static IP (you choose) | 192.168.4.3 |
____ |
For the static IPs, pick something outside your router’s DHCP range and group your infrastructure devices together. If your router hands out .100-.254, use something low like .10 and .11. If you’re on eero with Automatic mode and can’t see the DHCP range, pick IPs near your router’s IP — e.g., if your router is 192.168.4.1, use 192.168.4.2 and 192.168.4.3.
Important: The static IPs are configured in the Proxmox installer and the LXC container settings — not in your router. This means it doesn’t matter whether your router’s DHCP is in automatic or manual mode. Your infrastructure devices hardcode their own IPs and ignore DHCP entirely.
Part 2: Wyse 5070 BIOS Configuration
Plug the USB into the Wyse, power it on, and spam F2 to enter BIOS setup. The Wyse 5070 BIOS is organized into sections in the left sidebar — here’s exactly where to find each setting and what to change.
1. Enable USB Boot Support
This is critical and easy to miss. The Wyse 5070 ships with USB boot disabled by default — your Proxmox USB won’t even show up in the boot menu without this.
Navigate to: System Configuration → USB Configuration
| Setting | Default | Change to |
|---|---|---|
| Enable USB Boot Support | ☐ Unchecked | ☑ Checked |
| Enable Front USB Ports | ☑ Checked | Leave as-is |
| Enable Rear USB Ports | ☑ Checked | Leave as-is |
2. Disable Secure Boot
Navigate to: Secure Boot → Secure Boot Enable
Set Secure Boot Enable to Disabled. Proxmox won’t boot with Secure Boot on.
3. Enable Virtualization (VT-d)
Navigate to: Virtualization Support
| Setting | Default | Change to |
|---|---|---|
| Virtualization (VT-x) | ☑ Enabled | Leave as-is (already enabled) |
| VT for Direct I/O (VT-d) | ☐ Unchecked | ☑ Checked |
VT-x is what Proxmox needs to run VMs and containers. VT-d enables PCI passthrough — not needed right now, but you’ll want it later if you ever pass a NIC or GPU directly to a VM.
4. Wake on LAN (Optional)
Navigate to: Power Management → Wake on LAN
| Option | What it does |
|---|---|
| Disabled | Default. Wyse stays off when it receives a wake packet. |
| LAN Only | Wyse powers on when it receives a magic packet over Ethernet. |
| LAN with PXE Boot | Powers on and boots from the network. Not needed. |
Set to LAN Only if you want the ability to remotely power on the Wyse from another device on your network. Handy for a headless server tucked in a closet.
5. Boot Sequence
Navigate to: General → Boot Sequence
After enabling USB Boot Support, you should see your USB drive appear in the boot sequence list. Use the up/down arrows on the right side to move it above the Windows Boot Manager entries.
Alternatively, you can skip reordering and just use the F12 one-time boot menu after saving BIOS settings — this lets you pick the USB without permanently changing the boot order.
Your current boot sequence probably shows: KD, Windows Boot Manager, Merlin Non-Pxe, Onboard NIC entries. Once Proxmox is installed, it will replace the Windows Boot Manager entry automatically.
Note on UEFI Boot Path Security (under General → UEFI Boot Path Security): The default “Always, Except Internal HDD” is fine. This just controls whether the BIOS asks for an admin password when booting from external devices. If you haven’t set an admin password, this setting has no effect.
Save and Boot
Click Apply to save your changes, then Exit. If you reordered the boot sequence, the Wyse should boot directly into the Proxmox installer from the USB. If you didn’t reorder, power off, plug in the USB, power on, and press F12 to get the one-time boot menu — select your USB drive from the list.
Part 3: Install Proxmox VE
Installer Walkthrough
- Select Install Proxmox VE (Graphical)
- Accept the EULA
- Target disk: Select your 64GB SSD (probably
/dev/sdaor/dev/mmcblk0)- Click Options → choose ext4 (lighter than ZFS for a single disk)
- This wipes Windows entirely
- Country/Timezone: United States, Eastern
- Password and email:
- Set a strong root password — this is your web GUI login
- Email can be anything (
admin@atilho.comis fine) — it’s for alerts
- Network configuration — this is the important part:
- Management interface: Should auto-detect (e.g.,
enp1s0) - Hostname (FQDN):
pve01.lab.atilho.com - IP Address (CIDR):
192.168.4.2/22(your chosen static IP) - Gateway:
192.168.4.1(your router) - DNS Server:
1.1.1.1(temporary — we’ll switch to AdGuard later)
- Management interface: Should auto-detect (e.g.,
- Review the summary and click Install
Takes about 5-10 minutes. When it finishes, remove the USB and let it reboot.
First Boot
You’ll see a console screen with:
Welcome to the Proxmox Virtual Environment

https://192.168.4.2:8006
That’s it for the physical screen. Everything from here is done from your regular PC’s browser.
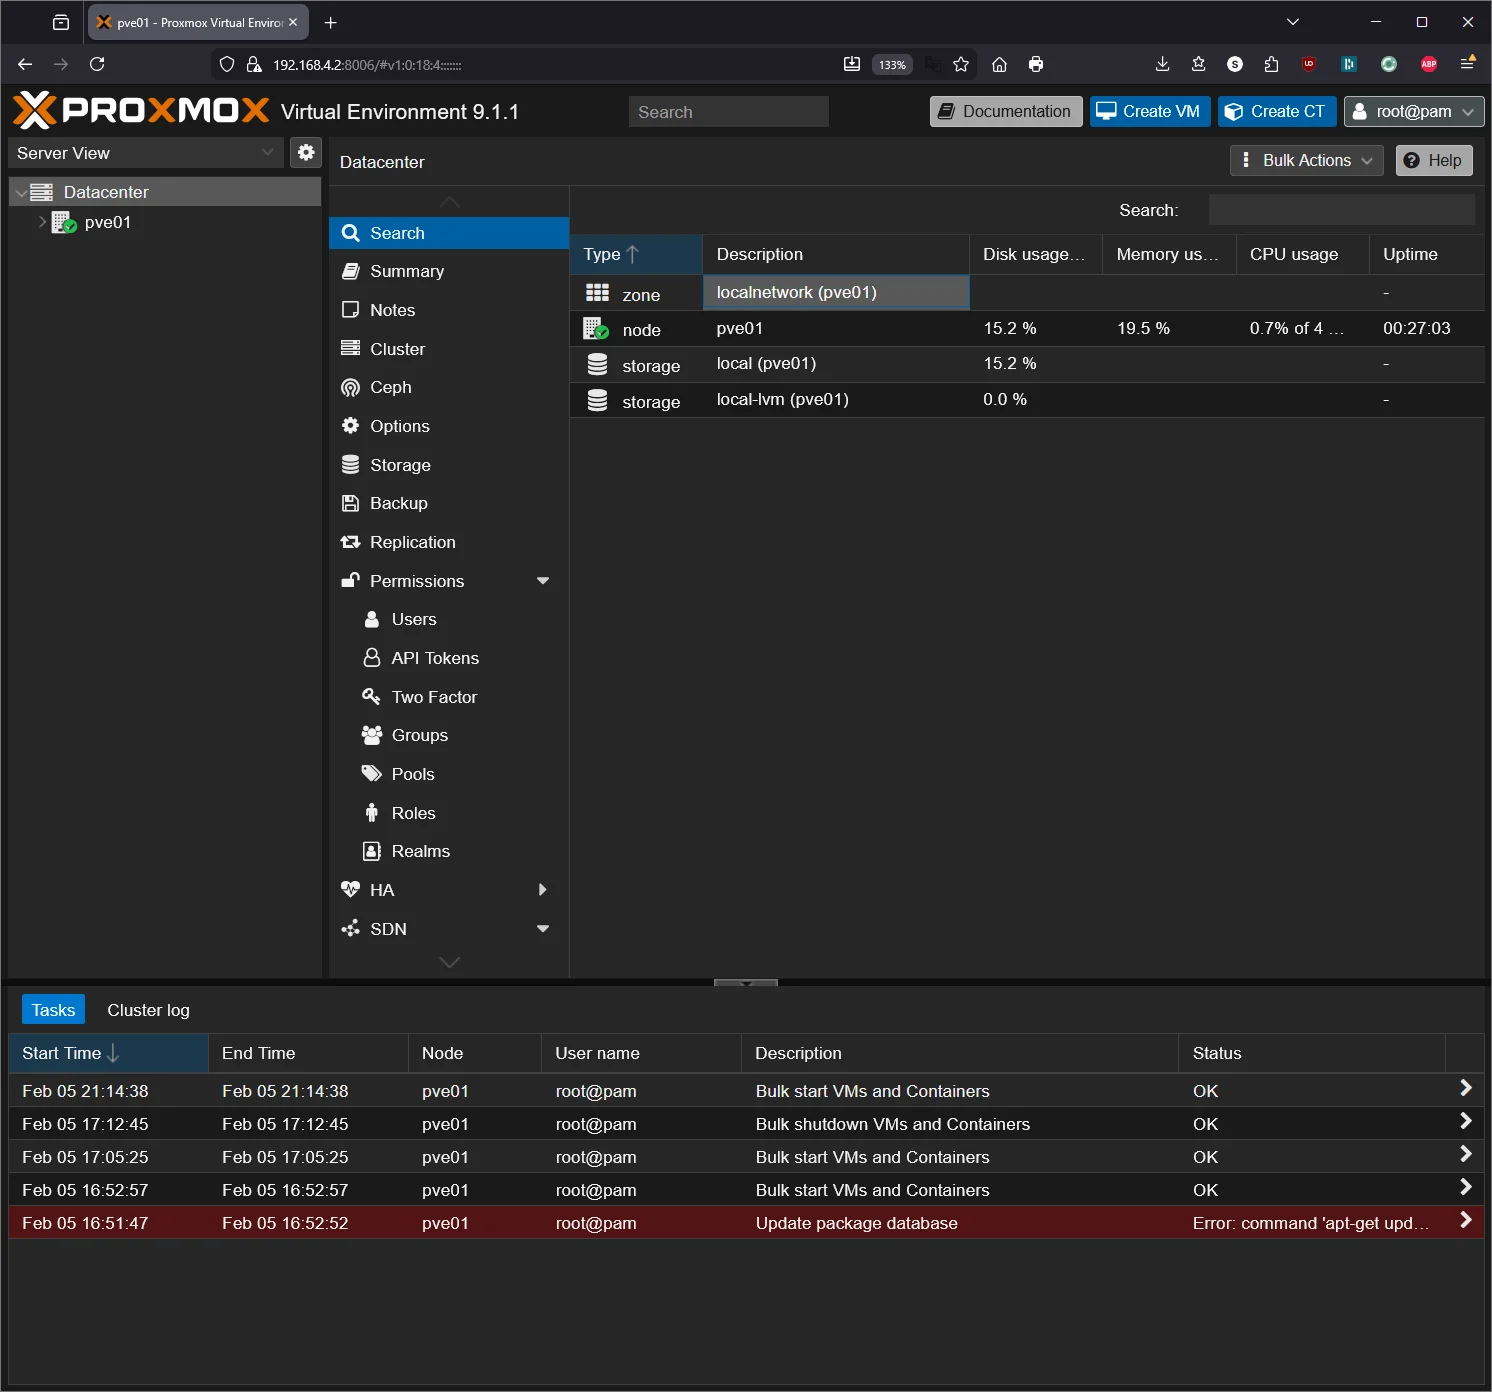
Part 4: Proxmox Post-Install Setup
Access the Web GUI
From any device on your network, open a browser and go to:
https://192.168.4.2:8006
You’ll get a certificate warning — click Advanced → Proceed. This is expected (self-signed cert).
Log in with:
- Username:
root - Password: what you set during install
- Realm: Linux PAM
Remove the Subscription Nag
Proxmox shows a “no valid subscription” popup every login. The free version is fully functional — this is just cosmetic. SSH into the Wyse:
ssh root@192.168.4.2
Then run:
sed -i.bak 's/Ext\.Msg\.show(/\/\/ Ext.Msg.show(/' /usr/share/javascript/proxmox-widget-toolkit/proxmoxlib.js && systemctl restart pveproxy.service
Clear your browser cache (or open an incognito window) and log in again — the popup should be gone.
Note: You’ll need to re-run this after Proxmox updates that touch the
proxmox-widget-toolkitpackage. It’s a 10-second fix when it happens.
Switch to the Free Repository
Proxmox 9 defaults to the enterprise (paid) repo which will throw errors on apt update. PVE 9 uses the newer Deb822 .sources format instead of the old .list files. Switch to the free repos:
# Disable enterprise PVE repo (comment out all lines)
sed -i 's/^[^#]/#&/' /etc/apt/sources.list.d/pve-enterprise.sources
# Disable enterprise Ceph repo (comment out all lines)
sed -i 's/^[^#]/#&/' /etc/apt/sources.list.d/ceph.sources
# Create the free no-subscription PVE repo
cat > /etc/apt/sources.list.d/pve-no-subscription.sources << 'EOF'
Types: deb
URIs: http://download.proxmox.com/debian/pve
Suites: trixie
Components: pve-no-subscription
Signed-By: /usr/share/keyrings/proxmox-archive-keyring.gpg
EOF
# Create the free no-subscription Ceph repo
cat > /etc/apt/sources.list.d/ceph-no-subscription.sources << 'EOF'
Types: deb
URIs: http://download.proxmox.com/debian/ceph-squid
Suites: trixie
Components: no-subscription
Signed-By: /usr/share/keyrings/proxmox-archive-keyring.gpg
EOF
# Update and upgrade
apt update && apt full-upgrade -y
Reboot when done:
reboot
Give it a minute, then verify the web GUI loads again.
Part 5: Download a Container Template
Before creating the AdGuard container, you need a base OS template.
In the Proxmox web GUI:
- Expand your node in the left sidebar
- Click on local storage
- Go to the CT Templates tab
- Click Templates
- Search for debian-13-standard and download it
Wait for the download to finish. You’ll see it in the template list.
Part 6: Create the AdGuard Home LXC Container
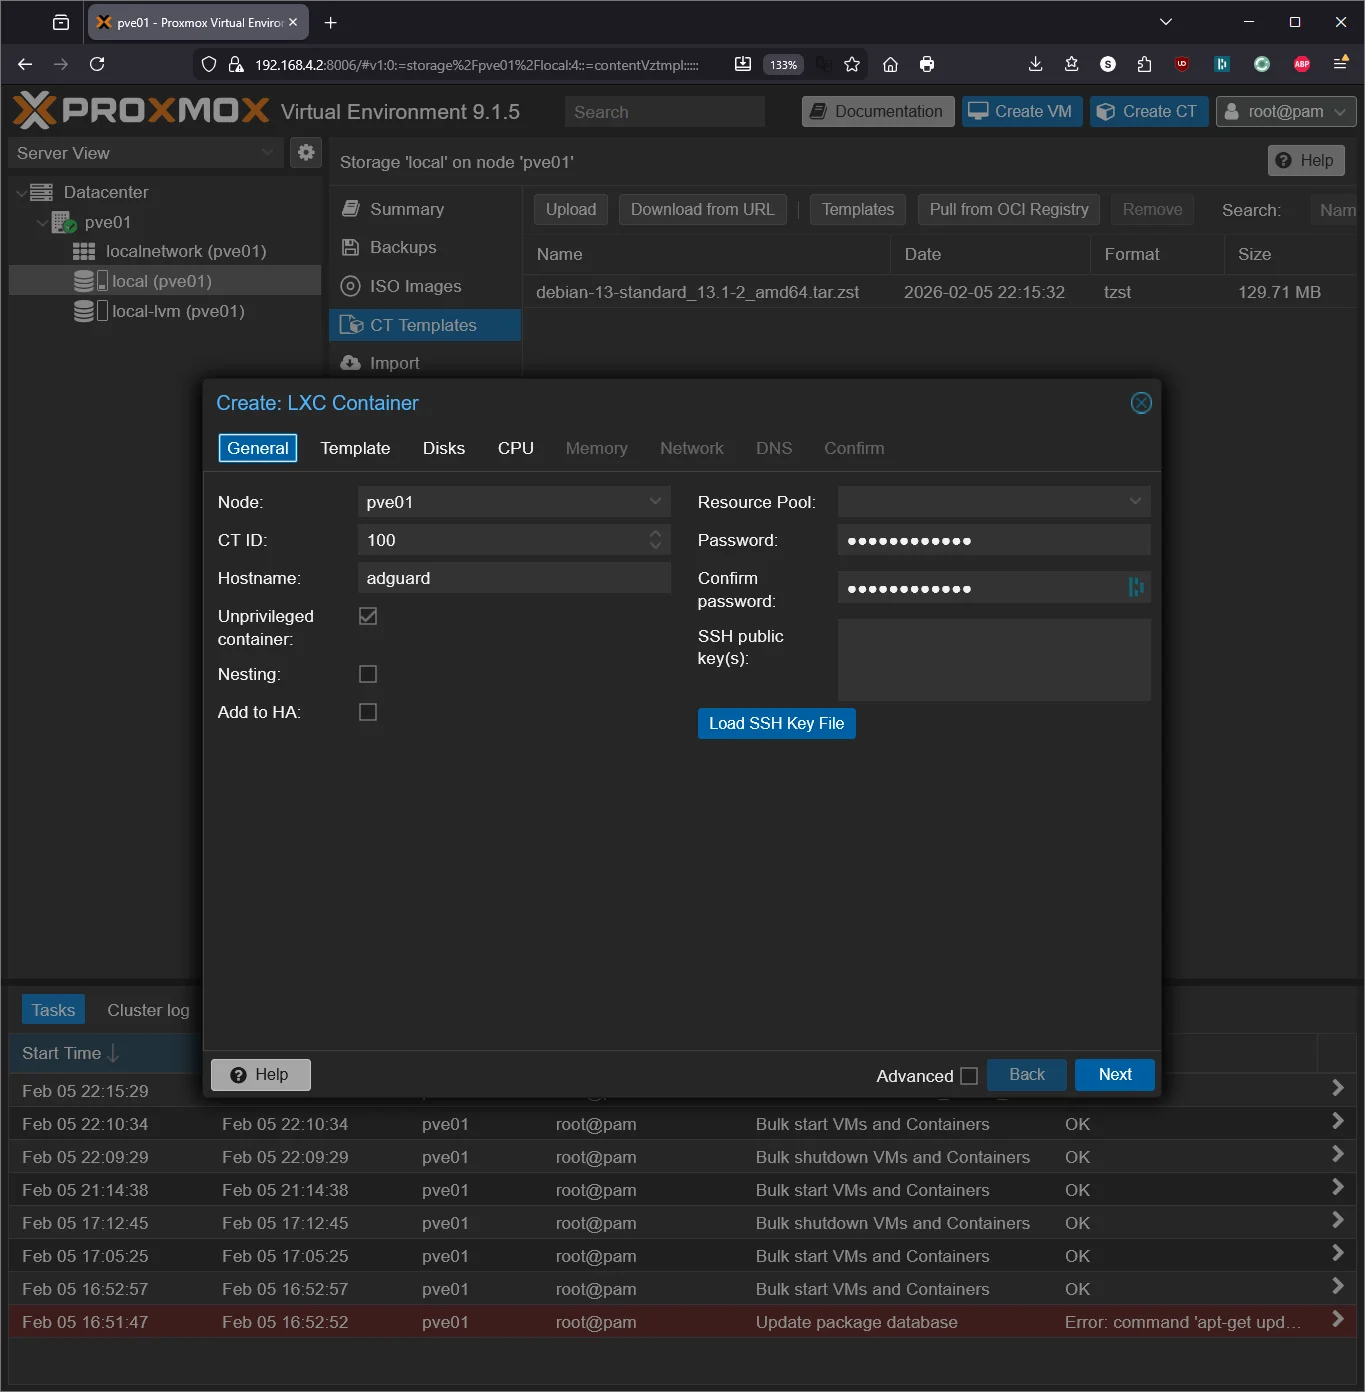
Click Create CT (top-right corner of the GUI).
General
| Field | Value |
|---|---|
| CT ID | 100 |
| Hostname | adguard |
| Password | Set a root password for this container |
| Unprivileged | ✅ Checked |
Template
Select the debian-13-standard template you downloaded.
Disks
| Field | Value |
|---|---|
| Disk size | 4 GB |
AdGuard Home is tiny. 4GB is more than enough.
CPU
| Field | Value |
|---|---|
| Cores | 1 |
DNS resolution isn’t CPU-intensive. One core handles a household easily.
Memory
| Field | Value |
|---|---|
| Memory | 512 MB |
| Swap | 256 MB |
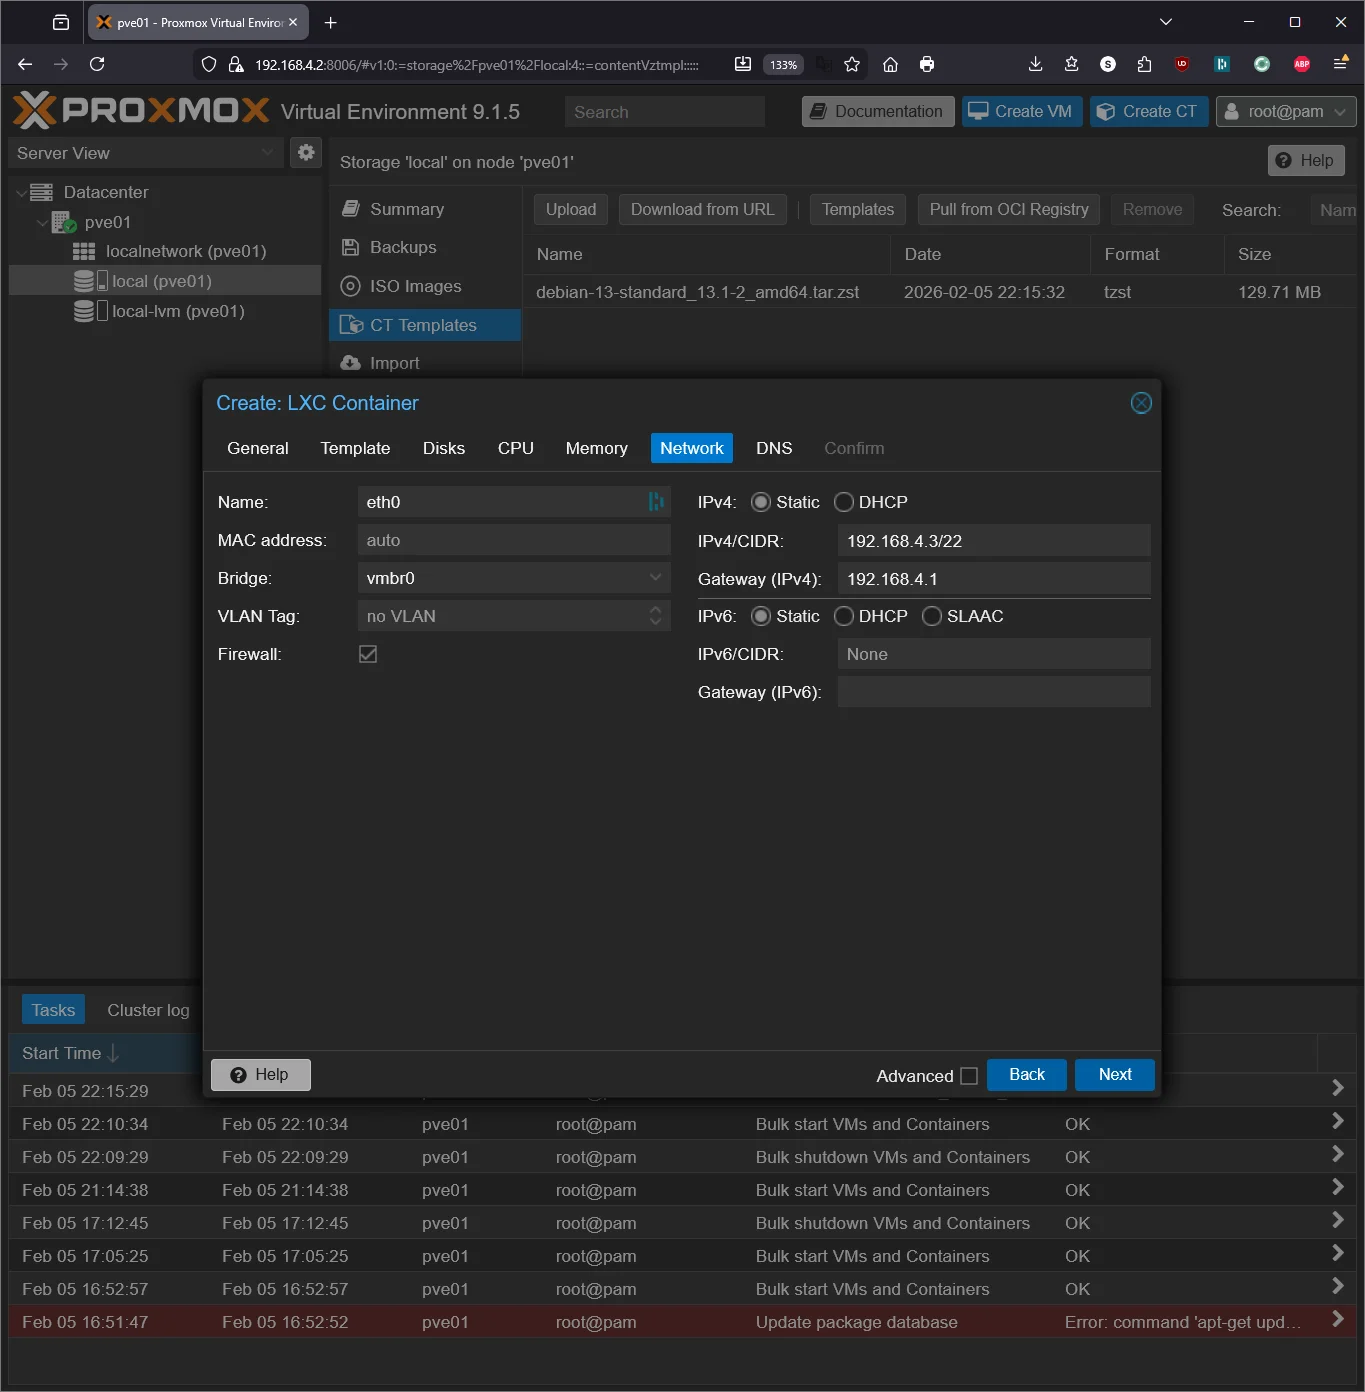
Network
| Field | Value |
|---|---|
| Name | eth0 |
| Bridge | vmbr0 |
| IPv4 | Static |
| IPv4/CIDR | 192.168.4.3/22 (one above the Proxmox host) |
| Gateway | 192.168.4.1 |
Important: Give this container its own static IP, separate from the Proxmox host. This is the IP your router will point to for DNS.
DNS
| Field | Value |
|---|---|
| DNS domain | lab.atilho.com |
| DNS server | 1.1.1.1 |
Temporary — once AdGuard + Unbound are running, the container resolves its own DNS.
Confirm and Create
Check Start after created and click Finish.
Part 7: Install AdGuard Home + Unbound
Enter the Container
Click on container 100 (adguard) in the left sidebar, then go to the Console tab. Log in as root with the password you set.
Update the System and Install Dependencies
apt update && apt upgrade -y && apt install -y curl dnsutils
Note: The Debian 13 container template doesn’t include
curlordnsutilsby default. We needcurlto download files anddnsutilsfordigto test DNS resolution later.
Install Unbound
Unbound is a recursive DNS resolver. Instead of forwarding queries to Google or Cloudflare, it resolves them from the root DNS servers directly. More private, no third party sees your queries.
apt install -y unbound
Configure Unbound
Download the root hints (the addresses of the 13 root DNS servers):
curl -o /var/lib/unbound/root.hints https://www.internic.net/domain/named.cache
Create the Unbound config:
cat > /etc/unbound/unbound.conf.d/adguard.conf << 'EOF'
server:
    verbosity: 0

    interface: 127.0.0.1
    port: 5335

    do-ip4: yes
    do-ip6: no
    do-udp: yes
    do-tcp: yes

    # Security
    harden-glue: yes
    harden-dnssec-stripped: yes
    harden-referral-path: yes
    harden-algo-downgrade: yes

    # Privacy
    use-caps-for-id: yes
    qname-minimisation: yes
    aggressive-nsec: yes

    # Performance
    prefetch: yes
    prefetch-key: yes
    num-threads: 1
    msg-cache-slabs: 2
    rrset-cache-slabs: 2
    infra-cache-slabs: 2
    key-cache-slabs: 2
    rrset-cache-size: 64m
    msg-cache-size: 32m

    # Root hints
    root-hints: /var/lib/unbound/root.hints

    # Block private IP reverse lookups from leaking upstream
    private-address: 192.168.0.0/16
    private-address: 169.254.0.0/16
    private-address: 172.16.0.0/12
    private-address: 10.0.0.0/8
    private-address: fd00::/8
    private-address: fe80::/10
EOF
Restart and verify Unbound:
systemctl restart unbound
systemctl enable unbound
Test it:
dig google.com @127.0.0.1 -p 5335
You should get an ANSWER SECTION with an IP address. If it works, Unbound is resolving recursively on port 5335.

Install AdGuard Home
curl -s -S -L https://raw.githubusercontent.com/AdguardTeam/AdGuardHome/master/scripts/install.sh | sh -s -- -v
This installs AdGuard Home and sets it up as a systemd service.
Fix the Port 53 Conflict
Debian runs systemd-resolved by default, which binds to port 53. AdGuard Home needs that port. Disable it:
systemctl disable --now systemd-resolved
Update /etc/resolv.conf so the container can still resolve DNS during setup:
rm /etc/resolv.conf
echo "nameserver 1.1.1.1" > /etc/resolv.conf
This is temporary. Once AdGuard Home is running, the container will use itself for DNS.
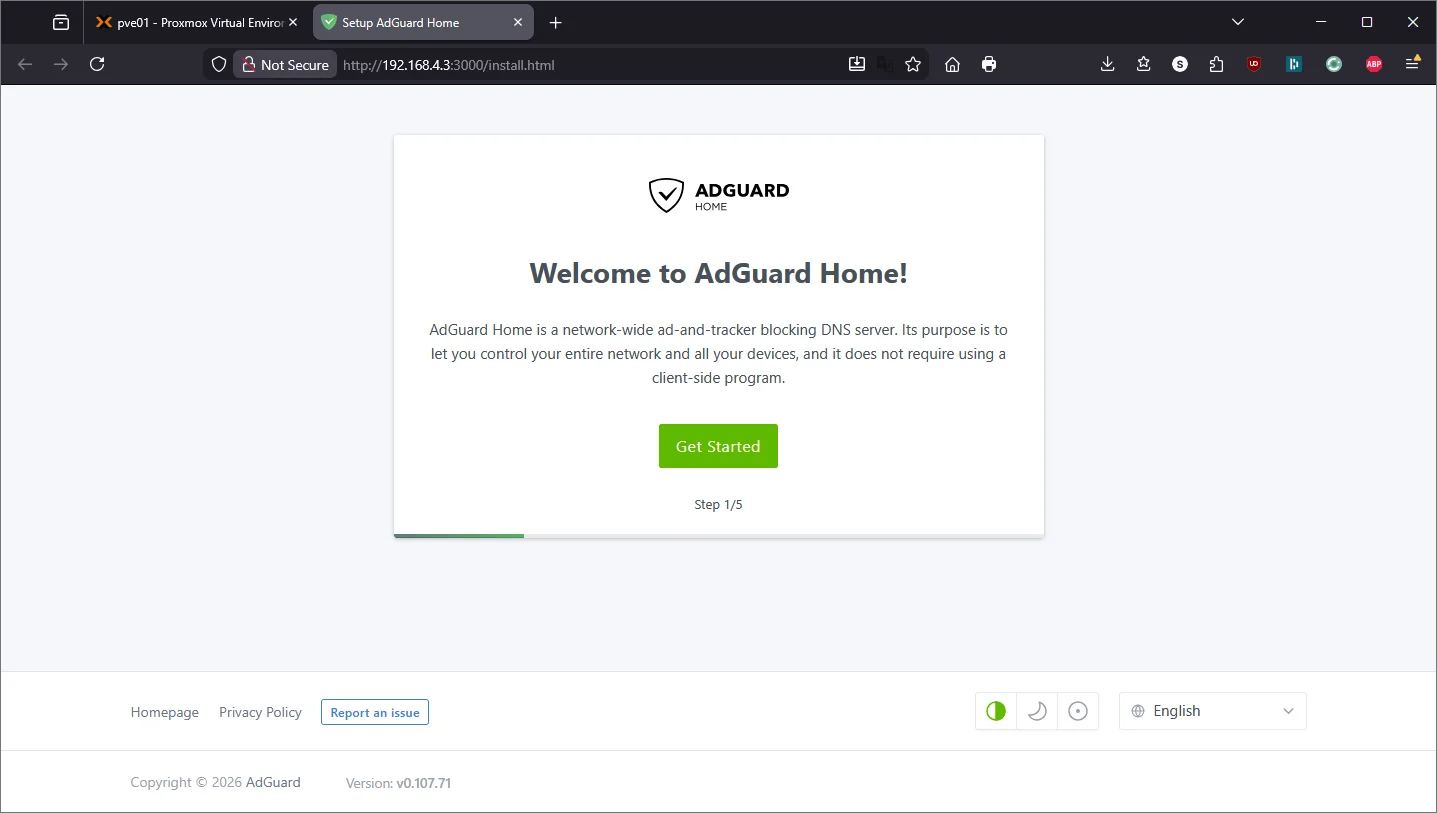
Run AdGuard Home Initial Setup
Open a browser and go to:
http://192.168.4.3:3000
This is the one-time setup wizard.
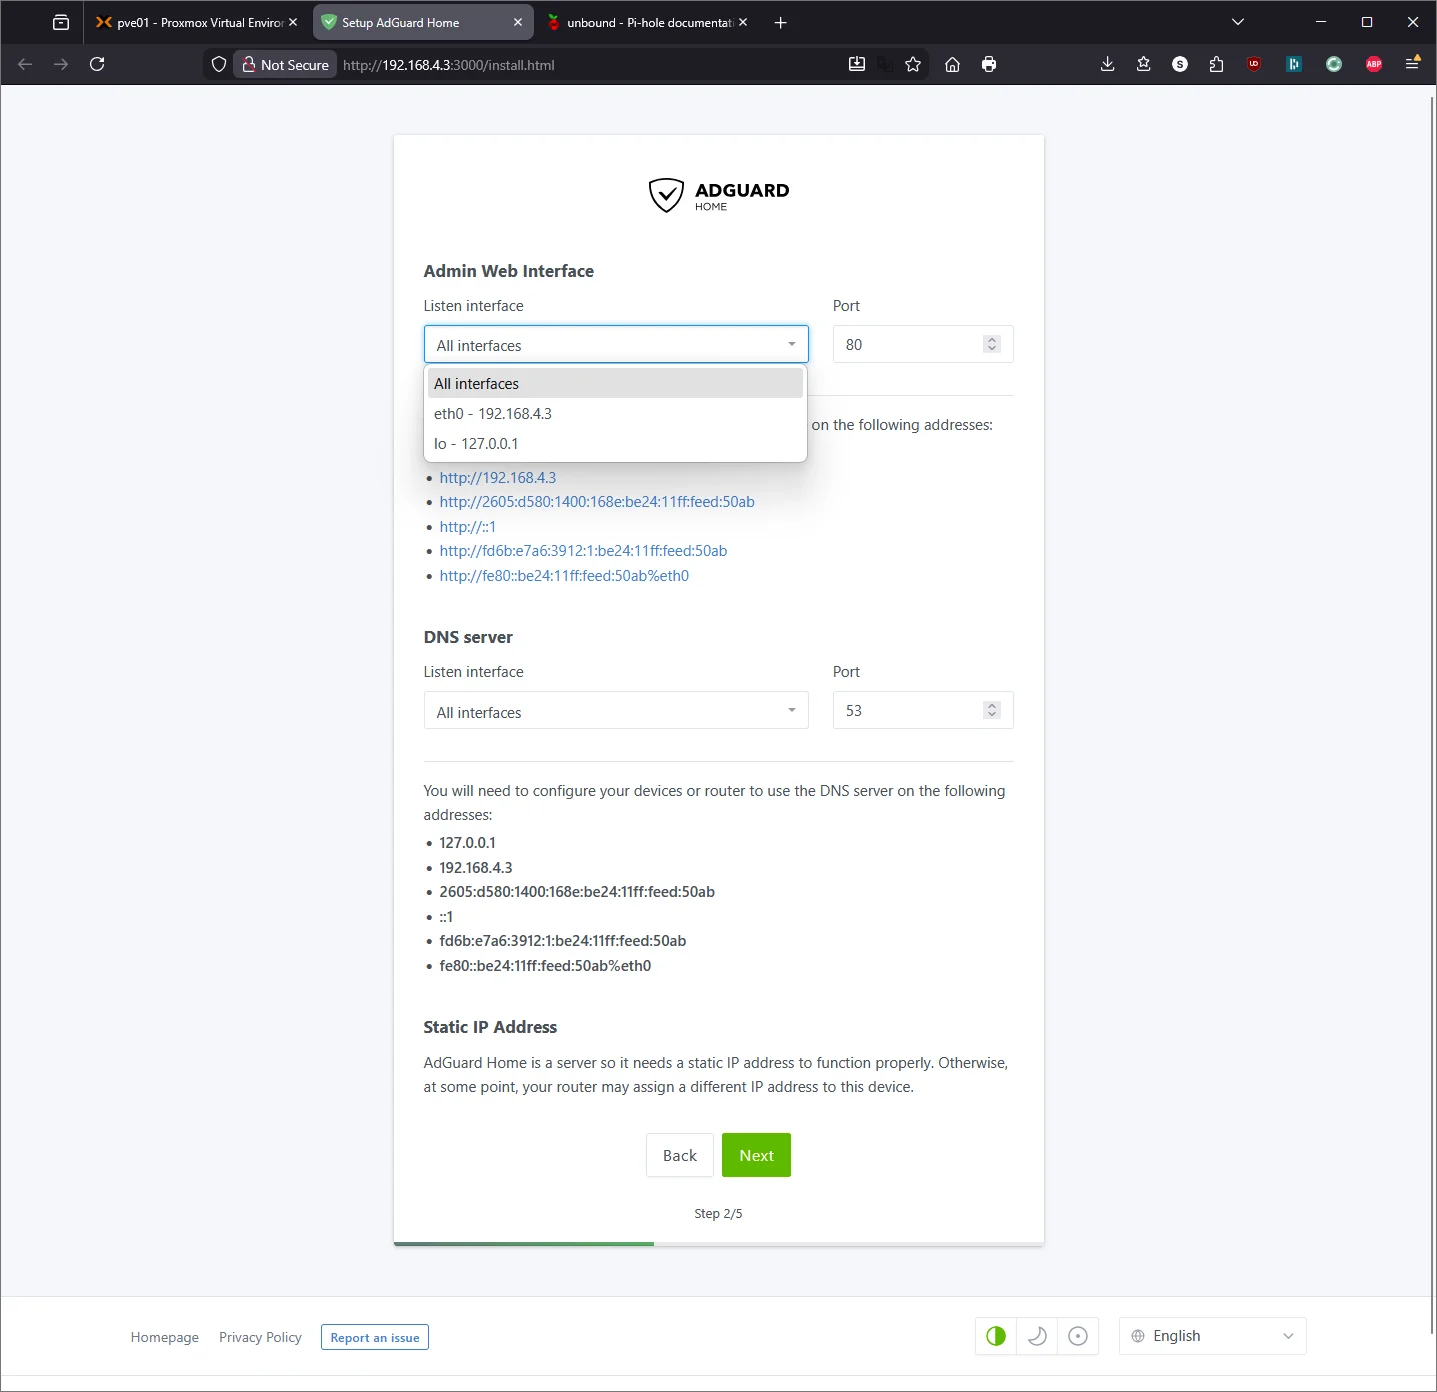
Configure it:
- Admin Web Interface: Listen on
0.0.0.0:80(so you can access the dashboard from your network) - DNS Server: Listen on
0.0.0.0:53(so it can serve DNS to your whole network) - Username/Password: Set your admin credentials
- Click through to finish
Point AdGuard Home to Unbound
Now tell AdGuard Home to use Unbound as its upstream resolver instead of a public DNS provider.
- Open the AdGuard Home dashboard:
http://192.168.4.3 - Go to Settings → DNS settings
- Under Upstream DNS servers, clear everything and enter:
127.0.0.1:5335
- Under Bootstrap DNS servers, enter:
1.1.1.1
- Scroll down and click Test upstreams — it should show green
- Click Apply
Update the Container’s Own DNS
Now that AdGuard + Unbound are running, point the container at itself:
echo "nameserver 127.0.0.1" > /etc/resolv.conf
Test it:
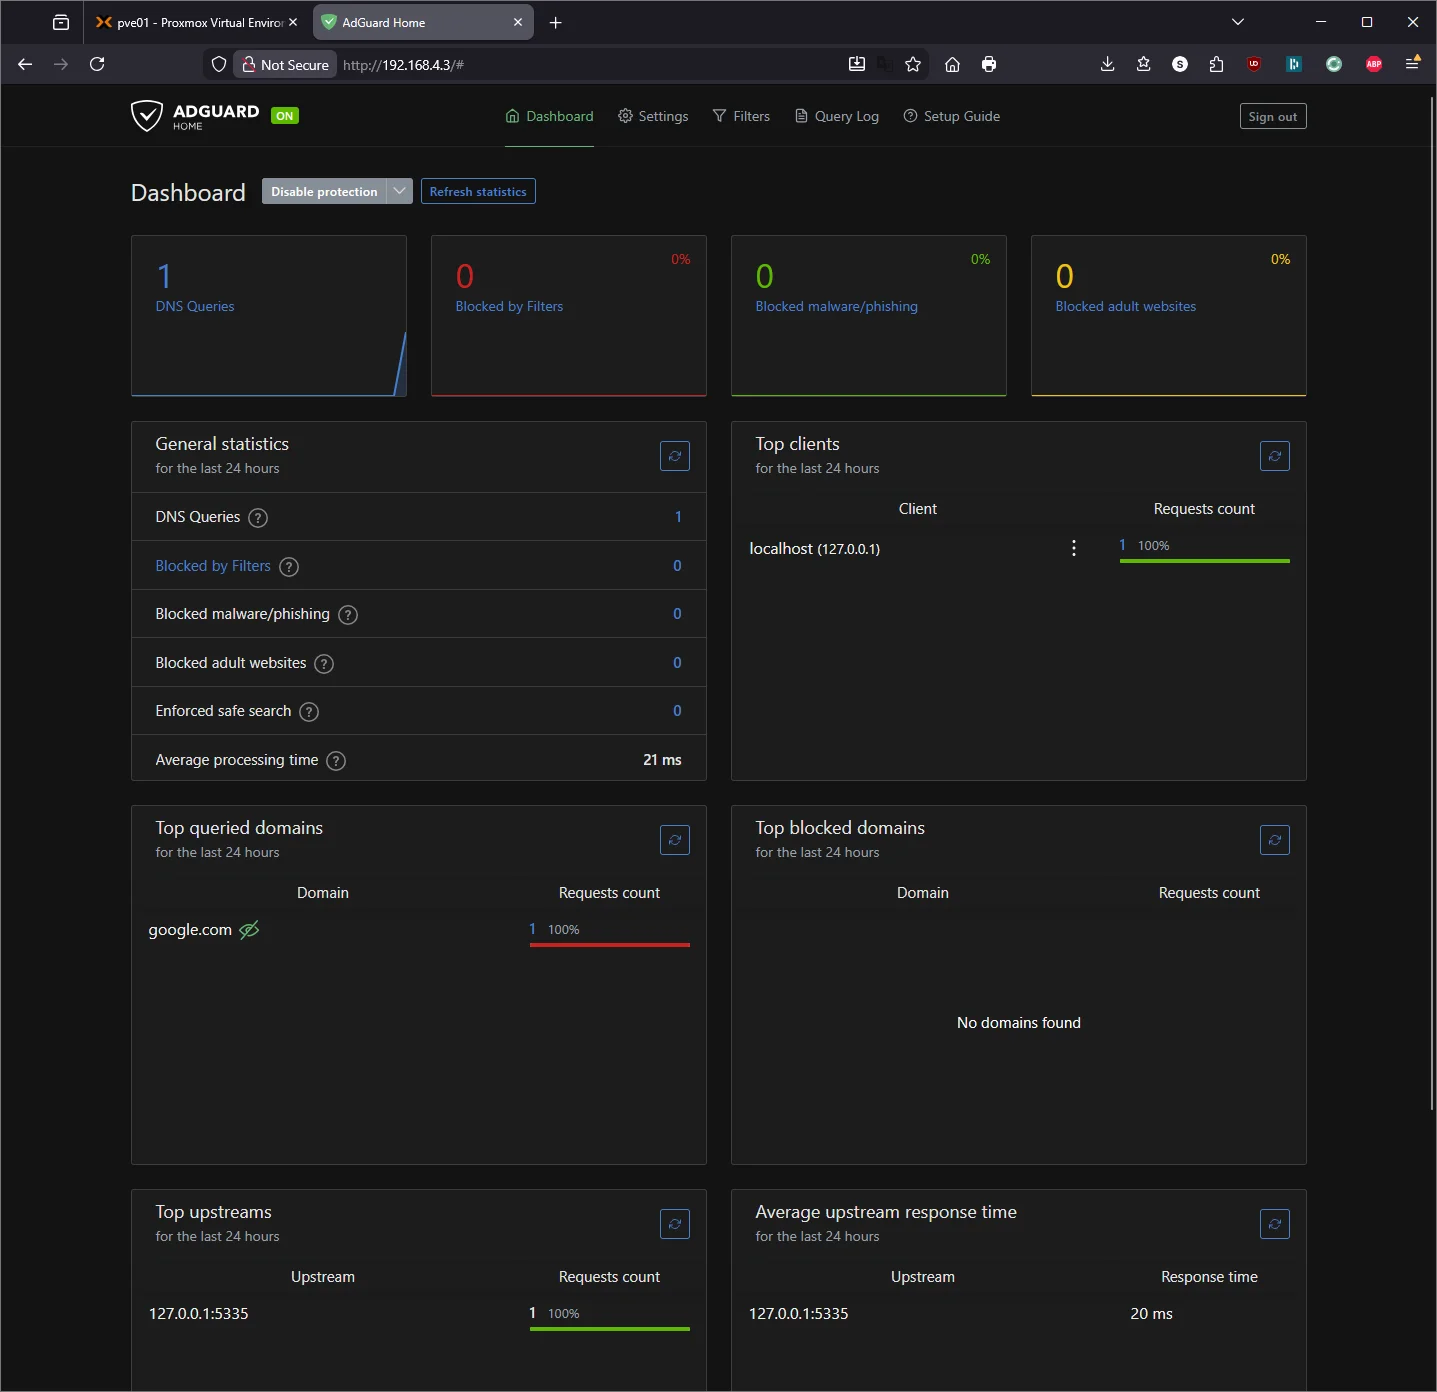
dig google.com
Should resolve through your own AdGuard Home → Unbound pipeline. Check the AdGuard Home dashboard — you should see the query logged.
Part 7.5: AdGuard Home Configuration Basics
AdGuard Home is running and blocking ads with its default filter list, but there’s a lot more you can tune. This section covers the highlights — I’ll write a dedicated deep-dive guide later.
Adding More Block Lists
AdGuard ships with its own DNS filter enabled. To add more, go to Filters → DNS Blocklists → Add blocklist → Add a custom list and paste the URL.
Some solid options to start with:
| List | URL | Notes |
|---|---|---|
| OISD (small) | https://small.oisd.nl |
Well-curated, minimal false positives — great starting point |
| Steven Black’s Unified Hosts | https://raw.githubusercontent.com/StevenBlack/hosts/master/hosts |
Combines several reputable sources into one list |
| OISD (big) | https://big.oisd.nl |
More aggressive, replaces the small version if you want broader coverage |
| HaGeZi Multi Pro | https://raw.githubusercontent.com/hagezi/dns-blocklists/main/adblock/pro.txt |
Aggressive blocking — may require occasional whitelisting |
Tip: Start with the default AdGuard filter plus OISD small. Live with it for a week, check the Query Log for false positives, then add more if needed. It’s much easier to add lists than to troubleshoot why a random app stopped working.
Other Settings Worth Exploring
Settings → General Settings:
- Query Log retention — defaults to 24 hours. Bump it up to 7 or 30 days if you want to see trends over time.
- Statistics retention — same idea, controls how long the dashboard charts keep data.
Settings → DNS Settings:
- Rate limit — defaults to 20 requests/second per client. Fine for most setups, but if a device is hitting this limit you’ll see it in the logs.
- EDNS Client Subnet — leave disabled for privacy. Enabling it sends a portion of your IP to upstream resolvers for geo-aware responses, which defeats the purpose of running your own recursive DNS.
- DNSSEC — you can enable this for an extra layer of validation. Unbound already handles DNSSEC, but enabling it in AdGuard adds a second check.
Filters → DNS Allowlists:
This is where you whitelist domains that got incorrectly blocked. Common ones people end up adding include CDN domains for streaming services, Microsoft update servers, or captive portal detection domains (connectivitycheck.gstatic.com for Android, captive.apple.com for iOS).
Settings → Encryption Settings:
Out of scope for this guide, but this is where you’d configure DNS-over-HTTPS (DoH) or DNS-over-TLS (DoT) with a TLS certificate. Worth setting up later if you want encrypted DNS queries from your devices.
Per-Client Settings
One of AdGuard Home’s advantages over Pi-hole is per-client filtering. Under Settings → Client Settings, you can define persistent clients by IP or MAC address and assign different filtering rules to each. For example, you could run stricter blocking on a kid’s device while leaving your workstation with lighter filters.
Part 8: Install Tailscale on the LXC Container
This is where it gets useful. Tailscale lets you access AdGuard Home’s dashboard and use it as your DNS server from anywhere — coffee shop, phone on cellular, wherever — all through your tailnet.
Enable TUN Device for the Container
Tailscale needs access to a TUN device, which unprivileged LXC containers don’t have by default. From the Proxmox host (not inside the container), SSH in:
ssh root@192.168.4.2
Stop the container first:
pct stop 100
Edit the container config:
nano /etc/pve/lxc/100.conf
Add these lines at the bottom:
lxc.cgroup2.devices.allow: c 10:200 rwm
lxc.mount.entry: /dev/net/tun dev/net/tun none bind,create=file
Save and exit (Ctrl+X, Y, Enter). Start the container:
pct start 100
Install Tailscale Inside the Container
Enter the container:
pct enter 100
Install Tailscale:
curl -fsSL https://tailscale.com/install.sh | sh
Start Tailscale:
tailscale up --hostname=adguard-home
It will give you an auth URL. Open it in your browser, log into Tailscale, and authorize the device.
Verify:
tailscale status
You should see adguard-home in your tailnet alongside your other devices.
Access AdGuard Home Over Tailscale
Find the container’s Tailscale IP:
tailscale ip -4
Let’s say it returns 100.100.100.50. You can now access the AdGuard Home dashboard from any device on your tailnet:
http://100.100.100.50
No port forwarding. No exposure to the internet.
Part 9: Use AdGuard Home as Tailscale DNS
This is the real payoff. Every device on your Tailscale network can use AdGuard Home for DNS — meaning ad blocking follows you everywhere.
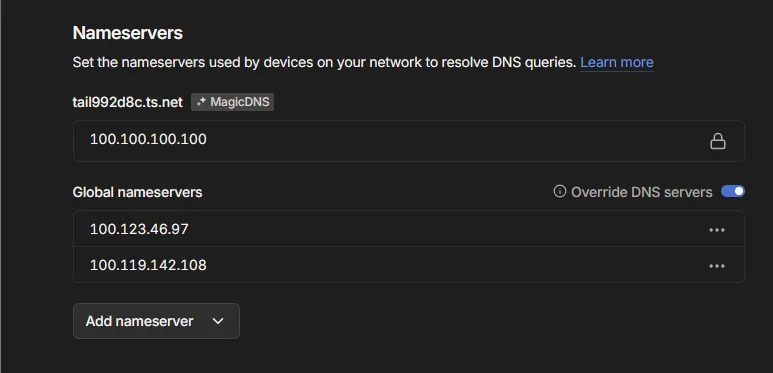
In the Tailscale Admin Console
- Go to login.tailscale.com/admin/dns
- Under Nameservers, click Add nameserver → Custom
- Enter the Tailscale IP of your AdGuard container (e.g.,
100.100.100.50) - Check Override local DNS if you want to force all tailnet devices through AdGuard
- Save
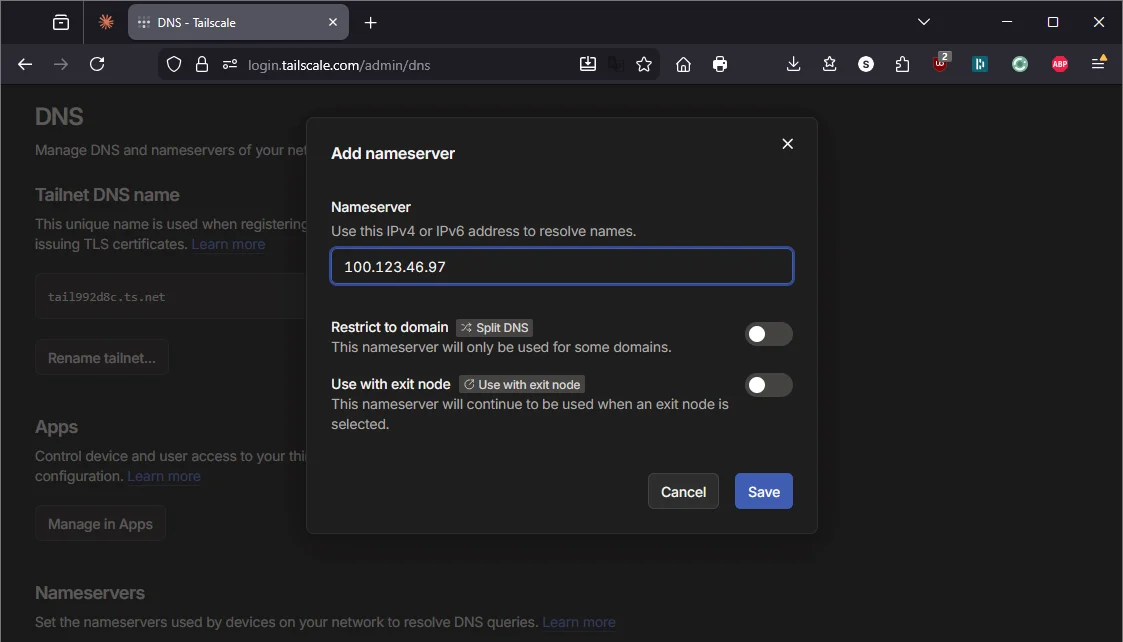
Now any device running Tailscale uses your self-hosted AdGuard Home for DNS resolution, whether you’re at home or on the road.
Part 10: Configure Your Router for Local DNS
For devices that aren’t on Tailscale (smart TVs, IoT devices, guests), you need to update your router’s DNS settings so all network traffic goes through AdGuard Home.
If You Have an eero Router
eero handles custom DNS through the app:
- Open the eero app
- Tap Settings (gear icon) → Network settings → DNS
- Select Custom DNS
- Set the Primary DNS to your AdGuard Home LXC IP (e.g.,
192.168.4.3) - Set the Secondary DNS to your Pi-hole IP (e.g., your existing backup)
- Tap Save
Note on eero Secure: If you have eero Secure (eero’s paid ad-blocking/filtering service) enabled, you may need to disable it before setting custom DNS. eero Secure overrides custom DNS settings. Since you’re replacing it with AdGuard Home — which does the same thing and more — you won’t lose any functionality.
Don’t change DHCP & NAT settings. If your eero is on Automatic mode in DHCP & NAT, leave it there. Switching to Manual IP to “set static IPs” is unnecessary and can disrupt your network. The static IPs for Proxmox and AdGuard are set at the device/container level, not in eero.
If You Have a Standard Router (Netgear, TP-Link, Asus, UniFi, etc.)
- Open a browser and go to your router’s admin page (usually
192.168.1.1or192.168.0.1) - Find the DHCP or DNS settings section (sometimes under LAN or WAN settings depending on the router)
- Set the DNS servers:
| DNS | IP | Service |
|---|---|---|
| Primary DNS | Your AdGuard Home LXC IP | AdGuard Home (Wyse LXC) |
| Secondary DNS | Your Pi-hole IP | Pi-hole (Raspberry Pi 3B+) |
- Save and apply
Why keep the Pi as backup? If the Wyse is rebooting, updating, or you broke something experimenting — your household still has DNS through the Pi. Redundancy matters when DNS going down means no internet for everyone.
Renew DHCP Leases
After changing the router DNS, devices need to pick up the new settings. You can either:
- Wait — leases renew automatically (usually within 24 hours)
- Force it — restart devices, or on each device run:
- Windows:
ipconfig /release && ipconfig /renew - Mac:
sudo dscacheutil -flushcache; sudo killall -HUP mDNSResponder - Linux:
sudo dhclient -r && sudo dhclient
- Windows:
Verify It’s Working
From any device on your network:
nslookup google.com 192.168.4.3
Should return a result. Check the AdGuard Home dashboard — you’ll start seeing queries from all your network devices.
Part 11: Harden the Setup
Set AdGuard Container to Auto-Start
In the Proxmox GUI, click container 100 (adguard) → Options → Start at boot → check Yes.
This means if the Wyse loses power and reboots, the AdGuard container comes back automatically.
Set a Boot Delay
If you add more containers later, you want AdGuard starting first (since other containers might need DNS):
In Options → Start/Shutdown order → set Order to 1 and Startup delay to 0.
Schedule Root Hints Updates
The root hints file changes occasionally. Set up a monthly cron job inside the container:
crontab -e
Add:
0 4 1 * * curl -o /var/lib/unbound/root.hints https://www.internic.net/domain/named.cache && systemctl restart unbound
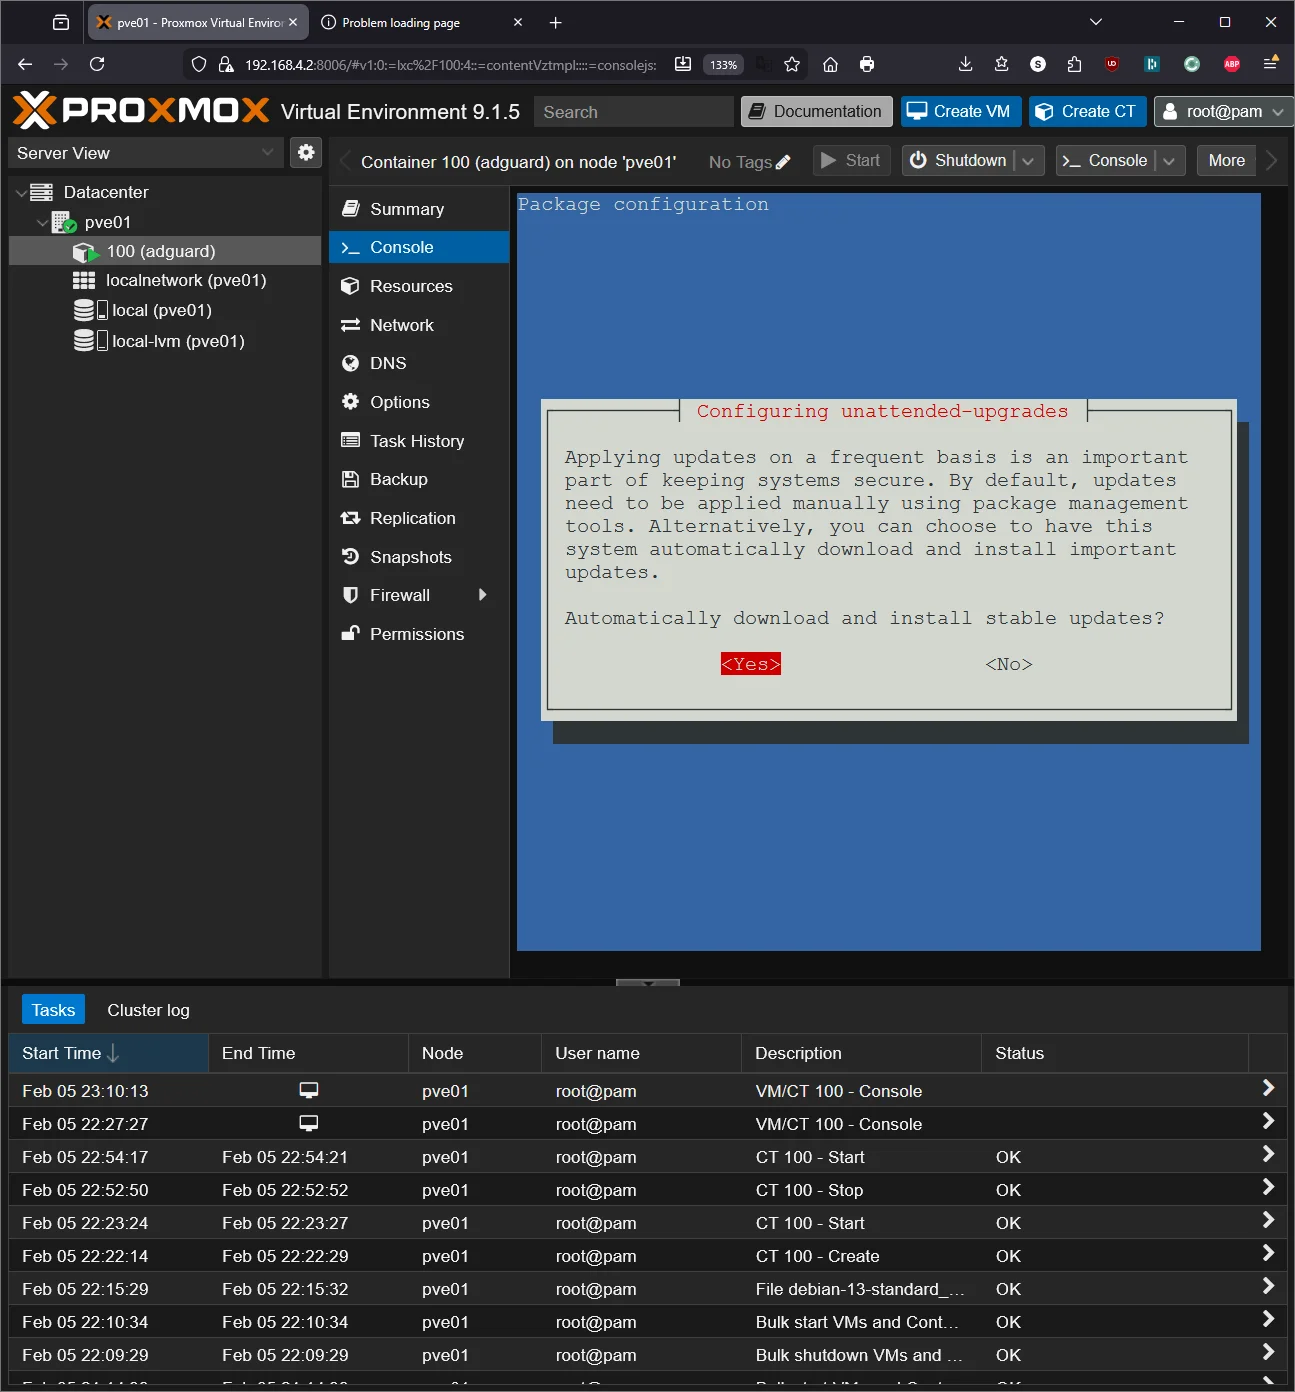
Enable Automatic Security Updates
apt install -y unattended-upgrades
dpkg-reconfigure -plow unattended-upgrades
Select Yes to enable.
Maintenance Cheatsheet
| Task | Command / Location |
|---|---|
| Proxmox GUI | https://192.168.4.2:8006 |
| SSH to Proxmox host | ssh root@192.168.4.2 |
| Enter AdGuard container | pct enter 100 (from Proxmox host) |
| AdGuard dashboard (local) | http://192.168.4.3 |
| AdGuard dashboard (Tailscale) | http://100.x.x.x (your Tailscale IP) |
| Restart AdGuard Home | systemctl restart AdGuardHome (inside container) |
| Restart Unbound | systemctl restart unbound (inside container) |
| Check Unbound | dig google.com @127.0.0.1 -p 5335 (inside container) |
| Container status | pct status 100 (from Proxmox host) |
| Snapshot container | Proxmox GUI → container → Snapshots → Take Snapshot |
| Tailscale status | tailscale status (inside container) |
| Update Proxmox | apt update && apt full-upgrade -y (on host) |
| Update container | apt update && apt upgrade -y (inside container) |
| Backup container | Proxmox GUI → container → Backup → Backup now |
Troubleshooting
AdGuard Home won’t start?
Port 53 is probably still in use. Check:
ss -tlnp | grep ':53'
If systemd-resolved is listed, it wasn’t disabled properly:
systemctl disable --now systemd-resolved
systemctl restart AdGuardHome
Unbound returning SERVFAIL?
Root hints might be stale or missing:
curl -o /var/lib/unbound/root.hints https://www.internic.net/domain/named.cache
systemctl restart unbound
dig google.com @127.0.0.1 -p 5335
Tailscale won’t connect inside the container?
The TUN device isn’t available. Verify the config from the Proxmox host:
cat /etc/pve/lxc/100.conf | grep -E "tun|cgroup"
You should see the two lines you added. If they’re there, stop and start (not just restart) the container:
pct stop 100 && pct start 100
Devices on the network still getting ads?
They’re probably using cached DNS. Flush and renew:
- Router: Reboot it (nuclear option but guaranteed to work)
- Individual devices: Flush DNS cache and renew DHCP lease
- Check:
nslookup google.com 192.168.4.3— if this works, the issue is the device’s DNS cache, not AdGuard
Can’t access Proxmox GUI?
From a monitor plugged into the Wyse, check if the host is up and has the right IP:
ip addr show vmbr0
If the IP is wrong, fix it in /etc/network/interfaces.
What’s Running Now
| Layer | Service | IP / Port |
|---|---|---|
| Hypervisor | Proxmox VE | 192.168.4.2:8006 |
| LXC 100 | AdGuard Home + Unbound | 192.168.4.3:80 (dashboard) / :53 (DNS) |
| Tailscale | AdGuard accessible on tailnet | 100.x.x.x |
| Backup DNS | Pi-hole + Unbound (Pi 3B+) | Your Pi’s IP |
What’s next: The Wyse is barely breaking a sweat. With Proxmox running and ~6GB of RAM still free, I can spin up more containers — reverse proxy, monitoring, password manager — without touching hardware. That’s a writeup for another day.