Workflow Automation: n8n and OpenClaw on the Homelab
This is Part 6 of the homelab series. Part 1 set up Proxmox and AdGuard. Part 2 added the reverse proxy and TLS. Part 3 added monitoring and a dashboard. Part 4 added the OptiPlex 5060 as a second node. Part 5 built the GPU bridge for on-demand inference. Start there if you haven’t.
The GPU bridge from Part 5 gave the homelab a brain. Send a Telegram message, a 30B model spins up on the desktop GPU, answers a question, and the desktop goes back to sleep. But right now the only way to use it is manual curl commands or Telegram toggles. There’s no automation layer, no scheduled workflows, no way for services to chain AI calls together.
That’s what this guide fixes. n8n is a self-hosted workflow automation platform, like Zapier or Make but running entirely on your own hardware. It has a visual editor for building workflows, native AI nodes that can talk to Ollama, and webhook/Telegram integrations for triggering them. OpenClaw is a lightweight automation framework I’ve been running on Oracle Cloud for Telegram-driven tasks, scheduled jobs, and proactive notifications. Moving it local means it can talk directly to n8n and the GPU bridge without round-tripping through the internet.
By the end of this guide, you’ll have a workflow engine that can: receive commands via Telegram, call local AI for processing, execute multi-step automations, and send results back, all on your own hardware with zero API costs.
The Architecture
┌──────────────────────────────────────────────────────────────────┐
│  ALWAYS ON                                                        │
│                                                                    │
│  Dell Wyse 5070 - Proxmox (pve01)                                 │
│  ├── CT 100 - AdGuard + Unbound                                  │
│  ├── CT 101 - NPM, Uptime Kuma, ntfy, Homepage                   │
│  └── Tailscale                                                     │
│                                                                    │
│  Dell OptiPlex 5060 Micro - Proxmox (pve02)                      │
│  ├── CT 200 - GPU Bridge + Telegram Bot                           │
│  ├── CT 201 - n8n (Docker)                              <- NEW   │
│  ├── CT 202 - OpenClaw (native)                         <- NEW   │
│  └── Tailscale                                                     │
│                                                                    │
├──────────────────────────────────────────────────────────────────┤
│  ON-DEMAND                                                        │
│                                                                    │
│  Windows Desktop - RTX 5070 Ti                                    │
│  192.168.5.88                                                      │
│  ├── Ollama (:11434)                                              │
│  ├── Idle timer                                                    │
│  └── Tailscale                                                     │
└──────────────────────────────────────────────────────────────────┘
What’s new: Two new containers on pve02. CT 201 runs n8n as a Docker container, providing the visual workflow engine at https://n8n.lab.atilho.com. CT 202 runs OpenClaw natively as a systemd service for Telegram-driven task automation. Both route AI requests through the GPU bridge on CT 200, which handles WoL and Ollama proxying transparently.
Why n8n
There are several self-hosted automation options: Node-RED, Huginn, Activepieces, n8n. Here’s why n8n won:
Native AI integration. n8n has first-class AI nodes that speak the Ollama API directly. Drop an “AI Agent” or “Chat Model” node into a workflow, point it at your GPU bridge URL, pick a model, done. No custom HTTP requests, no parsing JSON manually. The other tools can do this but require more glue.
Visual workflow editor. Building a workflow that receives a Telegram message, calls an AI model, processes the response, and sends a reply takes five nodes dragged onto a canvas. For the agentic workflows we’re building toward in Part 7, being able to see the execution path visually is invaluable for debugging.
Webhook triggers. Any workflow can be triggered by hitting a URL. OpenClaw can fire n8n workflows by calling a webhook, other homelab services can trigger automations, and you can chain workflows together.
Active community and integrations. n8n has built-in nodes for Telegram, HTTP, SSH, file operations, databases, and hundreds of SaaS tools. When I need something it doesn’t have, the HTTP Request node covers it.
Prerequisites
Before starting, you need:
- Everything from Parts 1-5 working (both Proxmox nodes, NPM, monitoring, GPU bridge)
- The GPU bridge on CT 200 running and responding to
/gpu_status - About 45-60 minutes
Part 1: Create the Docker Host Container
n8n runs as a Docker container. We’ll create a new LXC container on pve02 as its Docker host, following the same pattern as CT 101 on the Wyse. OpenClaw gets its own container (CT 202) in Part 3.
1.1 - Create CT 201 on pve02
In the pve02 web GUI (https://pve02.lab.atilho.com):
- Click Create CT
General:
| Field | Value |
|---|---|
| CT ID | 201 |
| Hostname | automation |
| Password | Set a strong root password |
| Unprivileged container | checked |
Template:
Select the debian-13-standard template.
Disks:
| Field | Value |
|---|---|
| Storage | local-lvm |
| Disk size | 16 GB |
16GB gives room for Docker images and n8n’s SQLite database (workflow history grows over time). More generous than CT 200’s 4GB because n8n accumulates execution data.
CPU:
| Field | Value |
|---|---|
| Cores | 2 |
n8n can be CPU-hungry when executing complex workflows with multiple parallel branches.
Memory:
| Field | Value |
|---|---|
| Memory | 2048 MB |
| Swap | 512 MB |
Network:
| Field | Value |
|---|---|
| Bridge | vmbr0 |
| IPv4 | Static |
| IPv4/CIDR | 192.168.4.8/22 |
| Gateway | 192.168.4.1 |
DNS:
| Field | Value |
|---|---|
| DNS domain | lab.atilho.com |
| DNS servers | 192.168.4.3 |
Click Finish and start the container.
1.2 - Enable Keyctl for Docker
Docker in unprivileged LXC needs the keyctl feature. From the pve02 host (not inside the container):
ssh root@192.168.4.6
Edit the container config:
nano /etc/pve/lxc/201.conf
Add at the bottom:
features: keyctl=1,nesting=1
lxc.apparmor.profile: unconfined
lxc.cgroup2.devices.allow: a
lxc.cap.drop:
lxc.mount.auto: proc:rw sys:rw
Stop and start the container (not restart):
pct stop 201 && pct start 201
1.3 - Install Docker
SSH into CT 201:
ssh root@192.168.4.8
apt update && apt upgrade -y
apt install -y curl gnupg lsb-release ca-certificates
Add Docker’s official repository:
install -m 0755 -d /etc/apt/keyrings
curl -fsSL https://download.docker.com/linux/debian/gpg -o /etc/apt/keyrings/docker.asc
chmod a+r /etc/apt/keyrings/docker.asc

echo \
  "deb [arch=$(dpkg --print-architecture) signed-by=/etc/apt/keyrings/docker.asc] \
  https://download.docker.com/linux/debian \
  $(. /etc/os-release && echo "$VERSION_CODENAME") stable" | \
  tee /etc/apt/sources.list.d/docker.list > /dev/null
Install Docker:
apt update
apt install -y docker-ce docker-ce-cli containerd.io docker-buildx-plugin docker-compose-plugin
Verify:
docker run hello-world
Part 2: Deploy n8n
2.1 - Create the Compose File
mkdir -p /opt/n8n && cd /opt/n8n
cat <<'EOF' > docker-compose.yml
services:
  n8n:
    image: docker.n8n.io/n8nio/n8n
    container_name: n8n
    restart: unless-stopped
    environment:
      - N8N_HOST=n8n.lab.atilho.com
      - N8N_PORT=5678
      - N8N_PROTOCOL=https
      - WEBHOOK_URL=https://n8n.lab.atilho.com/
      - N8N_SECURE_COOKIE=true
      - GENERIC_TIMEZONE=America/New_York
      - TZ=America/New_York
    ports:
      - "5678:5678"
    volumes:
      - ./data:/home/node/.n8n
EOF
A few things worth explaining:
N8N_HOST and WEBHOOK_URL tell n8n its own public URL. This matters for webhook triggers, the OAuth callback URL, and links in the UI. Since n8n sits behind NPM, these must match the hostname you’ll use in the proxy host.
N8N_PROTOCOL=https and N8N_SECURE_COOKIE=true are required when running behind a reverse proxy with TLS. Without these, n8n generates HTTP links and sets non-secure cookies, which breaks login when you’re accessing it over HTTPS.
WEBHOOK_URL is the full base URL for webhook triggers. When you create a webhook-triggered workflow, n8n generates URLs like https://n8n.lab.atilho.com/webhook/abc123. Other services (OpenClaw, external APIs) call these URLs to trigger workflows.
2.2 - Start It Up
Before starting, fix permissions on the data directory. n8n runs as user node (UID 1000) inside the container, but the ./data directory gets created as root. Without this, n8n crashes in a loop trying to write its encryption key and config:
mkdir -p /opt/n8n/data
chown -R 1000:1000 /opt/n8n/data
Now start it:
cd /opt/n8n
docker compose up -d
n8n’s image is larger than the monitoring tools from Part 3. Give it a couple of minutes for the first pull.
docker compose ps
You should see n8n running on port 5678.
Quick sanity check:
curl -s -o /dev/null -w "%{http_code}" http://localhost:5678
Should return 200.
2.3 - Add NPM Proxy Host
In NPM at https://npm.lab.atilho.com:
- Add Proxy Host
- Details tab:
| Field | Value |
|---|---|
| Domain Names | n8n.lab.atilho.com |
| Scheme | http |
| Forward Hostname / IP | 192.168.4.8 |
| Forward Port | 5678 |
| Block Common Exploits | unchecked |
| Websockets Support | checked |
Uncheck Block Common Exploits for n8n. This is important. n8n’s webhook payloads and workflow executions can contain patterns that NPM’s exploit filter flags as malicious (long JSON bodies, encoded characters, SQL-like strings in legitimate data). With it checked, some webhook triggers and AI responses will silently fail with 403 errors.
- SSL tab:
| Field | Value |
|---|---|
| SSL Certificate | Select the *.lab.atilho.com cert |
| Force SSL | checked |
| HTTP/2 Support | checked |
- Click Save
Test it: Open https://n8n.lab.atilho.com in your browser. You should see the n8n setup wizard.
2.4 - Initial Setup
n8n walks you through account creation on first access:
- Create your owner account - set email and password. This is the admin account for n8n. There’s no recovery mechanism, so use a strong password and don’t forget it.
- You can skip the optional survey and onboarding steps.
You should land on the n8n workflow editor, an empty canvas ready for your first workflow.
2.5 - Connect n8n to the GPU Bridge
This is where n8n becomes useful for AI workflows. We’ll configure n8n to use the GPU bridge as its Ollama backend.
- In n8n, click Personal in the left sidebar > Credentials > Add Credential
- Search for Ollama
- Fill in:
| Field | Value |
|---|---|
| Credential Name | Homelab GPU Bridge |
| Base URL | http://192.168.4.7:11434 |
- Click Save
That’s it. n8n’s AI nodes (Chat Model, AI Agent, Text Classifier, Summarization, etc.) will now route through the GPU bridge, which handles WoL and Ollama proxying transparently. n8n doesn’t know or care that the actual GPU is on a sleeping desktop across the network.
Remember: The GPU bridge returns a 503 if GPU mode is off. For scheduled workflows that need AI, you’ll want a “check and wake” step at the beginning. We’ll build this pattern in the demo workflow.
2.6 - Build a Demo Workflow: AI Chat via Webhook
Let’s build something useful to verify the full chain works. This workflow receives a message via a webhook, sends it to the local LLM through the GPU bridge, and returns the AI’s response. Three nodes in the main chain, plus one sub-node for the model.
Create the workflow
- Click the + button in the top-left sidebar to create a new workflow.
- Click the workflow name at the top and rename it to AI Chat via Webhook.
Node 1 - Webhook (trigger)
The canvas shows “Add first step…” with a dashed + button in the center. Click it. A panel opens on the right asking “What triggers this workflow?” - search for Webhook and select it.
The Webhook node opens. Configure it:
| Field | Value |
|---|---|
| HTTP Method | POST |
| Path | ai-chat |
| Respond | Using 'Respond to Webhook' Node |
The Respond dropdown is important - it tells n8n to keep the HTTP connection open until a “Respond to Webhook” node later in the chain sends the response. Leave Authentication as None.
You’ll see two URL tabs at the top: Test URL and Production URL. The test URL (/webhook-test/ai-chat) only works while you have “Listen for test event” active in the editor. The production URL (/webhook/ai-chat) is the one that works after publishing and is what other services will call.
Close the panel (click the X in the top-right or click the canvas background).

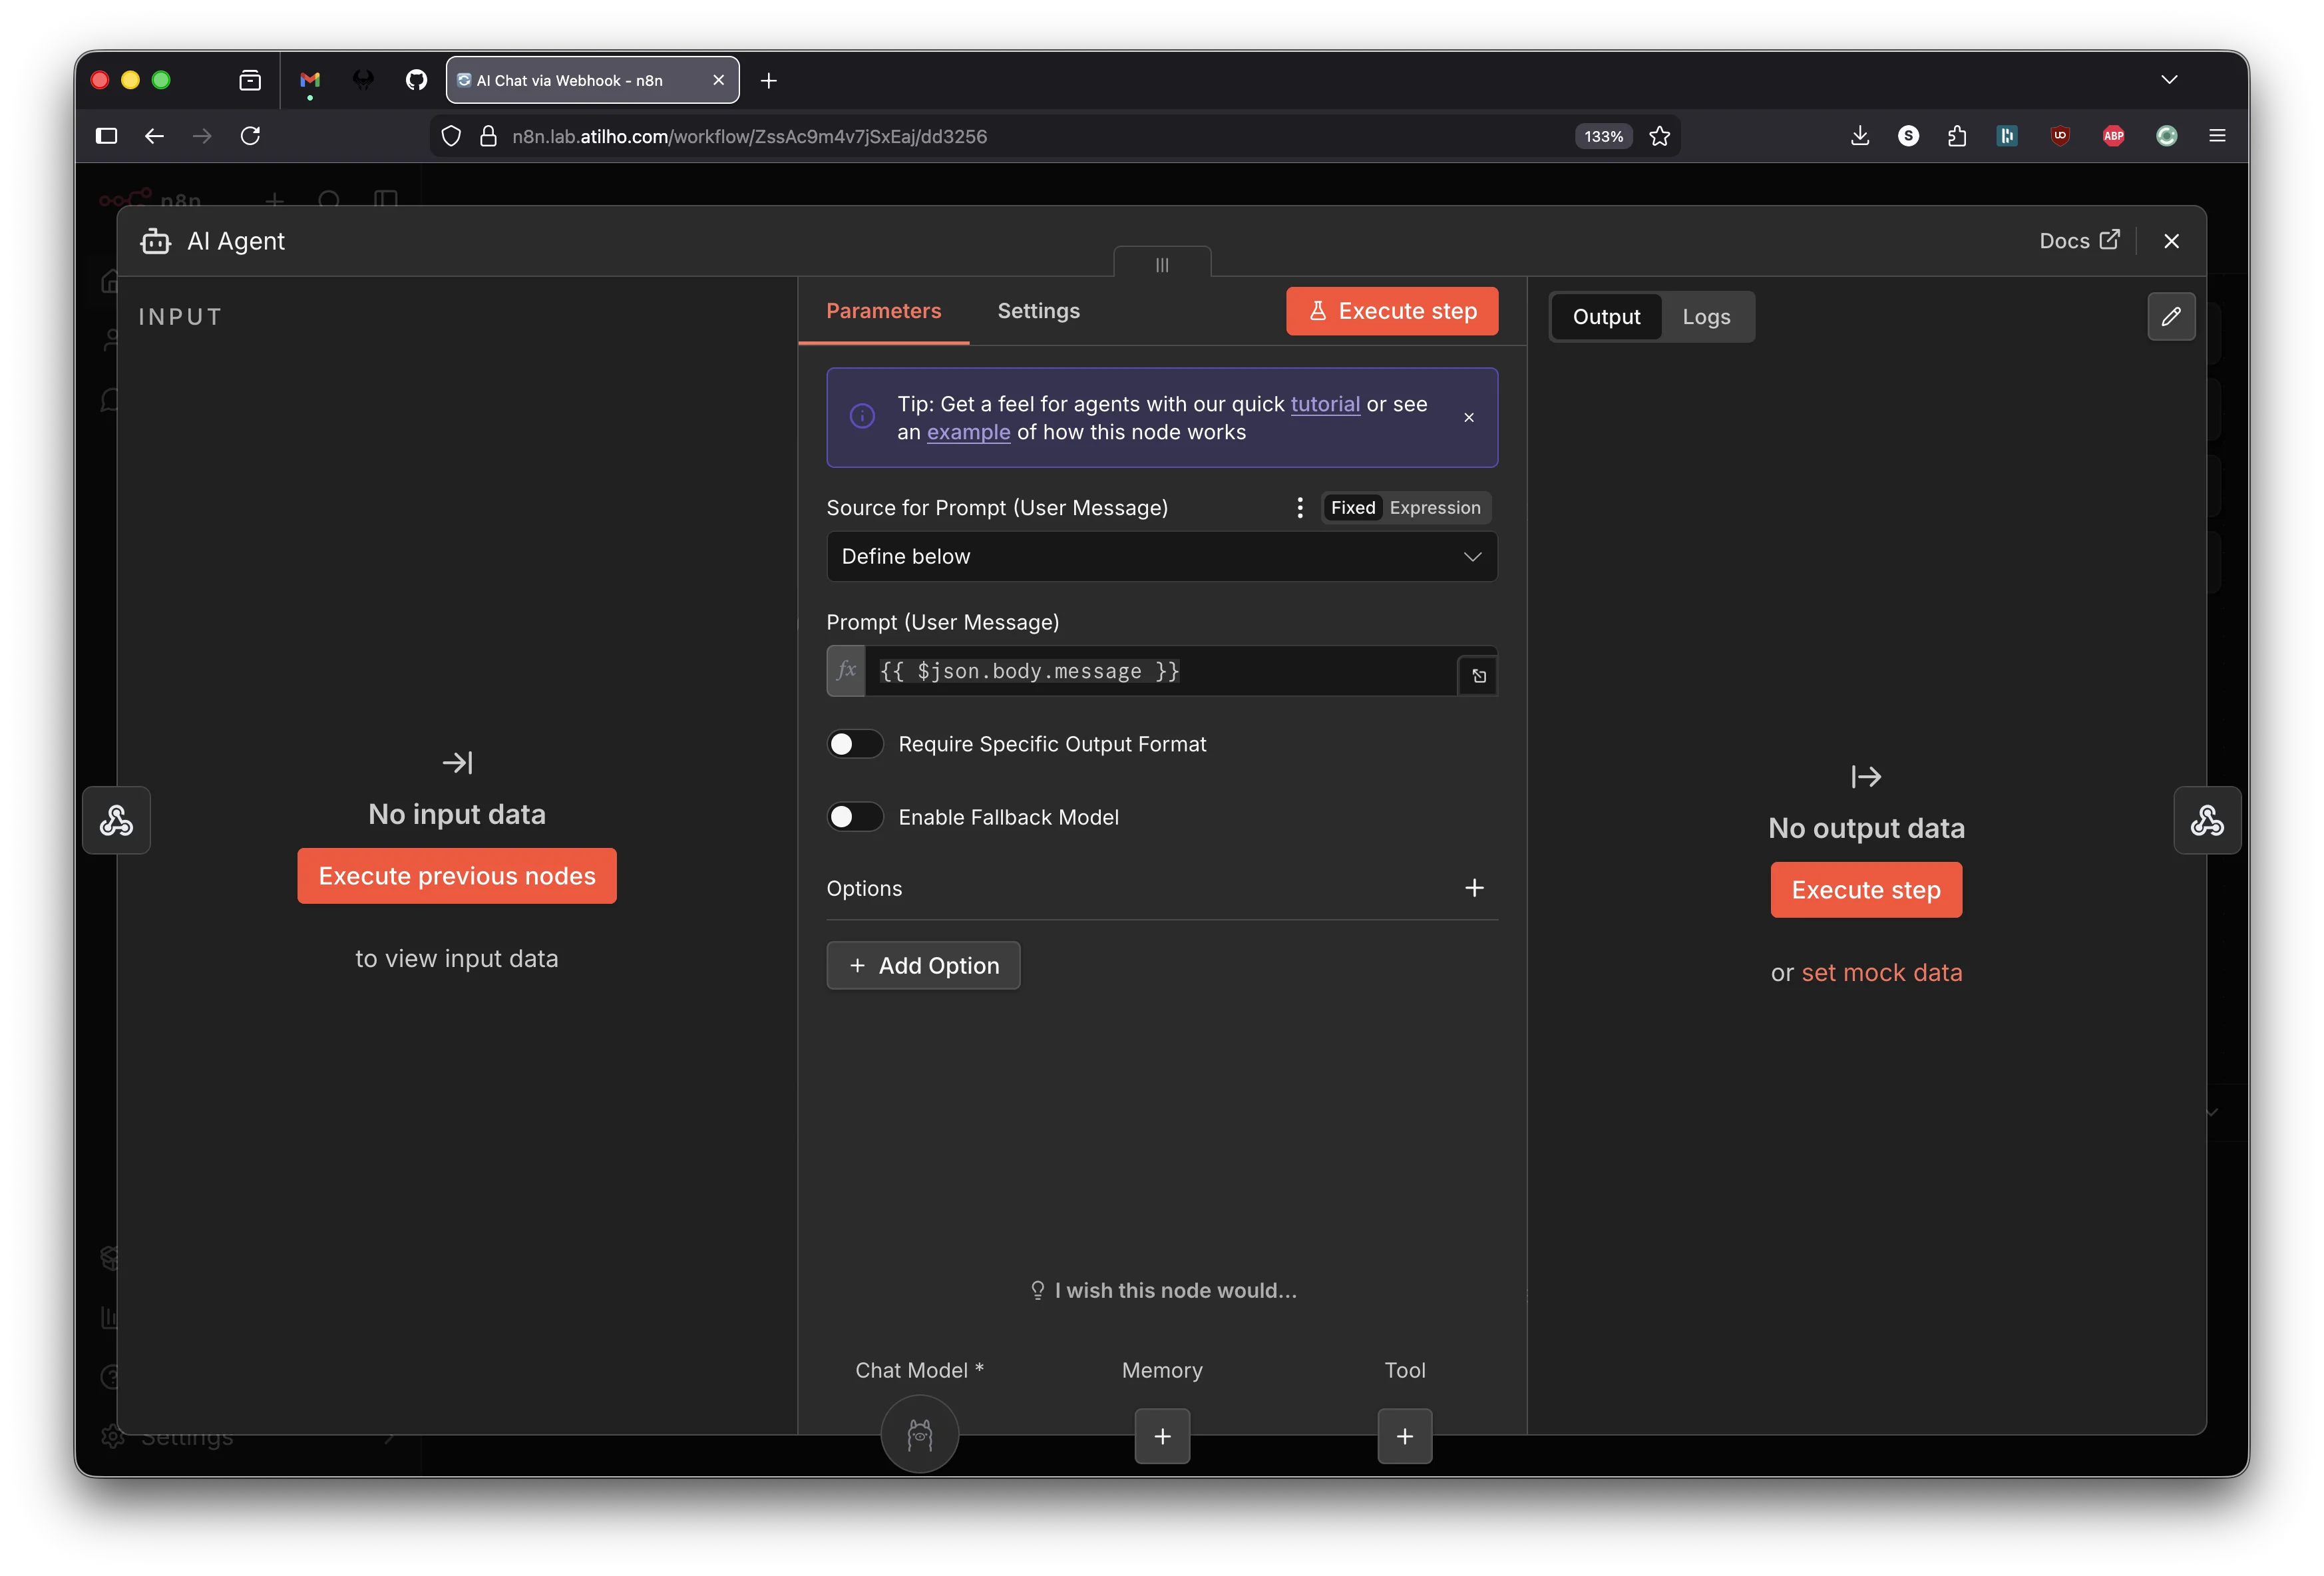
Node 2 - AI Agent
Click the small + on the right edge of the Webhook node (at the end of the “POST” connector line). This opens the node search. Search for AI Agent and add it.
The AI Agent node opens. It has a few things to configure:
Source for Prompt (User Message) defaults to “Connected Chat Trigger Node” - this is wrong for our use case. That option is for n8n’s built-in chat widget, not for webhook input. Change this dropdown to Define below.
A text field appears for Prompt (User Message). Enter:
This expression pulls the message field from the webhook’s incoming JSON body.
Now look at the bottom of the AI Agent panel. You’ll see three sub-node slots: Chat Model (required), Memory, and Tool. The Chat Model slot needs a model connected.
Click the + under Chat Model. Search for Ollama Chat Model and select it.
The Ollama Chat Model sub-node opens. Configure it:
| Field | Value |
|---|---|
| Credential | Select your Homelab GPU Bridge credential (or Ollama account if that’s how you named it in 2.5) |
| Model | Pick whichever model you pulled to Ollama (e.g. qwen3-coder:30b, llama3.2:8b) |
Close the Ollama Chat Model panel to return to the AI Agent. The Chat Model slot at the bottom now shows the Ollama icon, confirming it’s connected.
Close the AI Agent panel.
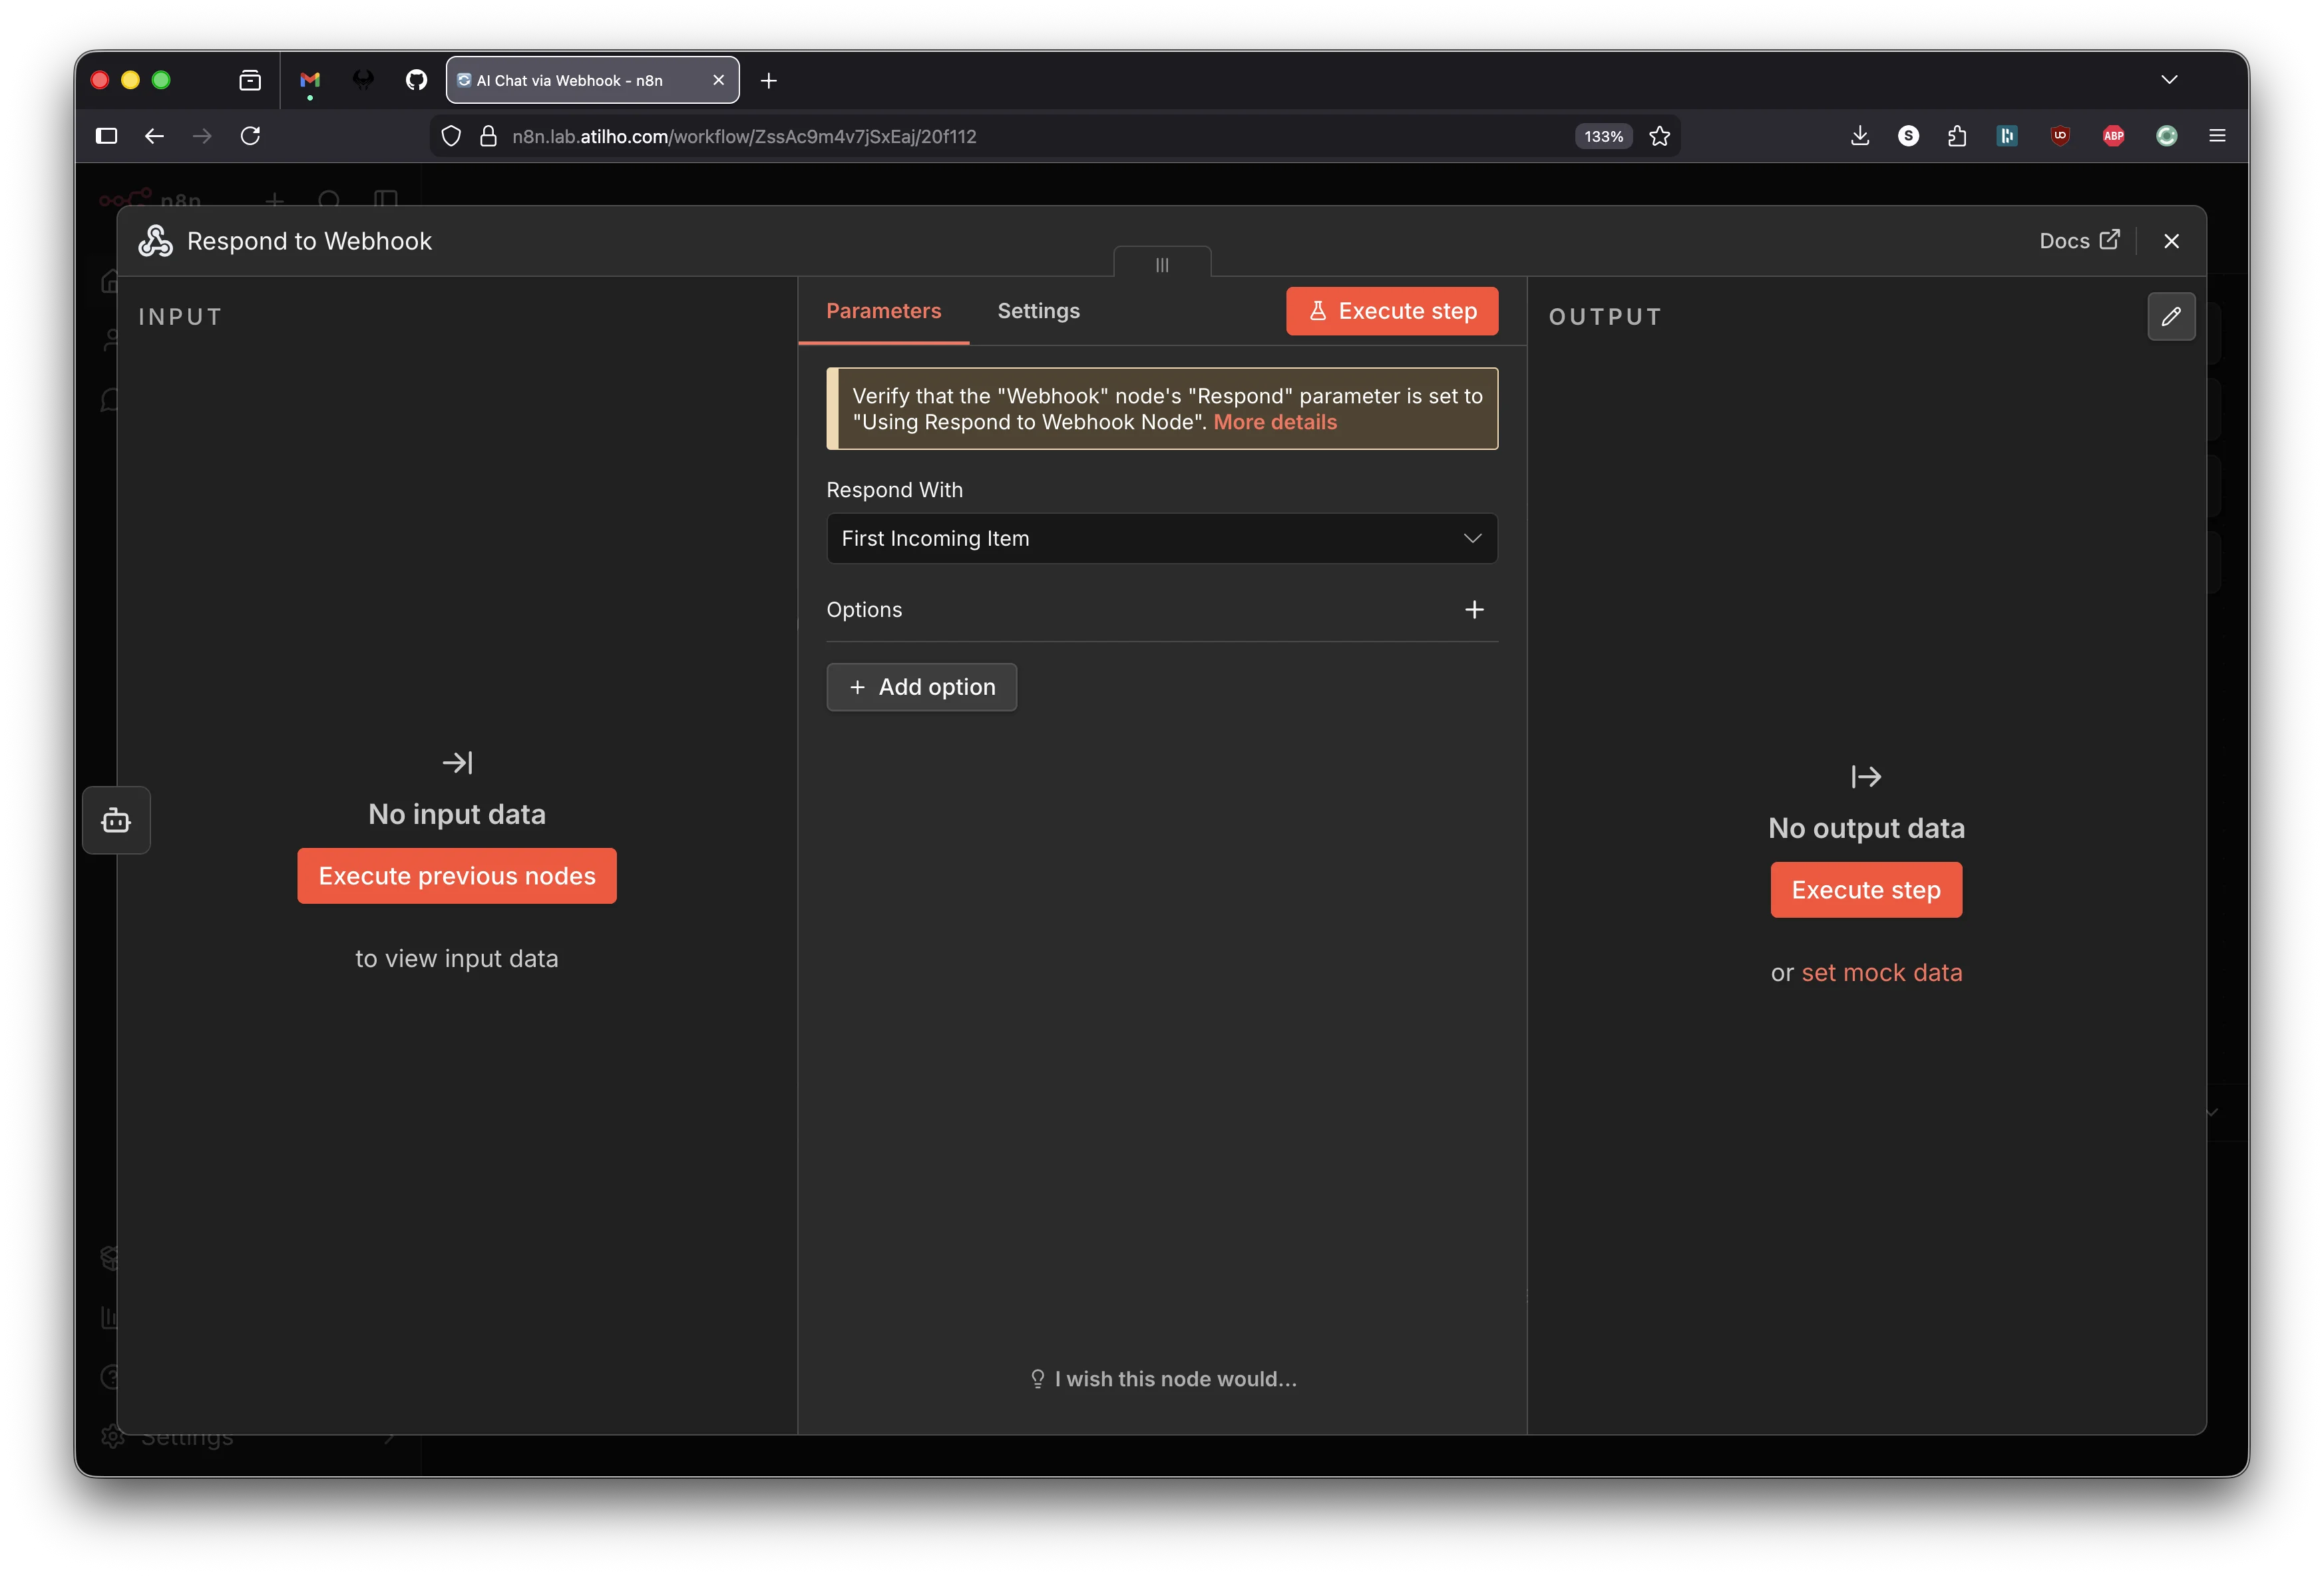
Node 3 - Respond to Webhook
Click the small + on the right edge of the AI Agent node. Search for Respond to Webhook and add it.
The Respond to Webhook node opens. The default setting is Respond With: First Incoming Item, which passes through the AI Agent’s full output JSON. That’s what we want - leave it as is.
You’ll see a yellow banner that says “Verify that the Webhook node’s Respond parameter is set to Using Respond to Webhook Node.” This is a reminder, not an error. We already set that in Node 1.
Close the panel. Your canvas should now show:
Webhook → AI Agent → Respond to Webhook
              │
        Ollama Chat Model (sub-node)
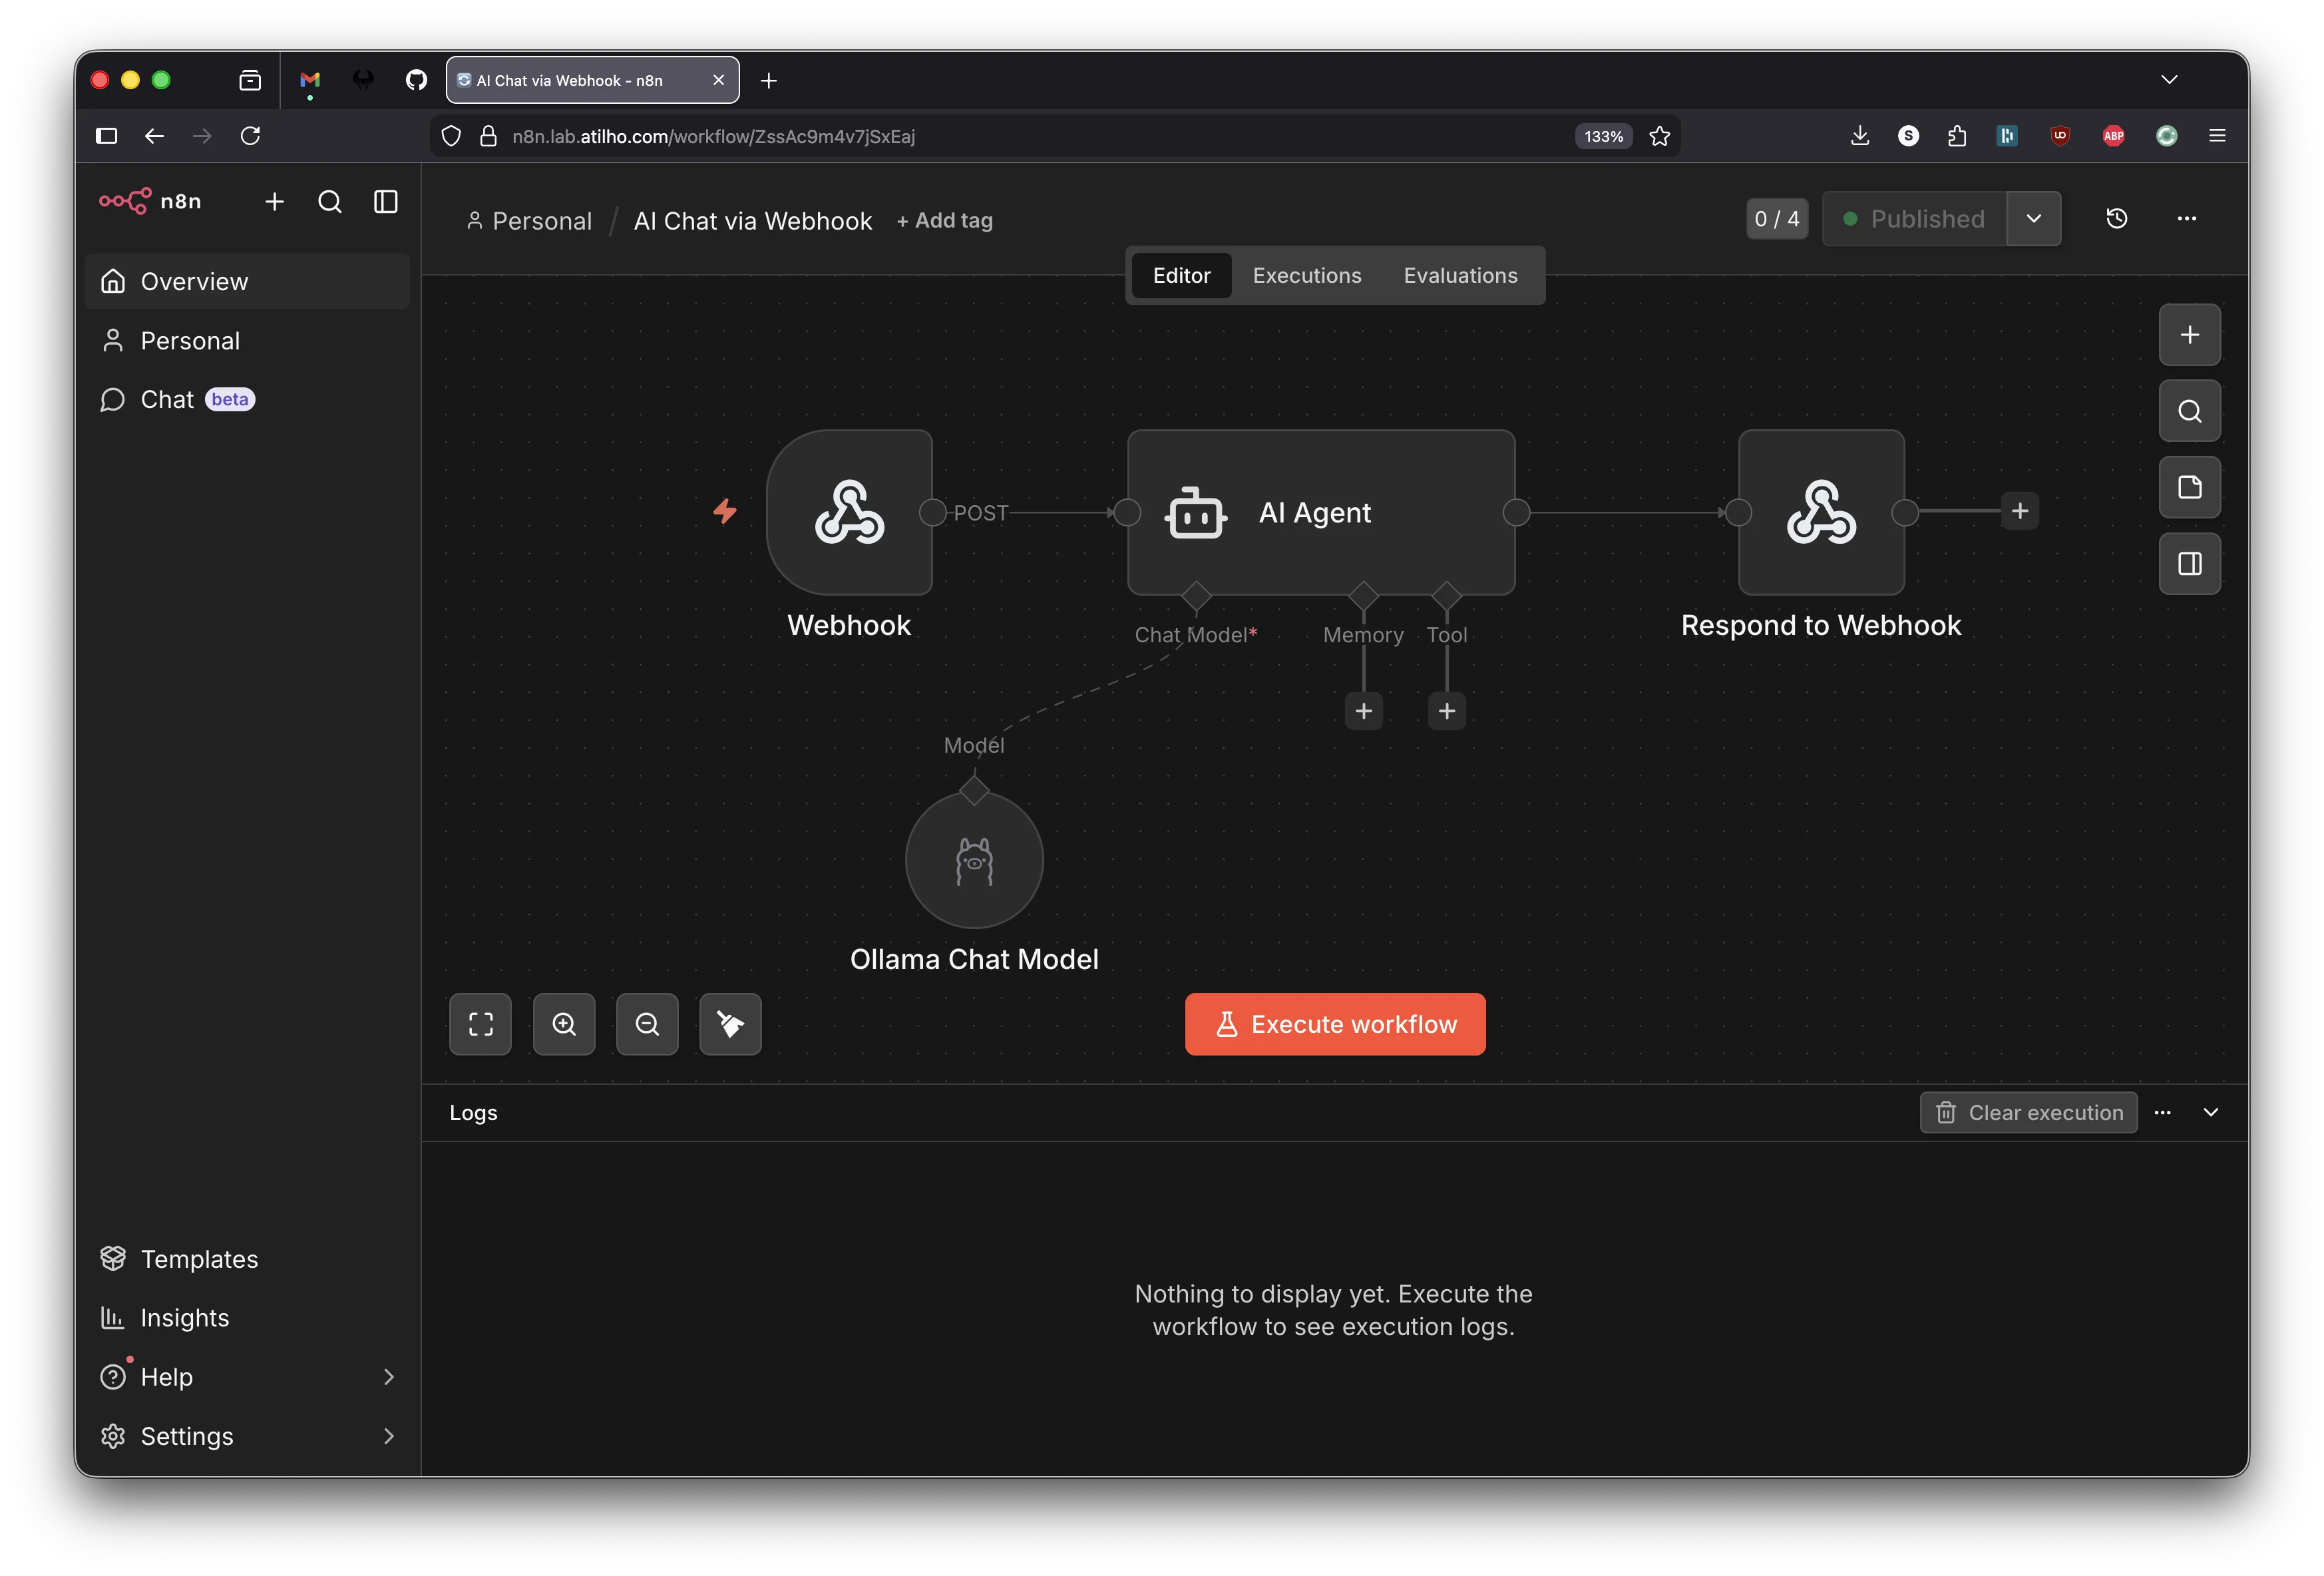
Publish and test
Save the workflow with Ctrl+S, then click Publish in the top-right corner. This makes the production webhook URL live.
First, make sure GPU mode is on:
- Send
/gpu_onto your GPU Bridge Telegram bot
Then hit the webhook:
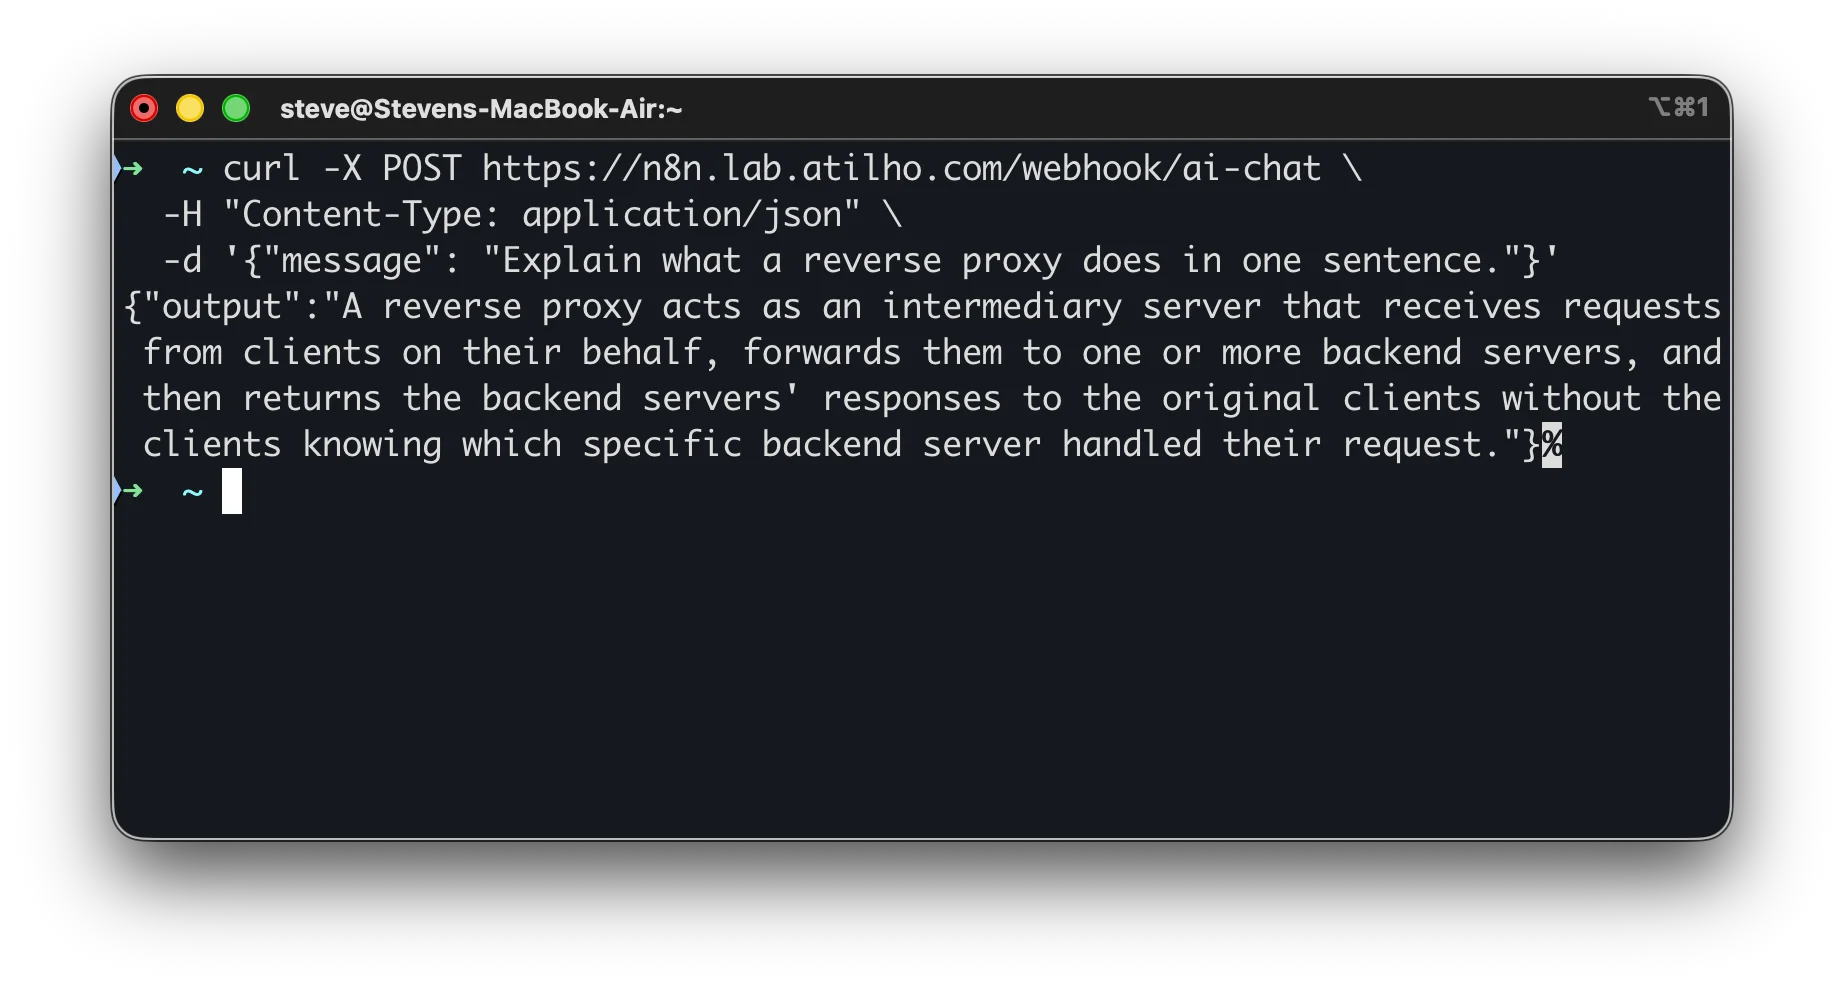
curl -X POST https://n8n.lab.atilho.com/webhook/ai-chat \
  -H "Content-Type: application/json" \
  -d '{"message": "Explain what a reverse proxy does in one sentence."}'
You should get back a JSON response with the AI’s answer:
{"output":"A reverse proxy acts as an intermediary server that receives requests from clients, forwards them to backend servers, and returns the responses without clients knowing which server handled their request."}
Check the execution log by clicking Executions in the top navigation bar. You’ll see each node’s input and output, the time each step took, and any errors. Unlike test URL calls, production executions don’t show live on the canvas - they only appear in the executions list.
First request is slow? That’s the GPU bridge waking the desktop if it was asleep. Subsequent requests while the desktop is awake are fast. For production workflows, add a “wake and wait” HTTP node at the start that hits the bridge’s health endpoint first.
Part 3: Deploy OpenClaw
OpenClaw has been running on Oracle Cloud and Cloudflare Workers. Moving it to the 5060 means it lives on the same network as n8n and the GPU bridge, with no round-trips through the internet and direct access to all homelab services.
OpenClaw gets its own LXC container (CT 202) with a native install rather than Docker. The native route is simpler - it’s the same approach that’s been running on Oracle Cloud. OpenClaw runs as a systemd user service, which means systemctl --user commands for management. Keeping it in its own container gives clean separation from n8n’s Docker environment on CT 201.
We’ll also set up OpenClaw’s agent sandbox in this section. The sandbox runs agent tool execution (shell commands, file operations) inside isolated Docker containers while the gateway itself stays native. This is the officially recommended pattern - the gateway manages everything, but untrusted tool execution gets a hard wall around it. This means CT 202 needs Docker installed too, but only for sandbox containers, not for the gateway itself.
3.1 - Create CT 202 on pve02
In the pve02 web GUI (https://pve02.lab.atilho.com):
- Click Create CT
General:
| Field | Value |
|---|---|
| CT ID | 202 |
| Hostname | openclaw |
| Password | Set a strong root password |
| Unprivileged container | checked |
Template:
Select the debian-13-standard template.
Disks:
| Field | Value |
|---|---|
| Storage | local-lvm |
| Disk size | 16 GB |
16GB gives room for OpenClaw’s data plus Docker images for the agent sandbox.
CPU:
| Field | Value |
|---|---|
| Cores | 2 |
Memory:
| Field | Value |
|---|---|
| Memory | 2048 MB |
| Swap | 512 MB |
OpenClaw’s docs recommend at least 2GB RAM. The install runs pnpm install which can OOM on smaller allocations.
Network:
| Field | Value |
|---|---|
| Bridge | vmbr0 |
| IPv4 | Static |
| IPv4/CIDR | 192.168.4.9/22 |
| Gateway | 192.168.4.1 |
DNS:
| Field | Value |
|---|---|
| DNS domain | lab.atilho.com |
| DNS servers | 192.168.4.3 |
Click Finish but don’t start the container yet.
3.2 - Enable Keyctl for Docker (Sandbox)
The agent sandbox needs Docker, and Docker in unprivileged LXC needs the keyctl feature. Same process as CT 201. From the pve02 host:
ssh root@192.168.4.6
Edit the container config:
nano /etc/pve/lxc/202.conf
Add at the bottom:
features: keyctl=1,nesting=1
lxc.apparmor.profile: unconfined
lxc.cgroup2.devices.allow: a
lxc.cap.drop:
lxc.mount.auto: proc:rw sys:rw
Now start the container:
pct start 202
3.3 - Install Docker (for Sandbox)
SSH into CT 202:
ssh root@192.168.4.9
apt update && apt upgrade -y
apt install -y curl gnupg lsb-release ca-certificates build-essential
Add Docker’s official repository:
install -m 0755 -d /etc/apt/keyrings
curl -fsSL https://download.docker.com/linux/debian/gpg -o /etc/apt/keyrings/docker.asc
chmod a+r /etc/apt/keyrings/docker.asc

echo \
  "deb [arch=$(dpkg --print-architecture) signed-by=/etc/apt/keyrings/docker.asc] \
  https://download.docker.com/linux/debian \
  $(. /etc/os-release && echo "$VERSION_CODENAME") stable" | \
  tee /etc/apt/sources.list.d/docker.list > /dev/null
Install Docker:
apt update
apt install -y docker-ce docker-ce-cli containerd.io docker-buildx-plugin docker-compose-plugin
Verify:
docker run hello-world
Docker is only here for the agent sandbox. The OpenClaw gateway itself runs natively as a systemd service.
3.4 - Install OpenClaw
Still inside CT 202, run the OpenClaw installer:
curl -fsSL https://openclaw.bot/install.sh | bash
source ~/.bashrc
Run the onboarding wizard:
openclaw onboard
When prompted, select:
| Prompt | Value |
|---|---|
| Mode | Manual |
| Gateway | Local gateway (this machine) |
| Workspace | /root/.openclaw/workspace |
| Model/Auth Provider | Anthropic |
| Auth Method | Anthropic token (run claude setup-token on your local machine to get it) |
| Port | 18789 |
| Bind | LAN |
| Auth | Token |
| Tailscale exposure | None |
| Gateway token | Leave blank to auto-generate |
| Configure chat channels | Yes |
| Channel | Telegram (enter your bot token) |
| Configure DM access policies | Yes (accept pairing default) |
| Search provider | Your choice (DuckDuckGo is free/experimental) |
| Configure skills | Skip for now |
| Enable hooks | Skip for now |
| Install Gateway service | Yes |
| Gateway service runtime | node |
| Enable bash completion | Yes |
Binding to LAN instead of loopback is important here. Unlike the Oracle Cloud setup where Tailscale Serve handled proxying, this container sits on the local network and needs to be reachable by n8n, the reverse proxy, and Uptime Kuma.
Plaintext WebSocket warning. Onboarding will flag that the gateway uses
ws://to a non-loopback address. This is expected. NPM handles TLS termination, so the gateway doesn’t serve HTTPS itself. Same pattern as n8n.
3.5 - Verify the Gateway
The onboarding wizard installs the gateway as a systemd user service under /root/.config/systemd/user/. In an LXC container, the user session bus isn’t set up by default, so you need to configure the environment first:
export XDG_RUNTIME_DIR=/run/user/$(id -u)
mkdir -p $XDG_RUNTIME_DIR
loginctl enable-linger root
Add the export to your shell profile so it persists across SSH sessions:
echo 'export XDG_RUNTIME_DIR=/run/user/$(id -u)' >> ~/.bashrc
Now check the service:
systemctl --user status openclaw-gateway
You should see active (running). All systemctl commands for OpenClaw need the --user flag since it’s a user service, not a system service.
Quick health check:
curl -fsS http://localhost:18789/healthz
Should return a healthy response.
3.5a - Startup Optimization (Faster OpenClaw CLI)
OpenClaw CLI startup can feel slow on smaller hosts because Node has to repeatedly compile modules. Set these environment variables to speed up repeated runs:
mkdir -p /var/tmp/openclaw-compile-cache
echo 'export NODE_COMPILE_CACHE=/var/tmp/openclaw-compile-cache' >> ~/.bashrc
echo 'export OPENCLAW_NO_RESPAWN=1' >> ~/.bashrc
source ~/.bashrc
Apply the same env to the gateway service:
mkdir -p ~/.config/systemd/user/openclaw-gateway.service.d
cat <<'EOF' > ~/.config/systemd/user/openclaw-gateway.service.d/perf.conf
[Service]
Environment=NODE_COMPILE_CACHE=/var/tmp/openclaw-compile-cache
Environment=OPENCLAW_NO_RESPAWN=1
EOF
systemctl --user daemon-reload
systemctl --user restart openclaw-gateway
Verify:
openclaw doctor --non-interactive
The “Startup optimization” warning block should be gone.
3.5b - Set OpenClaw Default Model to Ollama (GPU Bridge)
If you want OpenClaw to default to local inference (zero token cost), switch the model provider to Ollama and point it at the GPU bridge:
openclaw configure --section model
If this command starts with gateway prompts (for example Where will the Gateway run?) and shows No gateway detected, that’s okay in some console sessions. Keep Local (this machine) selected and continue; you’re only updating the model section, not redeploying the gateway.
Choose:
| Prompt | Value |
|---|---|
| Provider | Ollama |
| Base URL | http://192.168.4.7:11434 |
| API mode | ollama (native API) |
| Default model | Any model you already pulled (for example qwen3-coder:30b) |
Important: Use the native Ollama URL with no
/v1suffix.http://192.168.4.7:11434/v1breaks tool calling in OpenClaw.
Confirm what OpenClaw sees, then set the default model explicitly:
openclaw models list --provider ollama
openclaw models set ollama/qwen3-coder:30b
openclaw models status
Optional fallback (if you keep cloud credentials configured):
openclaw models fallbacks add anthropic/claude-sonnet-4-5
3.5c - Make Wake-On-Request Automatic (No Per-Query /gpu_on)
From Part 5, the bridge already wakes the desktop automatically when it gets an Ollama request and the desktop is asleep, as long as gpu_mode is ON. The only time requests fail with 503 is when gpu_mode is OFF.
To avoid manual /gpu_on before OpenClaw queries, set the bridge default mode to ON:
On CT 200 (192.168.4.7), edit the bridge app:
nano /opt/gpu-bridge/bridge.py
Change:
gpu_mode = False
to:
gpu_mode = True
Restart and verify:
systemctl restart gpu-bridge
curl http://localhost:11434/health
You should see "gpu_mode": true. Now OpenClaw requests can auto-wake the desktop when needed. Use /gpu_off only when you intentionally want to block inference (for example while gaming), then /gpu_on to re-arm.
3.6 - Enable Agent Sandbox
The agent sandbox runs tool execution (shell commands, file reads/writes, browser automation) inside isolated Docker containers. The gateway stays native on the host and orchestrates everything, but the actual untrusted work happens inside throwaway containers with their own filesystem and network. This isn’t a perfect security boundary, but it limits the blast radius when a model does something dumb.
The sandbox setup scripts are part of the OpenClaw git repo, not the native installer. The native install puts a single binary at /usr/bin/openclaw and doesn’t include the repo’s scripts directory. Clone the repo to get them:
apt install -y git
git clone https://github.com/openclaw/openclaw.git /tmp/openclaw-repo
Run the sandbox scripts from the repo root. They reference Dockerfile.sandbox with relative paths.
Build the base sandbox image (openclaw-sandbox:bookworm-slim):
cd /tmp/openclaw-repo
bash scripts/sandbox-setup.sh
The base image is minimal - it doesn’t include Node, Python, or common tools. For a homelab where agents might need to run scripts, install packages, or interact with APIs, build the common image instead:
bash scripts/sandbox-common-setup.sh
This builds openclaw-sandbox-common:bookworm-slim with curl, jq, nodejs, python3, and git pre-installed.
You can clean up the repo clone after building - it’s not needed at runtime:
rm -rf /tmp/openclaw-repo
Configure the sandbox:
openclaw config set agents.defaults.sandbox.mode "non-main"
openclaw config set agents.defaults.sandbox.scope "session"
openclaw config set agents.defaults.sandbox.workspaceAccess "none"
If you built the common image, point to it:
openclaw config set agents.defaults.sandbox.docker.image "openclaw-sandbox-common:bookworm-slim"
mode: non-main means your direct chat sessions run on the host (fast, no container overhead), but group/channel sessions and sub-agents get sandboxed. This is the sweet spot for a personal homelab. Set to all if you want everything sandboxed, or off to disable.
scope: session creates one container per session. Each conversation gets its own isolated filesystem and process space. This is the default and the safest starting point.
workspaceAccess: none means sandboxed tools see an empty workspace under ~/.openclaw/sandboxes, not your host files. Change to rw if you want agents to read and write your workspace directly (less safe, more useful for some workflows).
One thing to be aware of: sandbox containers default to no network access. Agents inside the sandbox can’t reach the internet, the GPU bridge, or any other services. If you need agents to make network calls, set the Docker network:
openclaw config set agents.defaults.sandbox.docker.network "bridge"
Restart the gateway to pick up the sandbox config:
systemctl --user restart openclaw-gateway
Verify the sandbox is working:
openclaw doctor --non-interactive
The doctor output should show Docker as available and the sandbox image as built. You can also inspect the effective sandbox config:
openclaw sandbox explain
3.7 - Security Hardening
OpenClaw can run shell commands, read/write files, and send messages on your behalf. Even on a private homelab, it’s worth locking things down properly. The gateway sits behind NPM on the local network, which is good, but the defaults are more permissive than they need to be.
File permissions
Lock down the config and state directories:
chmod 700 ~/.openclaw
chmod 600 ~/.openclaw/openclaw.json
Anyone who can modify the OpenClaw config can change auth, tool policy, and credentials. Keep it user-only.
Gateway auth
The onboarding wizard should have generated a gateway token. Verify it’s set:
openclaw config get gateway.auth.mode
openclaw config get gateway.auth.token
If auth mode is none for some reason, generate a token:
openclaw doctor --generate-gateway-token
Add auth rate limiting so repeated failed logins are throttled:
openclaw config set gateway.auth.rateLimit '{"maxAttempts":10,"windowMs":60000,"lockoutMs":300000}'
This sets a 60-second window, 10 failed attempts max, then a 5-minute lockout.
Trusted proxies
NPM is the reverse proxy sitting in front of the gateway. Tell OpenClaw to trust it for proper client IP detection. Without this, the gateway might reject proxied connections or misidentify clients:
openclaw config set gateway.trustedProxies '["192.168.4.4"]'
192.168.4.4 is CT 101 where NPM runs. Don’t add 0.0.0.0 or broad ranges here.
DM policy
Set Telegram to pairing mode so unknown senders can’t just message the bot and start triggering tools:
openclaw config set channels.telegram.dmPolicy "pairing"
Tool policy hardening
Deny dangerous control-plane tools that could make persistent config changes or spawn uncontrolled sessions:
openclaw config set tools.deny '["gateway", "cron", "sessions_spawn", "sessions_send"]'
openclaw config set tools.fs.workspaceOnly true
gateway can modify the gateway config itself. cron can create scheduled jobs that outlive the chat. sessions_spawn and sessions_send enable uncontrolled delegation. fs.workspaceOnly restricts file tools to the workspace directory so agents can’t read arbitrary paths on the host.
If you previously copied a broad gateway.nodes.denyCommands list from older examples, reset it unless you’ve validated each command name. This setting only accepts exact node command IDs:
openclaw config set gateway.nodes.denyCommands '[]'
You can add command IDs back later, but they must match real node command names exactly.
Exec policy
Set exec to deny by default with mandatory approval:
openclaw config set tools.exec.security "deny"
openclaw config set tools.exec.ask "always"
openclaw config set tools.elevated.enabled false
elevated is the escape hatch that runs exec on the host bypassing the sandbox. Keep it off.
Disable mDNS discovery
The gateway broadcasts its presence via mDNS on the local network. In an LXC container this isn’t useful and it leaks operational details:
openclaw config set discovery.mdns.mode "off"
Log redaction
Make sure sensitive values are redacted in logs:
openclaw config set logging.redactSensitive "tools"
This is the default, but worth confirming explicitly.
Run the security audit
OpenClaw has a built-in audit that checks for common misconfigurations:
openclaw security audit --deep
Review the findings. Fix anything critical:
openclaw security audit --fix
The --fix flag auto-remedies some issues like file permissions. For anything it can’t auto-fix, the audit output tells you which config key to change.
Restart and verify
Restart the gateway to pick up all the hardening changes:
systemctl --user restart openclaw-gateway
Run the audit one more time to confirm everything’s clean:
openclaw security audit --deep
3.8 - Decommission the Cloud Instance
If OpenClaw is still running on Oracle Cloud or Cloudflare Workers, stop it now. Telegram only delivers messages to one polling client per bot token. If two instances are running, they’ll fight over messages and both will behave unpredictably.
For Oracle Cloud VM:
ssh ubuntu@openclaw-vnic
systemctl --user stop openclaw-gateway
systemctl --user disable openclaw-gateway
Verify the local instance is receiving messages by sending a test command to @pesetas_openclaw_bot in Telegram. If it responds, the migration worked. If not, check the logs:
journalctl --user -u openclaw-gateway -n 20
Part 4: Wire Up Monitoring
4.1 - Add Uptime Kuma Monitors
SSH into CT 101 on pve01 where Uptime Kuma runs, or use the web UI at https://status.lab.atilho.com.
n8n monitor:
| Field | Value |
|---|---|
| Monitor Type | HTTP(s) |
| Friendly Name | n8n |
| URL | http://192.168.4.8:5678 |
| Heartbeat Interval | 60 seconds |
| Notification | Telegram (existing atilho_homelab_bot) |
OpenClaw monitor:
| Field | Value |
|---|---|
| Monitor Type | HTTP(s) |
| Friendly Name | OpenClaw |
| URL | http://192.168.4.9:18789/healthz |
| Heartbeat Interval | 60 seconds |
| Notification | Telegram (existing atilho_homelab_bot) |
Both should go green within a minute.
4.2 - Add NPM Proxy Host for OpenClaw
If OpenClaw has a web UI or you want a clean URL for its API:
In NPM, add a proxy host:
| Field | Value |
|---|---|
| Domain Names | openclaw.lab.atilho.com |
| Scheme | http |
| Forward Hostname / IP | 192.168.4.9 |
| Forward Port | 18789 |
| Block Common Exploits | checked |
| Websockets Support | checked |
SSL tab: wildcard cert, Force SSL, HTTP/2. Same as always.
4.3 - Add to Homepage Dashboard
On CT 101, edit Homepage’s services config:
nano /opt/homepage/config/services.yaml
Add an Automation group:
- Automation:
    - n8n:
        icon: n8n
        href: https://n8n.lab.atilho.com
        description: Workflow Automation
    - OpenClaw:
        icon: mdi-robot
        href: https://openclaw.lab.atilho.com
        description: Telegram Automation
No container status for OpenClaw and n8n in Homepage. These run on CT 201 on pve02, not on CT 101 where Homepage’s Docker socket is mounted. The
server: local/container:pattern only works for containers on the same Docker host. To get status indicators from a remote Docker host, you’d need to configure Homepage with a remote Docker socket connection indocker.yaml, which is optional and covered in Homepage’s docs if you want it later.
Update settings.yaml to include the new section:
  Automation:
    style: row
    columns: 2
Restart Homepage:
cd /opt/homepage && docker compose down && docker compose up -d
4.4 - Fix Control UI Origin and Pairing
If the OpenClaw Control UI shows origin not allowed, allow your proxied domain:
openclaw config set gateway.controlUi.allowedOrigins '["https://openclaw.lab.atilho.com"]'
systemctl --user restart openclaw-gateway
If you connect with a token and see pairing required, approve the pending dashboard device on the gateway host:
openclaw devices list
openclaw devices approve --latest
If devices list shows no pending requests, click Connect in the Control UI once, then run openclaw devices list again and approve the new request ID.
Part 5: Verify the Full Stack
5.1 - Check All Services
n8n on CT 201:
ssh root@192.168.4.8
docker ps --format "table \t\t"
You should see:
| Name | Status | Ports |
|---|---|---|
n8n |
Up | 5678 |
OpenClaw on CT 202:
ssh root@192.168.4.9
systemctl --user status openclaw-gateway
curl -fsS http://localhost:18789/healthz
5.2 - Test the AI Workflow Chain
This tests the full path: you > n8n webhook > GPU bridge > Ollama on desktop > response back.
- If you kept manual GPU mode control, send
/gpu_onto the GPU Bridge Telegram bot and wait for confirmation. - If you followed section 3.5c and set
gpu_modedefault totrue, you can skip the manual toggle. - Hit the demo webhook:
curl -X POST https://n8n.lab.atilho.com/webhook/ai-chat \
  -H "Content-Type: application/json" \
  -d '{"message": "What services should every homelab have?"}'
- Verify you get an AI-generated response
- Check n8n’s execution log for the full trace
5.3 - Check Remote Access
From your phone on cellular (Tailscale active):
https://n8n.lab.atilho.com- n8n workflow editorhttps://dash.lab.atilho.com- Homepage with the new Automation sectionhttps://status.lab.atilho.com- both new monitors green
Part 6: Container Housekeeping
6.1 - Snapshot
On pve02, snapshot both new containers:
CT 201: initial-n8n-setup
CT 202: initial-openclaw-setup
On pve01, snapshot CT 101 (Homepage config changed):
CT 101: post-automation-integration
6.2 - Boot Order on pve02
Set startup order for pve02’s containers so they come up in the right sequence:
- CT 200 (GPU Bridge) - should start first
- CT 201 (n8n) - starts after GPU bridge is available
- CT 202 (OpenClaw) - starts after GPU bridge is available
In pve02 GUI, for each container: Options > Start/Shutdown Order. Set CT 200 to order 1 with startup delay 0, CT 201 to order 2 with startup delay 10, CT 202 to order 3 with startup delay 10.
Troubleshooting
n8n shows a blank page through NPM?
Check that N8N_HOST, N8N_PROTOCOL, and WEBHOOK_URL in docker-compose match the NPM proxy hostname. If these are wrong, n8n generates incorrect URLs and the browser can’t load assets.
n8n login loop (redirects back to login after entering credentials)?
N8N_SECURE_COOKIE=true must be set when running behind HTTPS. Without it, the browser rejects the session cookie because it’s marked as non-secure over an HTTPS connection. Restart the container after adding this.
Webhook returns 403 from NPM?
If you checked “Block Common Exploits” on the n8n proxy host, NPM’s ModSecurity rules may be blocking legitimate webhook payloads. Uncheck it for the n8n proxy host. This is called out in Part 2.3 above.
AI nodes in n8n return “GPU mode is off”?
The GPU bridge returns a 503 when GPU mode is disabled. If you’re using manual mode, send /gpu_on via Telegram before running AI workflows. If you set gpu_mode default to true in section 3.5c, requests will wake the desktop automatically. For scheduled workflows, adding an explicit “check and wake” step still improves reliability.
n8n can’t reach the GPU bridge?
Test connectivity from inside CT 201:
curl http://192.168.4.7:11434/health
If that fails, check that CT 200 (GPU Bridge) is running and the bridge service is active:
ssh root@192.168.4.7
systemctl status gpu-bridge
OpenClaw’s Telegram bot doesn’t respond?
Make sure you decommissioned the old cloud instance. Telegram only delivers messages to one polling client per bot token. If the Oracle Cloud instance is still running, it’s stealing the messages. Check the local gateway logs:
ssh root@192.168.4.9
journalctl --user -u openclaw-gateway -n 50
OpenClaw gateway won’t start on CT 202?
Run the built-in diagnostics:
openclaw doctor --non-interactive
Agent sandbox containers not starting?
Make sure Docker is running on CT 202 and the sandbox image was built:
systemctl status docker
docker images | grep openclaw
If the sandbox image is missing, clone the repo and rebuild:
git clone https://github.com/openclaw/openclaw.git /tmp/openclaw-repo
cd /tmp/openclaw-repo
bash scripts/sandbox-setup.sh
rm -rf /tmp/openclaw-repo
If Docker itself won’t start, check the LXC config on pve02:
cat /etc/pve/lxc/202.conf
Verify features: keyctl=1,nesting=1 and the apparmor/cgroup lines are present.
Docker won’t start inside CT 201 or CT 202?
Same issue as CT 101 in Part 2. Check the LXC config for the affected container:
cat /etc/pve/lxc/201.conf # or 202.conf
Verify features: keyctl=1,nesting=1 and the apparmor/cgroup lines are present. If you edited the config while the container was running, stop and start it (not restart):
pct stop 201 && pct start 201 # or 202
Maintenance Cheatsheet
| Task | Command / Location |
|---|---|
| n8n dashboard | https://n8n.lab.atilho.com |
| n8n containers on CT 201 | docker ps (inside CT 201) |
| Restart n8n | cd /opt/n8n && docker compose restart |
| n8n logs | docker logs n8n --tail 50 |
| Update n8n | cd /opt/n8n && docker compose pull && docker compose up -d |
| n8n execution history | n8n UI > Executions (top nav bar) |
| Trigger workflow manually | n8n UI > open workflow > click “Execute Workflow” |
| OpenClaw status | systemctl --user status openclaw-gateway (inside CT 202) |
| Restart OpenClaw | systemctl --user restart openclaw-gateway (inside CT 202) |
| OpenClaw logs | journalctl --user -u openclaw-gateway -f (inside CT 202) |
| Update OpenClaw | openclaw update (inside CT 202) |
| OpenClaw dashboard | https://openclaw.lab.atilho.com |
| Test GPU bridge from CT 201 | curl http://192.168.4.7:11434/health |
| Test GPU bridge from CT 202 | curl http://192.168.4.7:11434/health |
| Homepage dashboard | https://dash.lab.atilho.com |
| Snapshot CT 201 | pve02 GUI > CT 201 > Snapshots > Take Snapshot |
| Snapshot CT 202 | pve02 GUI > CT 202 > Snapshots > Take Snapshot |
What’s Running Now
| Layer | Service | Internal Access | HTTPS Access |
|---|---|---|---|
| Hypervisor | Proxmox VE (pve01) | 192.168.4.2:8006 |
https://pve01.lab.atilho.com |
| Hypervisor | Proxmox VE (pve02) | 192.168.4.6:8006 |
https://pve02.lab.atilho.com |
| CT 100 | AdGuard + Unbound | 192.168.4.3:80 |
https://adguard.lab.atilho.com |
| CT 101 | NPM, Uptime Kuma, ntfy, Homepage | 192.168.4.4 |
https://*.lab.atilho.com |
| CT 200 | GPU Bridge + Telegram Bot | 192.168.4.7:11434 |
https://ollama.lab.atilho.com |
| CT 201 | n8n | 192.168.4.8:5678 |
https://n8n.lab.atilho.com |
| CT 202 | OpenClaw | 192.168.4.9:18789 |
https://openclaw.lab.atilho.com |
| Desktop | Ollama (on-demand) | 192.168.5.88:11434 |
via GPU Bridge |
| Raspberry Pi | Pi-hole + Unbound | 192.168.4.118:80 |
https://pihole.lab.atilho.com |
| Tailscale | All services on tailnet | 100.x.x.x |
Same HTTPS URLs remotely |
The homelab now has a complete automation layer. n8n provides visual workflow building with native AI integration. OpenClaw handles Telegram-driven commands and scheduled tasks. Both route AI requests through the GPU bridge, which wakes the desktop on demand. The infrastructure watches itself (Uptime Kuma), notifies you when things break (ntfy/Telegram), and now it can act on your behalf.
What’s next: The big one. CrewAI agents that can plan, build, review, and deploy infrastructure autonomously, with human-in-the-loop approval checkpoints via Telegram. The AI homelab engineer. That’s Part 7.