Adding HTTPS to Everything: Nginx Proxy Manager on Proxmox
This is Part 2 of the Wyse 5070 homelab series. Part 1 covered installing Proxmox, setting up AdGuard Home with Unbound, and connecting everything to Tailscale. If you haven’t done that yet, start there.
At this point the homelab works, but every dashboard throws a browser security warning. Proxmox is on a self-signed cert. AdGuard Home is plain HTTP. Every time I open a dashboard I’m clicking through “Your connection is not private” like some kind of animal. And if I add more services later — Vaultwarden, Uptime Kuma, Grafana — each one gets its own port number that I have to remember.
The fix is a reverse proxy with real TLS certificates. One container that sits in front of everything, handles HTTPS termination, and lets me access services by name instead of IP:port.
adguard.lab.atilho.com instead of 192.168.4.3:80. pve01.lab.atilho.com instead of 192.168.4.2:8006. Real certs, no warnings, and every future service I add gets the same treatment automatically.
The Architecture
Here’s what the stack looks like after this writeup:
┌─────────────────────────────────────────────────────┐
│  Dell Wyse 5070 Extended — Proxmox VE 9.x           │
│  192.168.4.2 (pve01.lab.atilho.com)                 │
│                                                      │
│  ┌─────────────────────┐  ┌────────────────────────┐ │
│  │ CT 100 — AdGuard    │  │ CT 101 — Nginx Proxy   │ │
│  │ + Unbound           │  │ Manager (Docker)       │ │
│  │ 192.168.4.3         │  │ 192.168.4.4            │ │
│  │ DNS :53             │  │ HTTP :80 / HTTPS :443  │ │
│  │ Dashboard :80       │  │ Admin UI :81           │ │
│  │ Tailscale ✓         │  │ Tailscale ✓            │ │
│  └─────────────────────┘  └────────────────────────┘ │
│                                                      │
│  Tailscale ✓ on host                                 │
└─────────────────────────────────────────────────────┘
         │
    ┌────┴────┐
    │  eero   │  Router: 192.168.4.1
    │ Gateway │  DNS → 192.168.4.3 (primary)
    └─────────┘       → 192.168.4.118 (backup Pi-hole)
What’s new: CT 101 runs Nginx Proxy Manager inside Docker. It receives all HTTPS requests on ports 80 and 443, terminates TLS using real Let’s Encrypt certificates, and forwards traffic to the appropriate backend service. Certificates are issued via DNS-01 challenges through Cloudflare — no ports need to be opened to the internet.
Why Nginx Proxy Manager
There are a few options here. Caddy is simpler if you like config files. Traefik is powerful but has a learning curve. I went with Nginx Proxy Manager (NPM) because:
It has a GUI. Adding a new proxy host is a form, not a YAML file. When I add a service at 2am, I don’t want to debug indentation.
Automatic Let’s Encrypt renewal. Set it once, forget it. Certs renew on their own.
DNS-01 challenge support. This is the big one. HTTP-01 challenges require port 80 to be open to the internet, which defeats the purpose of a private homelab. DNS-01 proves domain ownership by creating a TXT record via the Cloudflare API — nothing needs to be exposed.
It’s just Nginx under the hood. If I need to drop into advanced config, it’s all standard Nginx syntax.
Prerequisites
Before starting, you need:
- A working Proxmox host with at least one LXC container (from Part 1)
- A domain you own (I’m using
atilho.com, registered on Porkbun) - That domain’s DNS managed by Cloudflare (free tier is fine — see Part 1 below for migrating from Porkbun or another registrar)
- About 30 minutes
Part 1: Move Your Domain’s DNS to Cloudflare
If your domain is already managed by Cloudflare, skip to Part 2.
Nginx Proxy Manager needs API access to your DNS provider to complete DNS-01 challenges. Cloudflare’s API is the most widely supported option. Even if you registered your domain elsewhere (Porkbun, Namecheap, etc.), you can point the nameservers to Cloudflare and manage DNS from there for free. Your domain registration stays with your registrar — you’re only moving DNS management.
1.1 — Add Your Domain to Cloudflare
- Create a Cloudflare account at dash.cloudflare.com (or log in)
-
In the left sidebar, click Domains — you’ll see the Domain Management page. If this is a fresh account, it’ll say “No domains or subdomains found.”
- Click Onboard a domain
- In the “Enter an existing domain” field, type your domain (e.g.,
atilho.com) - Leave Quick scan for DNS records selected (the recommended default) — Cloudflare will automatically import your existing records from your current registrar
- Under Block AI training bots, pick whatever you prefer. I went with “Block on all pages” since I don’t want crawlers scraping my site for training data. This has nothing to do with the homelab setup — purely personal preference.
- Leave Instruct AI bot traffic with robots.txt toggled on
-
Click Continue
- On the next screen, select the Free plan
1.2 — Review and Clean Up Imported DNS Records
Cloudflare will scan your registrar’s DNS and show you a “Review your DNS records” page with everything it found. In my case it picked up 2 A records, 2 CNAMEs, 2 MX records, 4 NS records, and 3 TXT records.
Delete these if they exist — they’re default parking records from your registrar and will cause problems later:
- CNAME
*→uixie.porkbun.com(or similar wildcard parking redirect) — this directly conflicts with your*.lab.atilho.comsetup - CNAME
www→uixie.porkbun.com(or similar parking page) — if you need awwwrecord, add it back later as a CNAME pointing to your root domain
Keep these:
- A records pointing to your hosting provider (these serve your personal site)
- MX records (these handle email forwarding — don’t touch them)
- NS records (Cloudflare will replace these automatically after activation)
- TXT records (likely SPF/DKIM for email, and possibly leftover
_acme-challengerecords from previous SSL certs — the_acme-challengeones are harmless but can be deleted for a clean slate since NPM will create its own)
After cleaning up, scroll down and click Continue to activation.
1.3 — Update Your Nameservers
Cloudflare will show you an “Update your nameservers to activate Cloudflare” page with two nameservers assigned to your account and a list of your registrar’s nameservers to remove.
It also recommends making sure DNSSEC is off at your registrar before switching nameservers. If DNSSEC is on at your registrar but Cloudflare isn’t managing it yet, DNS resolution can break during the transition. You can re-enable it through Cloudflare later.
Now switch to your registrar to make the swap. In Porkbun:
- Log in at porkbun.com
- Go to Domain Management (you should see your domains listed)
- Click Details next to your domain
- Scroll to Authoritative Nameservers and click edit
- An “Edit Authoritative Nameservers” dialog will pop up showing your current Porkbun nameservers (e.g.,
curitiba.ns.porkbun.com,fortaleza.ns.porkbun.com, etc.) - Delete all the Porkbun nameservers and replace them with the two Cloudflare nameservers, one per line:
cory.ns.cloudflare.com
vita.ns.cloudflare.com
(Your assigned nameservers will be different — use the ones Cloudflare showed you.)
-
Click Submit
- Porkbun will show a warning: “You appear to be removing our default nameservers. If you have any services configured for the domain they will most likely break.” This is expected — click OK. Your site and email will continue working since Cloudflare already has copies of your A and MX records.
If you’re on a different registrar:
- Namecheap: Domain List → Manage → Nameservers → Custom DNS
- Google Domains / Squarespace: DNS → Custom name servers
- GoDaddy: My Products → DNS → Nameservers → Change
1.4 — Confirm Activation
Switch back to the Cloudflare tab and click I updated my nameservers. Propagation can take up to 48 hours but usually happens within minutes. In my case it was near-instant.
Once active, you’ll see the Overview page for your domain with a green checkmark and “Your domain is now protected by Cloudflare.”
You can ignore the Quick Start guide, security toggles, and performance suggestions for now — none of that is relevant to the reverse proxy setup. Your personal site should still be working normally. Verify by visiting it in a browser.
Part 2: Create a Cloudflare API Token
NPM needs a way to talk to Cloudflare’s API to create the TXT records for DNS-01 challenges. You’ll create a scoped API token — not the global API key (which you should never use for this).
2.1 — Generate the Token
- Go to dash.cloudflare.com/profile/api-tokens — you can find this by clicking your profile icon in the top right → My Profile → API Tokens in the left sidebar
-
You’ll see the “User API Tokens” page with an empty token list and an “API Keys” section below it. Ignore the API Keys — you want API Tokens. Click Create Token.
- On the template selection screen, find Edit zone DNS and click Use template
- On the “Create Token” configuration page, verify/set:
| Section | Setting | Value |
|---|---|---|
| Token name | Edit zone DNS (default is fine, or rename it) |
|
| Permissions | Zone → DNS → Edit (pre-filled from template) |
|
| Zone Resources | Include → Specific zone → atilho.com |
|
| Client IP Address Filtering | Leave blank (default — allows all IPs) | |
| TTL | Leave blank (no expiration) |
The important one is Zone Resources — make sure you select Specific zone in the middle dropdown and then pick your domain from the third dropdown. This scopes the token to only your domain instead of giving it access to all zones on your account.
- Click Continue to summary → Create Token
2.2 — Save the Token
Copy the token immediately — Cloudflare only shows it once. Save it somewhere safe (password manager, encrypted note). You’ll paste it into NPM later.
Verify it works:
curl -X GET "https://api.cloudflare.com/client/v4/user/tokens/verify" \
  -H "Authorization: Bearer YOUR_TOKEN_HERE" \
  -H "Content-Type: application/json"
You should get "status": "active" in the response.
Part 3: Create the LXC Container
Same process as CT 100 from Part 1, with a couple of differences. This container runs Docker, so it needs slightly more resources.
3.1 — Create CT 101
In the Proxmox web GUI, click Create CT (top right):
| Tab | Setting | Value |
|---|---|---|
| General | CT ID | 101 |
| Hostname | npm |
|
| Password | Set a root password | |
| Unprivileged | ✅ Checked | |
| Nesting | ✅ Checked (required for Docker) | |
| Template | Template | debian-13-standard (or whatever Debian version you used in Part 1) |
| Disks | Disk size | 8 GB |
| CPU | Cores | 1 |
| Memory | Memory | 1024 MB |
| Swap | 512 MB |
|
| Network | Name | eth0 |
| Bridge | vmbr0 |
|
| IPv4 | Static | |
| IPv4/CIDR | 192.168.4.4/22 |
|
| Gateway | 192.168.4.1 |
|
| DNS | DNS domain | lab.atilho.com |
| DNS server | 192.168.4.3 |
Why 1024 MB RAM? Docker + NPM + its built-in MariaDB database need more headroom than AdGuard. 512 MB would work but you’d be tight. 1 GB keeps things comfortable.
Why Nesting? Docker needs to create its own namespaces inside the container. Without nesting enabled, Docker fails to start.
3.2 — Enable Keyctl (Required for Docker in Unprivileged LXC)
Before starting the container, SSH into the Proxmox host (not the container) and add this to the container’s config:
echo "lxc.apparmor.profile: unconfined" >> /etc/pve/lxc/101.conf
echo "lxc.cap.drop:" >> /etc/pve/lxc/101.conf
echo "lxc.mount.auto: proc:rw sys:rw" >> /etc/pve/lxc/101.conf
These lines relax the security profile enough for Docker to function inside an unprivileged container. It’s a well-known Proxmox + Docker requirement.
3.3 — Start the Container
Back in the Proxmox GUI, select CT 101 and click Start. Then open the Console tab or SSH in:
ssh root@192.168.4.4
3.4 — Update and Install Dependencies
apt update && apt upgrade -y
apt install -y curl ca-certificates gnupg
Part 4: Install Docker
4.1 — Add Docker’s Official Repository
install -m 0755 -d /etc/apt/keyrings
curl -fsSL https://download.docker.com/linux/debian/gpg -o /etc/apt/keyrings/docker.asc
chmod a+r /etc/apt/keyrings/docker.asc

echo \
  "deb [arch=$(dpkg --print-architecture) signed-by=/etc/apt/keyrings/docker.asc] https://download.docker.com/linux/debian \
  $(. /etc/os-release && echo "$VERSION_CODENAME") stable" | \
  tee /etc/apt/sources.list.d/docker.list > /dev/null
4.2 — Install Docker Engine and Compose
apt update
apt install -y docker-ce docker-ce-cli containerd.io docker-buildx-plugin docker-compose-plugin
4.3 — Verify Docker is Running
docker run hello-world
If you see “Hello from Docker!”, you’re good. If Docker fails to start, double-check that Nesting is enabled and the lxc.apparmor.profile lines were added in Part 3.2.
Part 5: Deploy Nginx Proxy Manager
5.1 — Create the Docker Compose File
mkdir -p /opt/npm && cd /opt/npm
Create the compose file:
cat <<'EOF' > docker-compose.yml
services:
  npm:
    image: jc21/nginx-proxy-manager:latest
    container_name: npm
    restart: unless-stopped
    ports:
      - "80:80"
      - "443:443"
      - "81:81"
    volumes:
      - ./data:/data
      - ./letsencrypt:/etc/letsencrypt
    environment:
      DISABLE_IPV6: 'true'
EOF
5.2 — Start It Up
docker compose up -d
First pull takes a minute or two. Once it’s done:
docker compose ps
You should see npm running with ports 80, 81, and 443 mapped.
5.3 — Access the Admin UI
Open a browser and go to:
http://192.168.4.4:81
You’ll see a “Welcome! Get started by creating your admin account” screen. Fill in your name, email, and a strong password, then click Save.
Part 6: Get Your First SSL Certificate
Before setting up proxy hosts, you need a wildcard certificate that covers everything under *.lab.atilho.com. This way every service you add is already covered.
6.1 — Request a Let’s Encrypt Certificate
In the NPM admin UI:
- Go to Certificates tab in the top nav
- Click Add Certificate → Let’s Encrypt via DNS
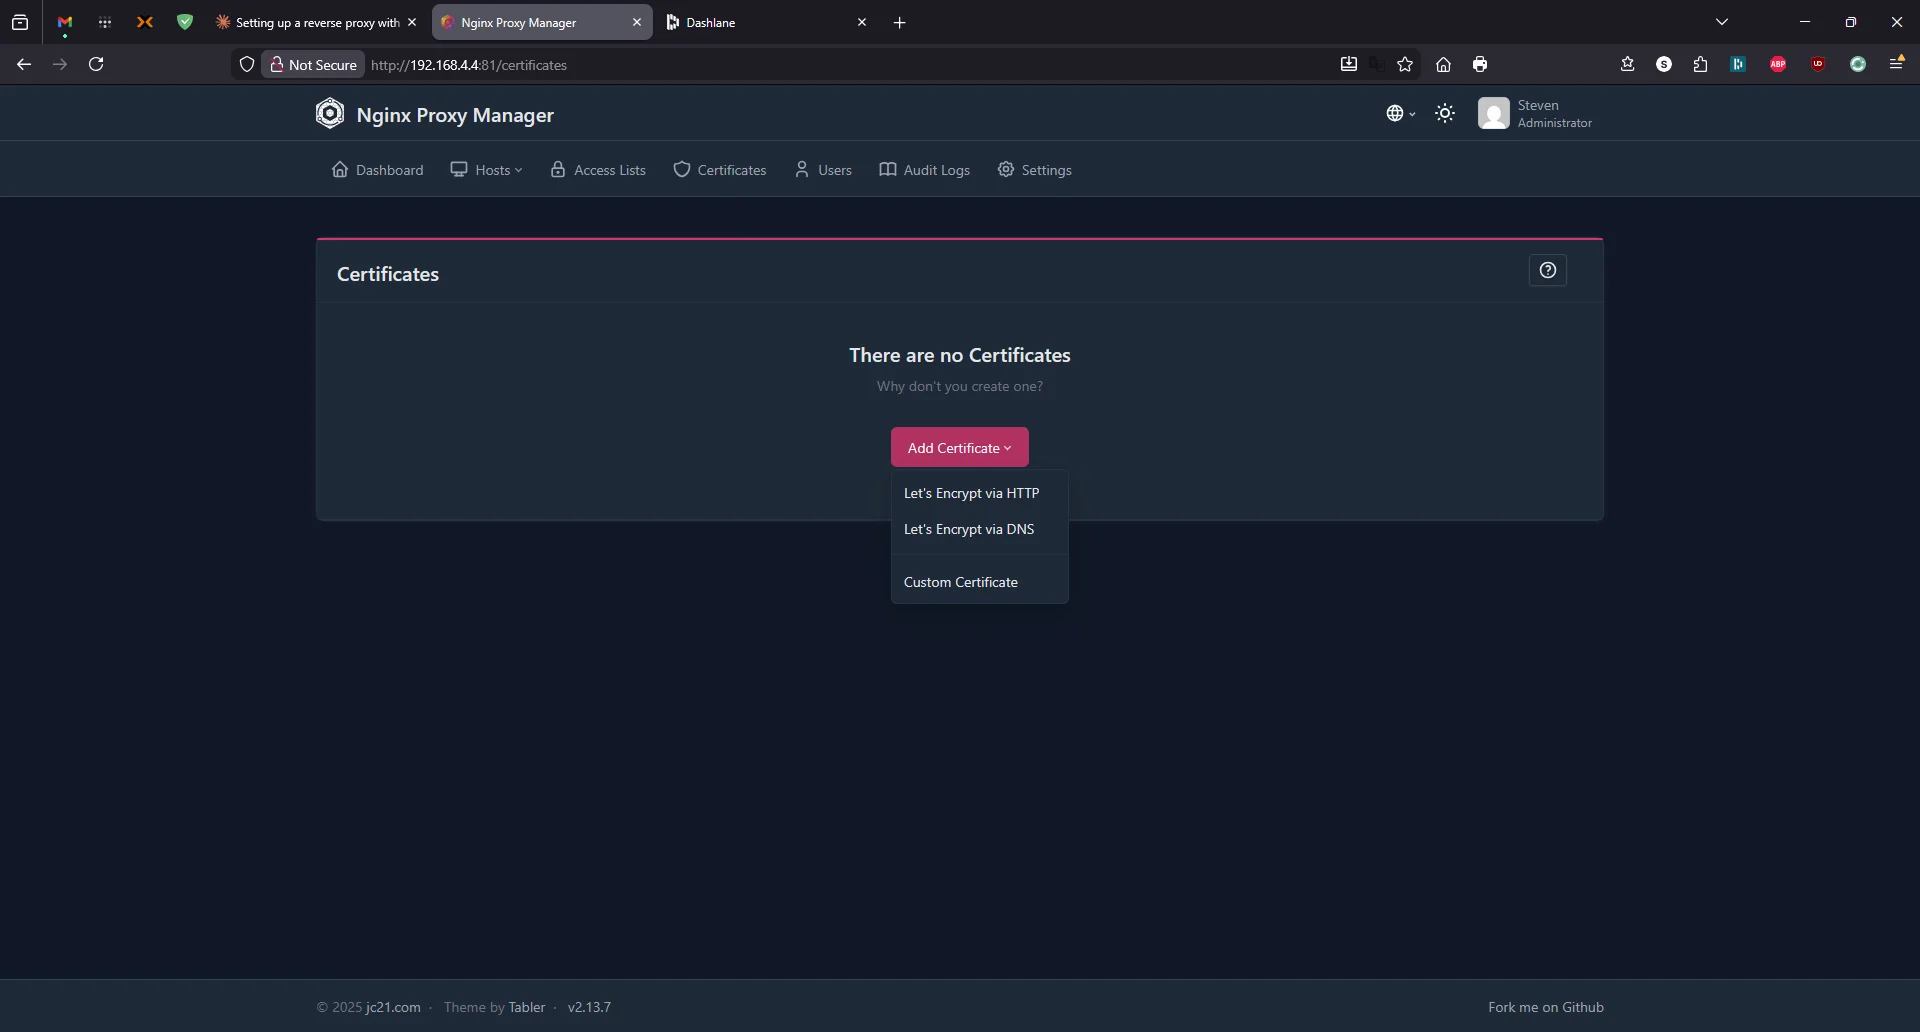
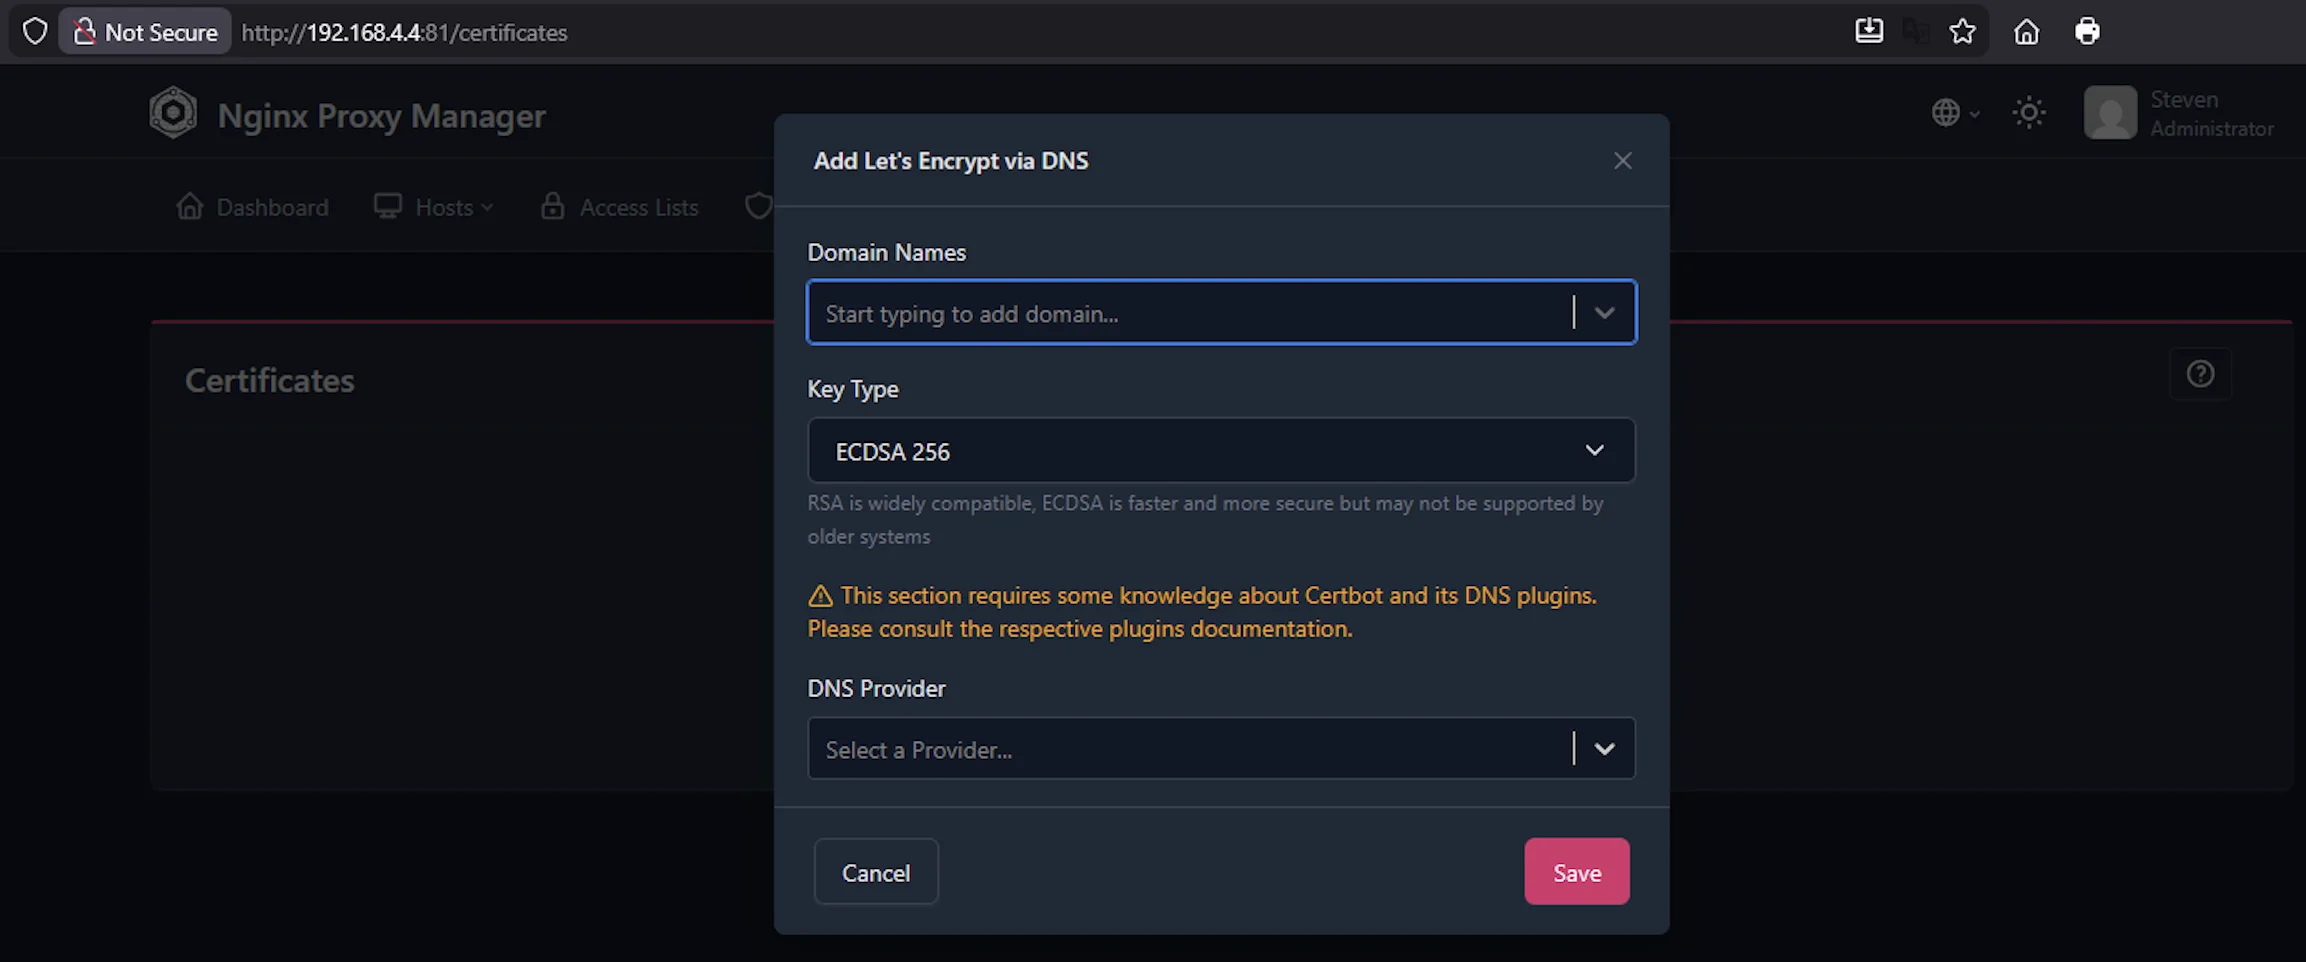
- Fill in:
| Field | Value |
|---|---|
| Domain Names | *.lab.atilho.com |
lab.atilho.com |
|
| Your real email (for Let’s Encrypt expiry notifications) | |
| DNS Provider | Cloudflare |
| Credentials File Content | dns_cloudflare_api_token = YOUR_TOKEN_HERE |
Replace YOUR_TOKEN_HERE with the Cloudflare API token from Part 2.
- Agree to TOS → Click Save
NPM will call the Cloudflare API, create a _acme-challenge.lab.atilho.com TXT record, Let’s Encrypt verifies it, and you get a real certificate. This takes 30 seconds to a couple minutes.
If it fails, the most common causes are:
- Token doesn’t have Edit permissions on the zone — go back to Cloudflare and check the token’s permissions
- Domain isn’t active on Cloudflare yet — nameserver propagation might still be in progress
- Typo in the credentials line — it must be exactly
dns_cloudflare_api_token =with the space before and after the equals sign
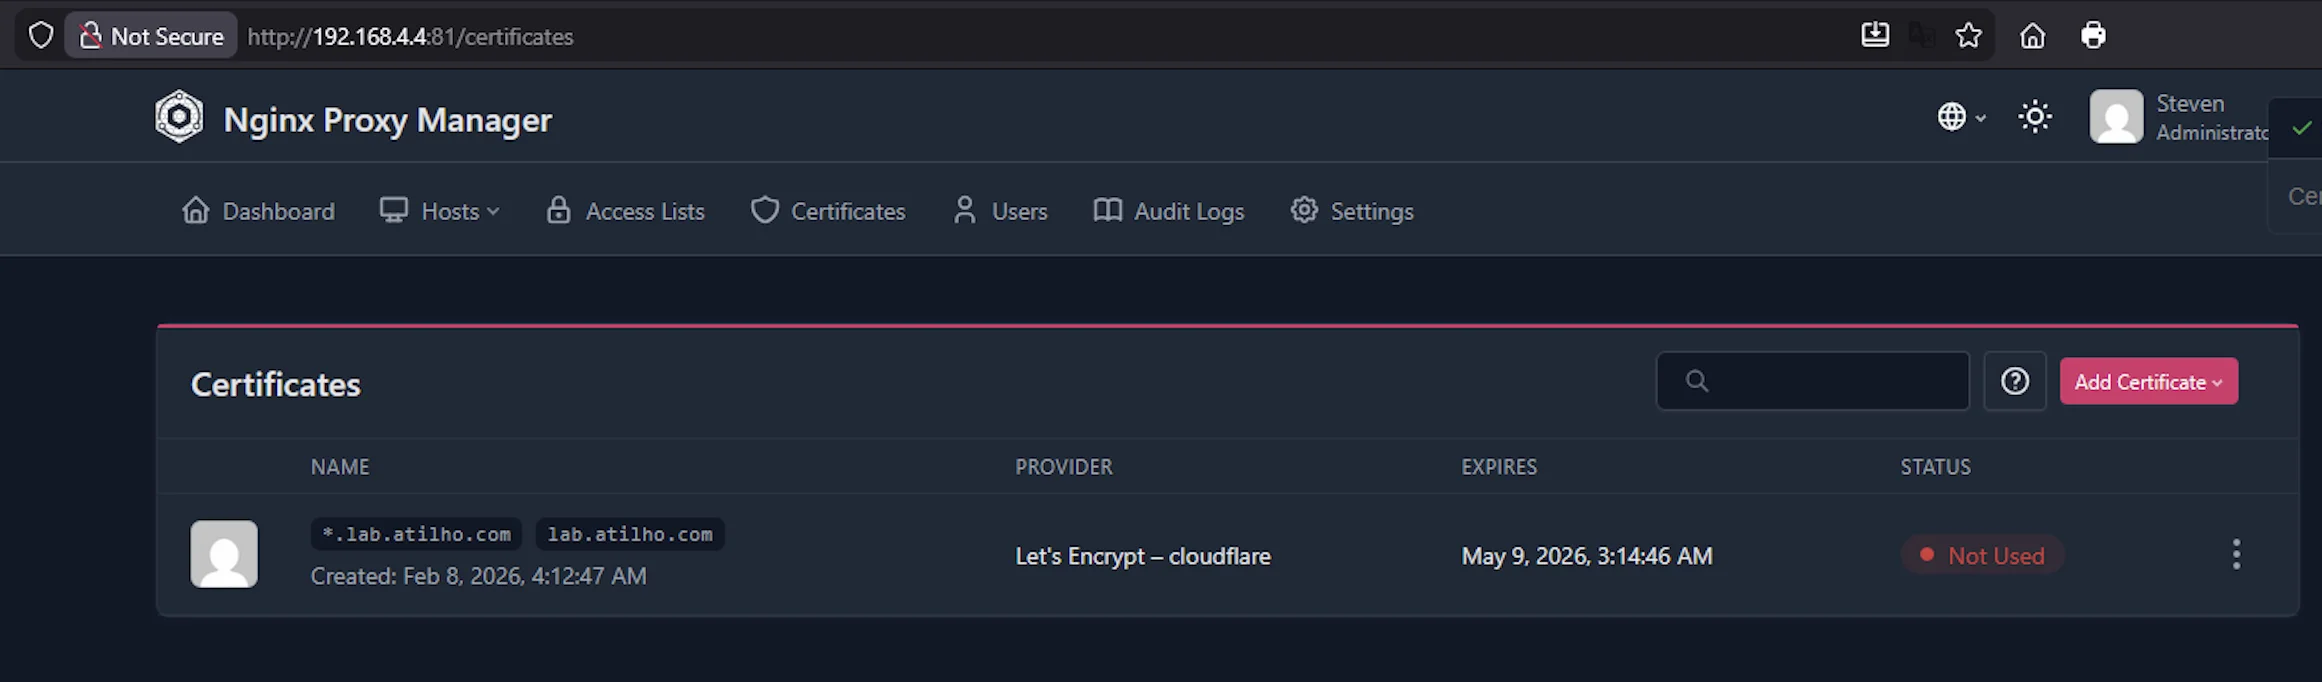
6.2 — Verify the Certificate
Once created, you’ll see it listed in the SSL Certificates tab with an expiry date ~90 days out. NPM handles renewal automatically — you don’t need to touch this again.
Part 7: Set Up DNS Records in AdGuard Home
The reverse proxy needs a way to know which service you’re requesting. It does this based on the hostname in the request. So adguard.lab.atilho.com and pve01.lab.atilho.com both hit the same IP (the reverse proxy at 192.168.4.4), but NPM routes them to different backends based on the name.
For this to work, your DNS resolver needs to know that *.lab.atilho.com points to the reverse proxy.
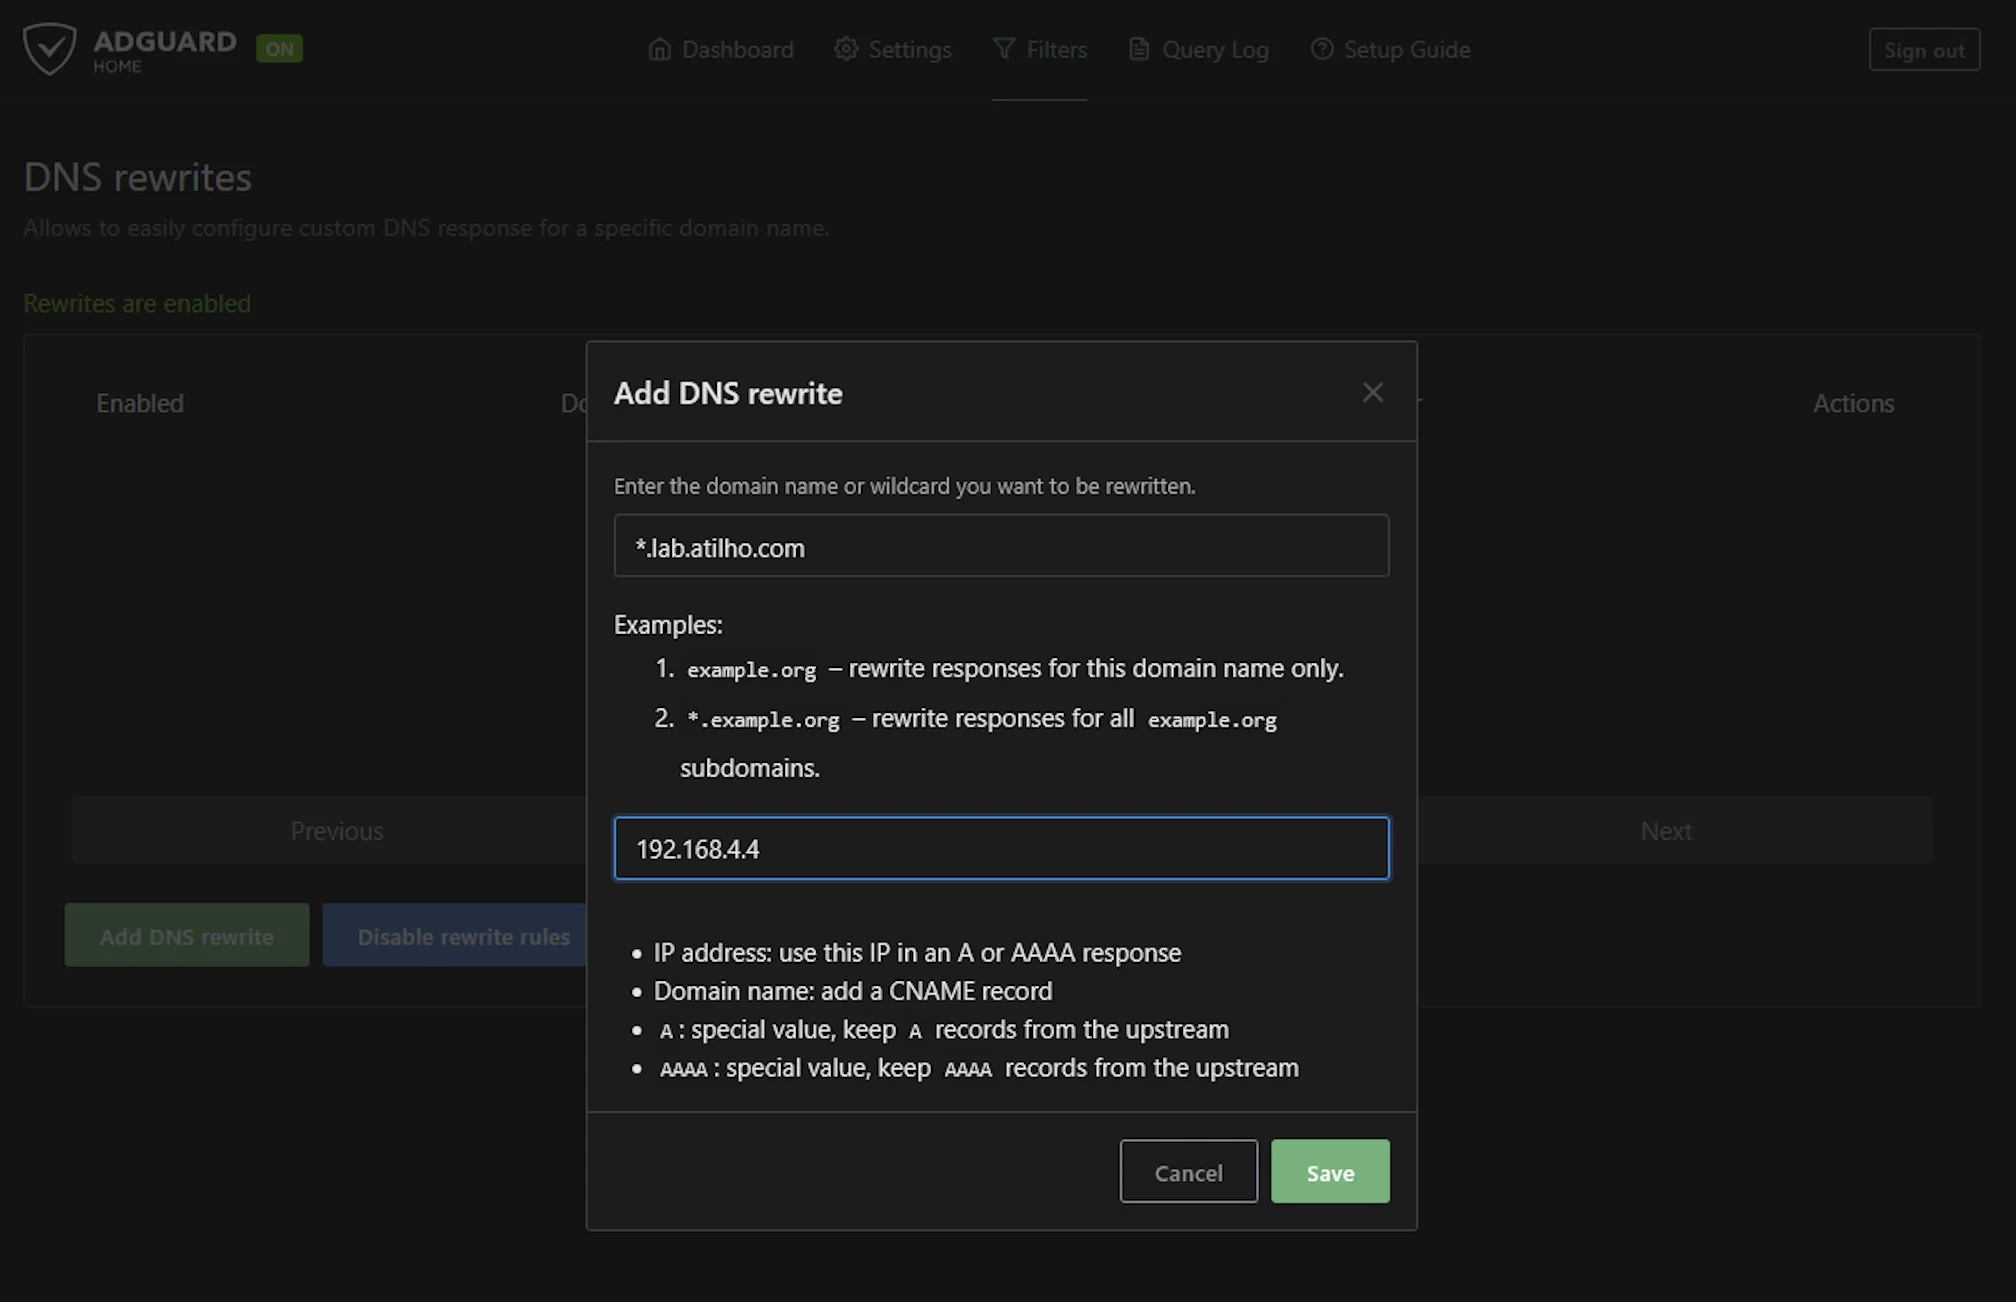
7.1 — Add DNS Rewrites in AdGuard Home
Open AdGuard Home at http://192.168.4.3 (or the Tailscale IP):
- Go to Filters → DNS rewrites
- Add the following entries:
| Domain | Answer |
|---|---|
adguard.lab.atilho.com |
192.168.4.4 |
pve01.lab.atilho.com |
192.168.4.4 |
npm.lab.atilho.com |
192.168.4.4 |
Why do they all point to .4 (the reverse proxy)? Because that’s the whole point — all traffic hits NPM first, and NPM decides where to send it based on the hostname. The backend services don’t need to know about TLS at all.
Alternatively, you can add a single wildcard rewrite:
| Domain | Answer |
|---|---|
*.lab.atilho.com |
192.168.4.4 |
This means any future service you add under lab.atilho.com automatically resolves to the proxy without needing to add another DNS entry. Cleaner, but means typos also resolve (which can be confusing when debugging).
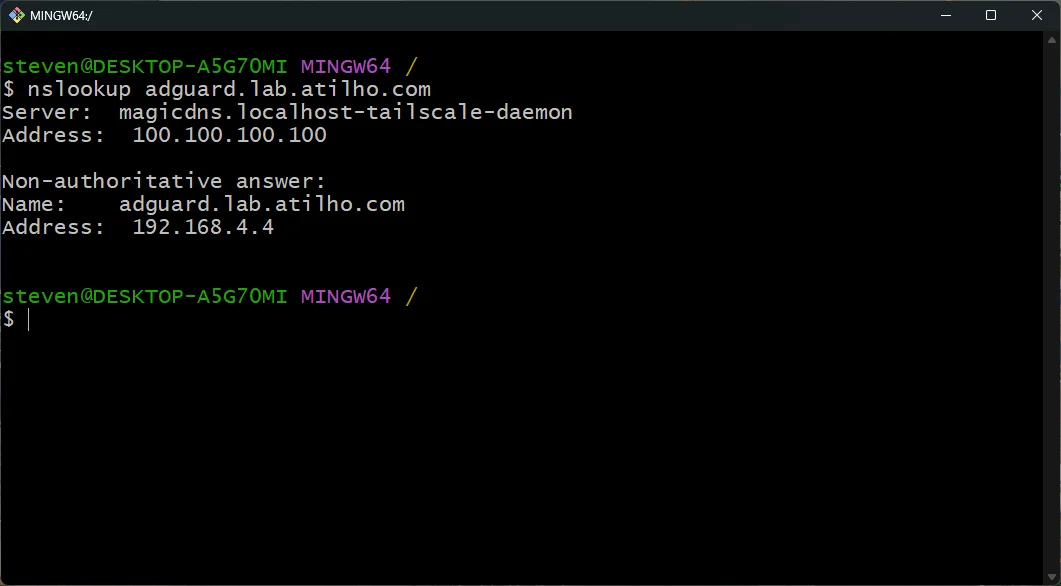
7.2 — Test DNS Resolution
From any device on your network:
nslookup adguard.lab.atilho.com
Should return 192.168.4.4. If it doesn’t, flush your DNS cache and try again.
Part 8: Create Proxy Hosts
Now wire up the actual services.
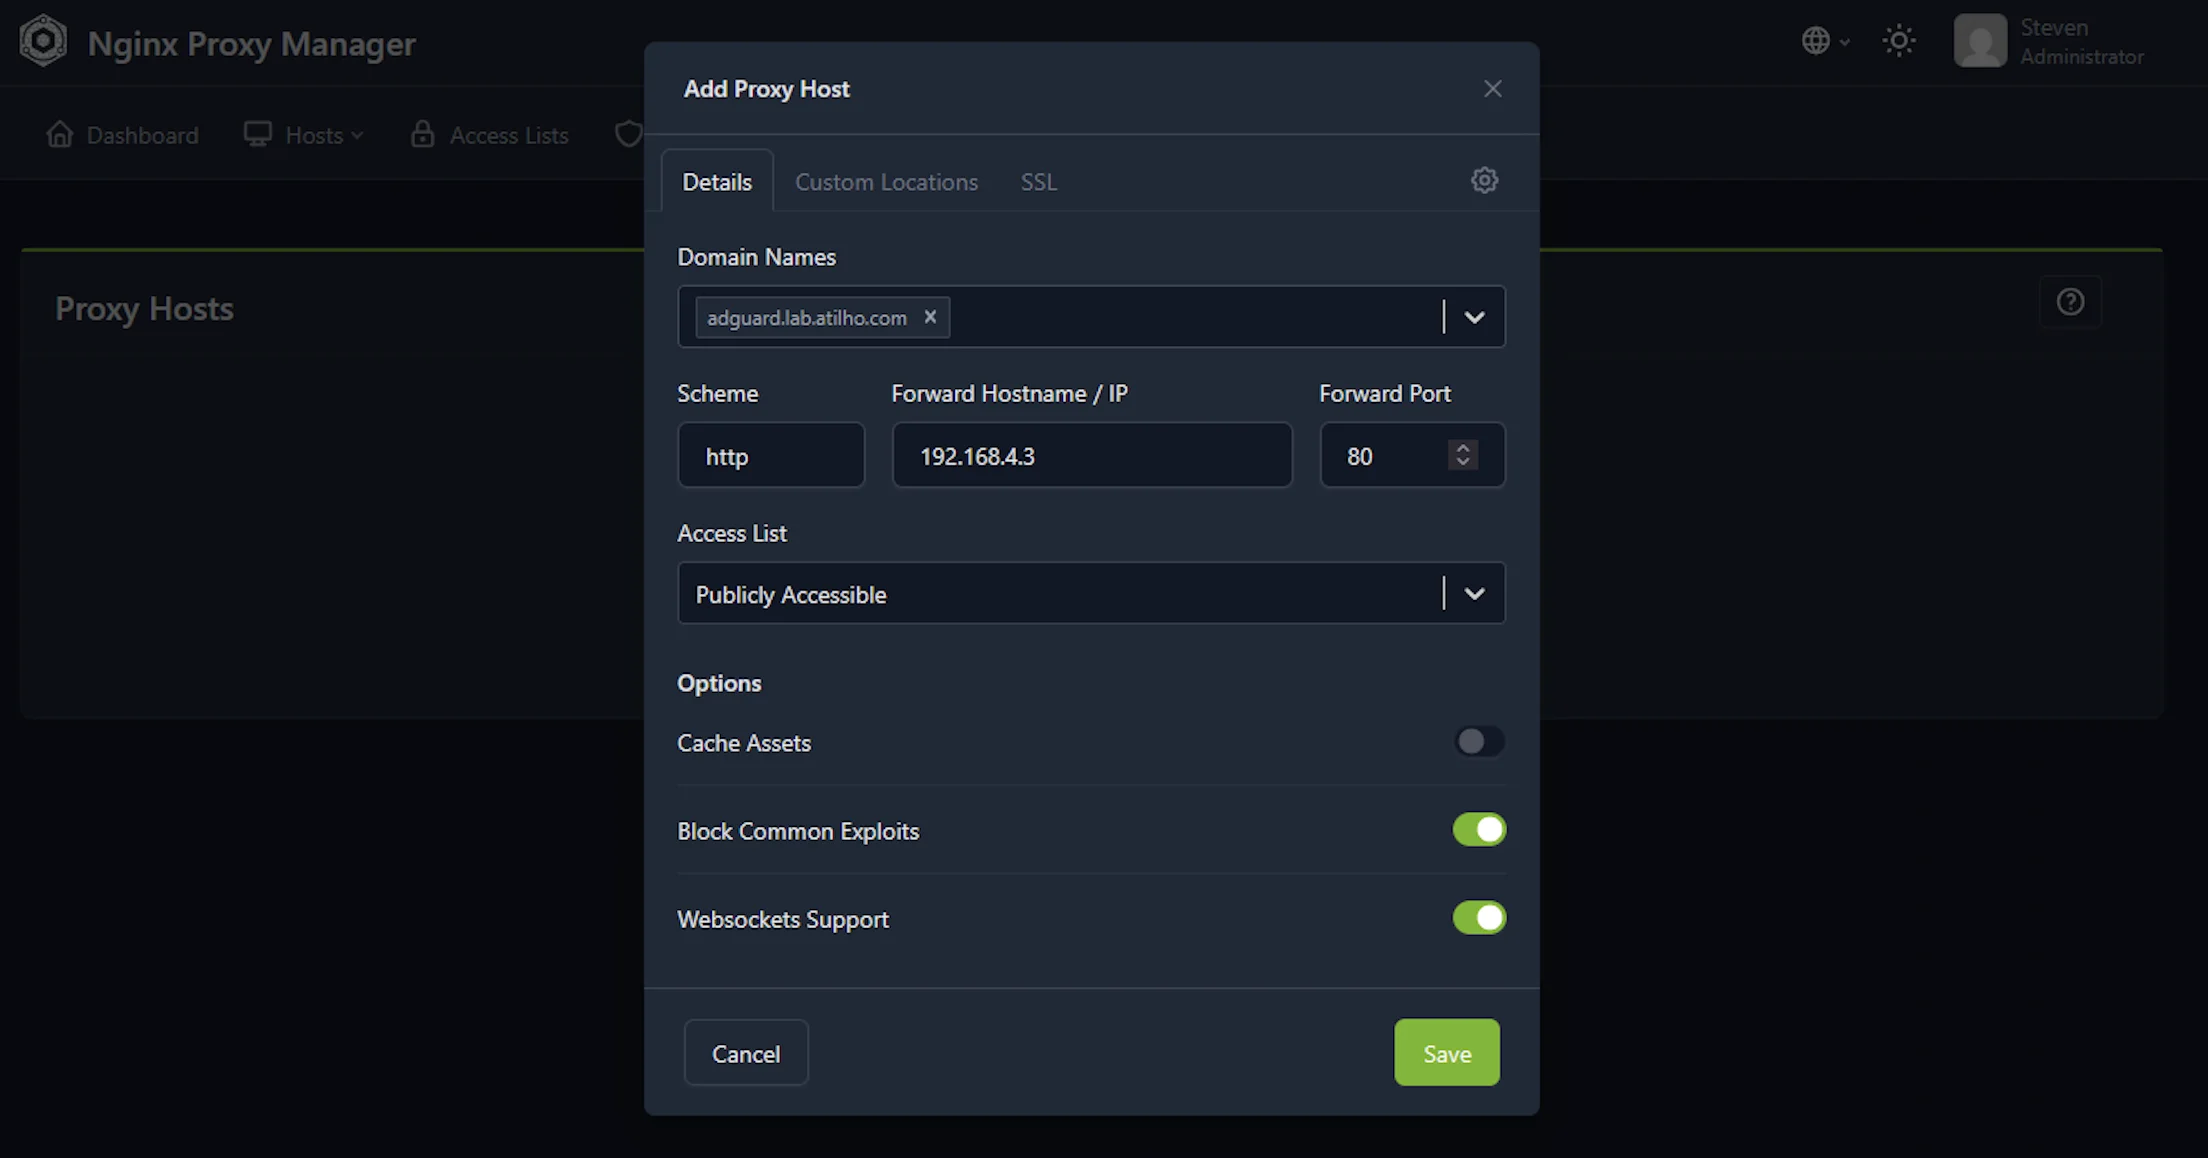
8.1 — Proxy Host for AdGuard Home
In NPM admin UI (http://192.168.4.4:81):
- Go to Hosts → Proxy Hosts
- Click Add Proxy Host
- Details tab:
| Field | Value |
|---|---|
| Domain Names | adguard.lab.atilho.com |
| Scheme | http |
| Forward Hostname / IP | 192.168.4.3 |
| Forward Port | 80 |
| Block Common Exploits | ✅ |
| Websockets Support | ✅ |
- SSL tab:
| Field | Value |
|---|---|
| SSL Certificate | Select the *.lab.atilho.com cert you created |
| Force SSL | ✅ |
| HTTP/2 Support | ✅ |
- Click Save
Test it: Open https://adguard.lab.atilho.com in your browser. You should see the AdGuard Home dashboard — with a padlock in the address bar and no security warnings.
8.2 — Proxy Host for Proxmox
Same process, but Proxmox uses HTTPS internally on port 8006 with a self-signed cert:
- Add Proxy Host
- Details tab:
| Field | Value |
|---|---|
| Domain Names | pve01.lab.atilho.com |
| Scheme | https |
| Forward Hostname / IP | 192.168.4.2 |
| Forward Port | 8006 |
| Block Common Exploits | ✅ |
| Websockets Support | ✅ |
- SSL tab:
| Field | Value |
|---|---|
| SSL Certificate | Select the *.lab.atilho.com cert |
| Force SSL | ✅ |
| HTTP/2 Support | ✅ |
- Advanced tab — paste this in the Custom Nginx Configuration box:
proxy_ssl_verify off;
This tells NPM to not verify the backend’s self-signed certificate. Without this line, NPM will refuse to connect to Proxmox because it can’t validate the cert.
- Click Save
Test it: Open https://pve01.lab.atilho.com. Proxmox login page, real cert, no warnings.
8.3 — Proxy Host for NPM Itself (Optional)
You can also put NPM’s own admin UI behind itself:
| Field | Value |
|---|---|
| Domain Names | npm.lab.atilho.com |
| Scheme | http |
| Forward Hostname / IP | 192.168.4.4 |
| Forward Port | 81 |
| SSL Certificate | *.lab.atilho.com |
| Force SSL | ✅ |
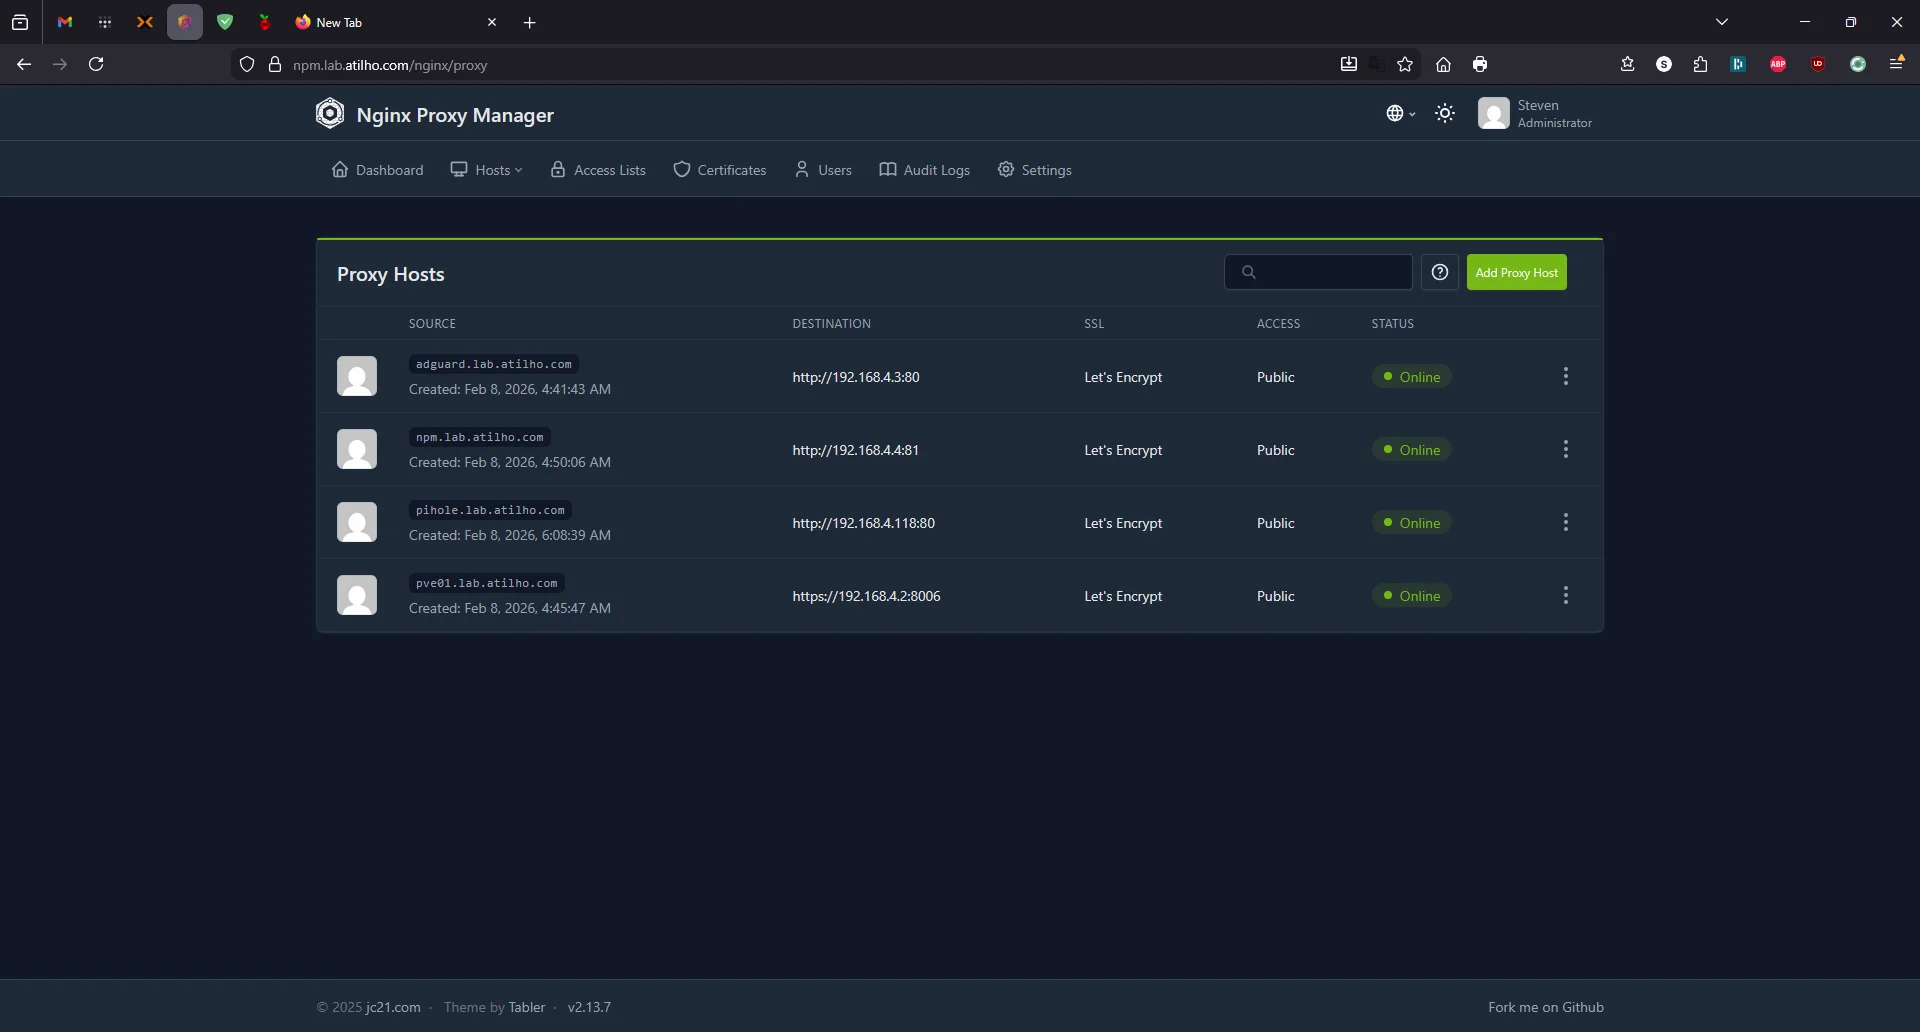
Now https://npm.lab.atilho.com gets you the NPM dashboard over HTTPS. Once this works, you can firewall off port 81 externally since you no longer need direct access.
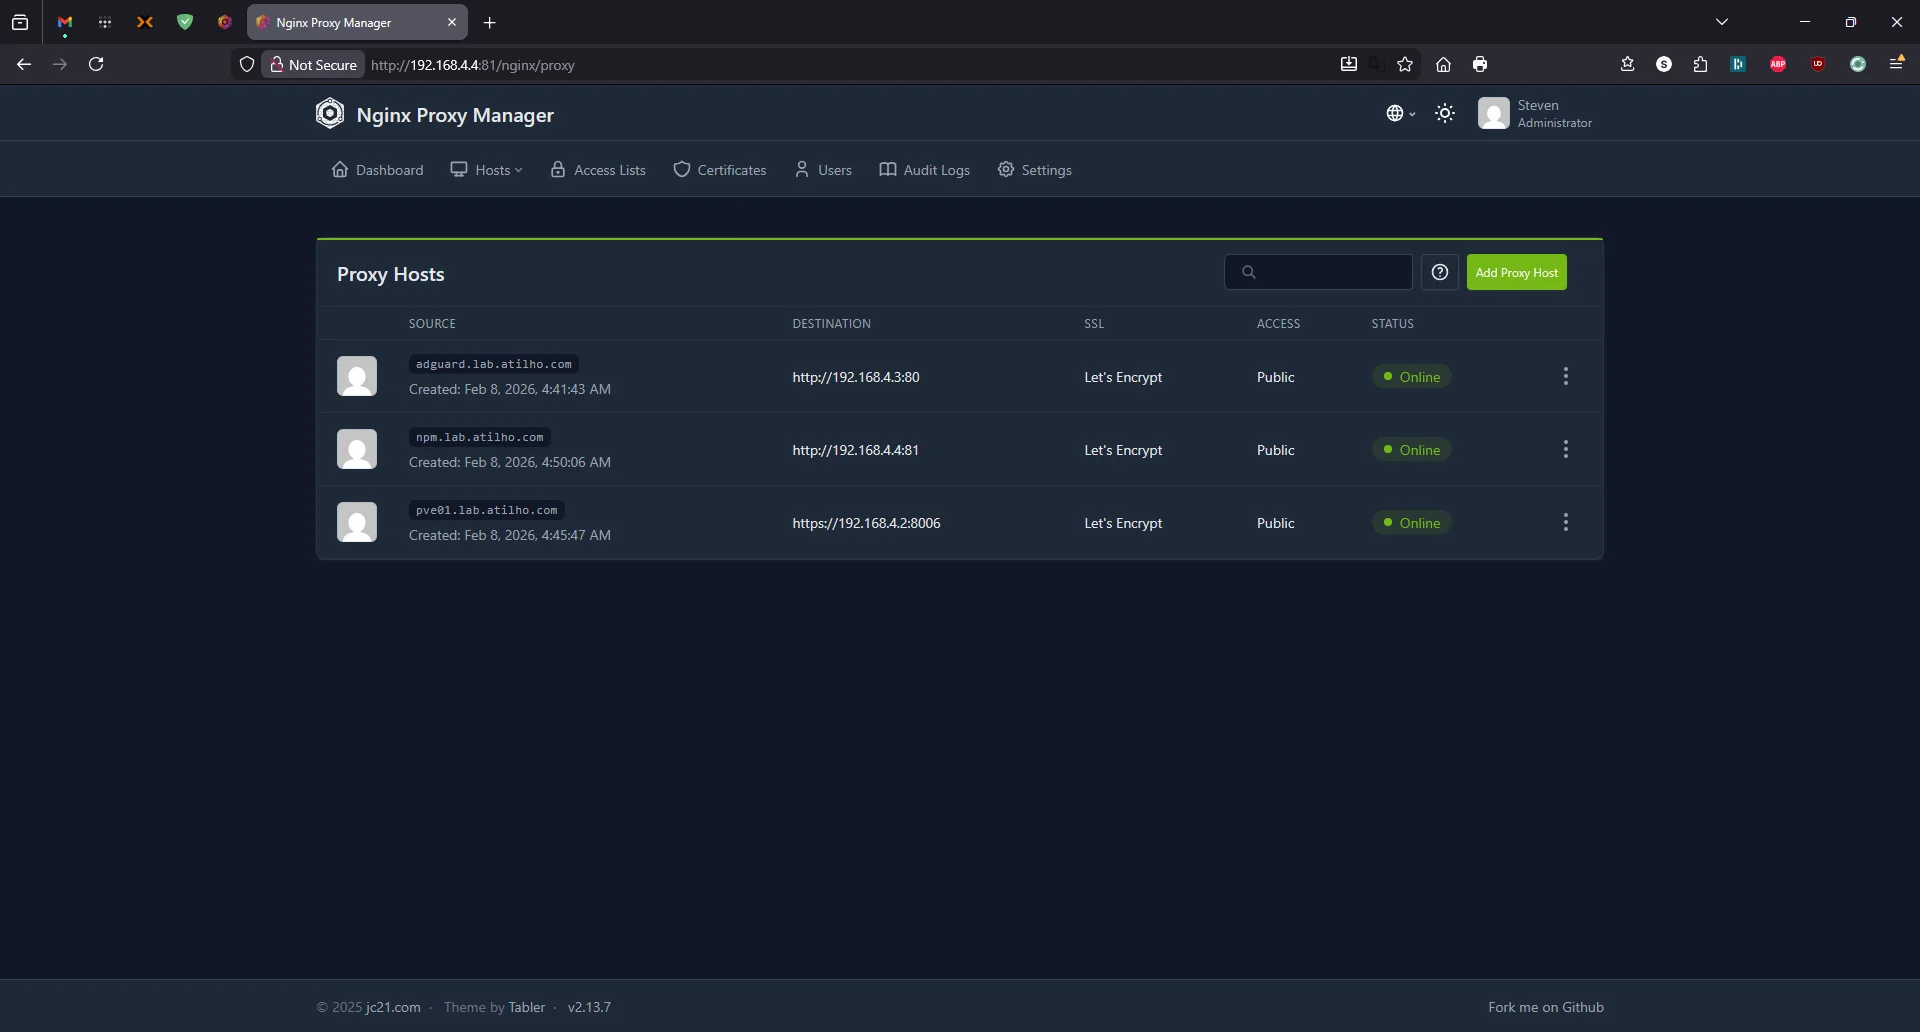
Open https://npm.lab.atilho.com — you should see the same proxy hosts list, now served over HTTPS with a valid certificate:

Part 9: Install Tailscale on CT 101
Same as Part 1 — make this container accessible from your tailnet.
9.1 — Enable TUN Device
SSH into the Proxmox host:
echo "lxc.cgroup2.devices.allow: c 10:200 rwm" >> /etc/pve/lxc/101.conf
echo "lxc.mount.entry: /dev/net/tun dev/net/tun none bind,create=file" >> /etc/pve/lxc/101.conf
Restart the container:
pct stop 101 && pct start 101
9.2 — Install and Authenticate
SSH into CT 101:
curl -fsSL https://tailscale.com/install.sh | sh
tailscale up --hostname=npm
Authenticate via the URL it prints. Now you can reach the reverse proxy from anywhere on your tailnet.
9.3 — Verify
tailscale ip -4
Note the 100.x.x.x IP. From your phone or laptop on Tailscale, you can now access https://adguard.lab.atilho.com and https://pve01.lab.atilho.com — but only if Tailscale’s DNS knows where to send those requests. See the next section.
Part 10: Remote Access via Tailscale (Optional)
At this point, everything works on your home network. If you also have Tailscale installed on your containers and Proxmox host (which we set up in Part 1), you can already access your services remotely using their Tailscale IPs or MagicDNS hostnames:
- Proxmox:
https://pve01.your-tailnet.ts.net:8006 - AdGuard:
http://adguard-home.your-tailnet.ts.net - NPM admin:
http://npm.your-tailnet.ts.net:81
This works, but it’s the same problem we started with — you’re back to remembering IP addresses, port numbers, and dealing with self-signed certificate warnings on Proxmox. The whole point of setting up NPM with a wildcard cert was clean URLs like https://adguard.lab.atilho.com with valid HTTPS and no ports.
To get that same clean experience when you’re off your home network, you need two things: Split DNS so Tailscale devices ask AdGuard to resolve *.lab.atilho.com, and subnet routing so Tailscale can reach the LAN IP (192.168.4.4) that AdGuard returns. Without both pieces, the hostnames either don’t resolve or resolve to an unreachable address.
10.1 — Enable Subnet Routing on the Proxmox Host
This tells Tailscale to route your entire home LAN (192.168.4.0/22) through pve01, making all LAN IPs reachable from any Tailscale device anywhere.
First, enable IP forwarding:
echo 'net.ipv4.ip_forward = 1' >> /etc/sysctl.d/99-tailscale.conf
sysctl -p /etc/sysctl.d/99-tailscale.conf
Then advertise the subnet. Include any existing non-default flags (Tailscale will tell you if you miss any):
tailscale up --advertise-routes=192.168.4.0/22 --hostname=pve01
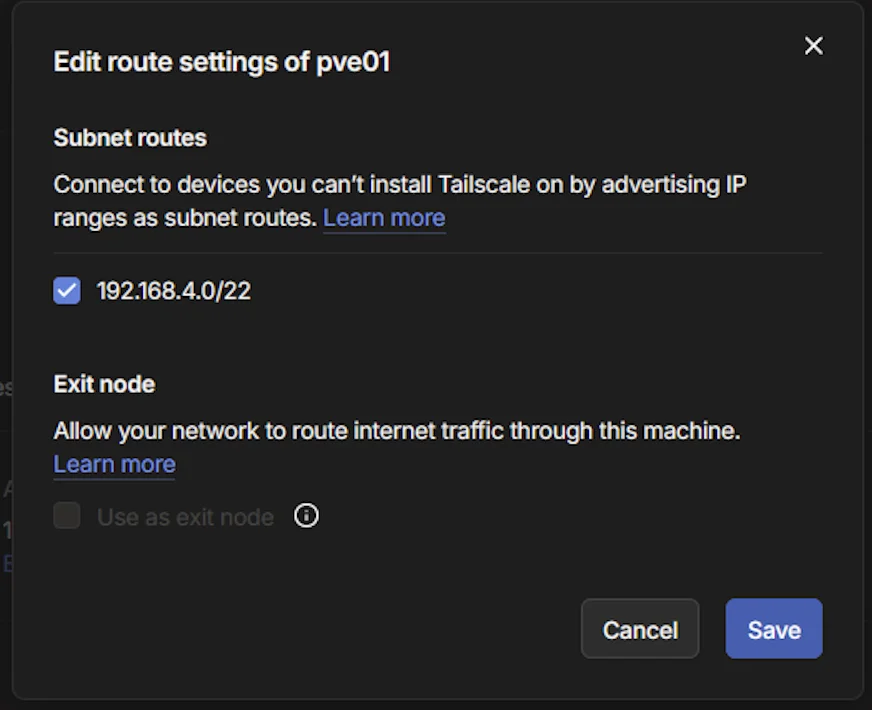
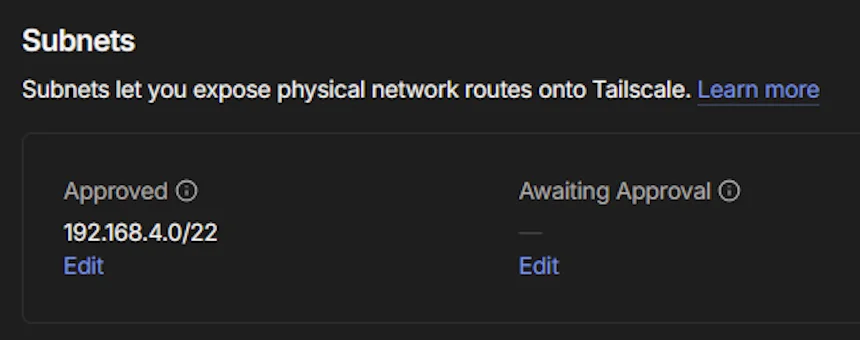
Now approve the route in the Tailscale admin console:
- Go to Machines → click pve01
- Under Subnets, click Edit (under “Awaiting Approval”)
- Check the box for
192.168.4.0/22 - Click Save
10.2 — Configure Split DNS
Split DNS tells Tailscale: “For anything under lab.atilho.com, ask AdGuard.” Without this, off-network devices wouldn’t know how to resolve your lab hostnames at all.
Prerequisite: AdGuard Home should already be on your tailnet from Part 1. You need its Tailscale IP (not its LAN IP) for this step. Find it in the Tailscale admin console under your
adguard-homemachine.
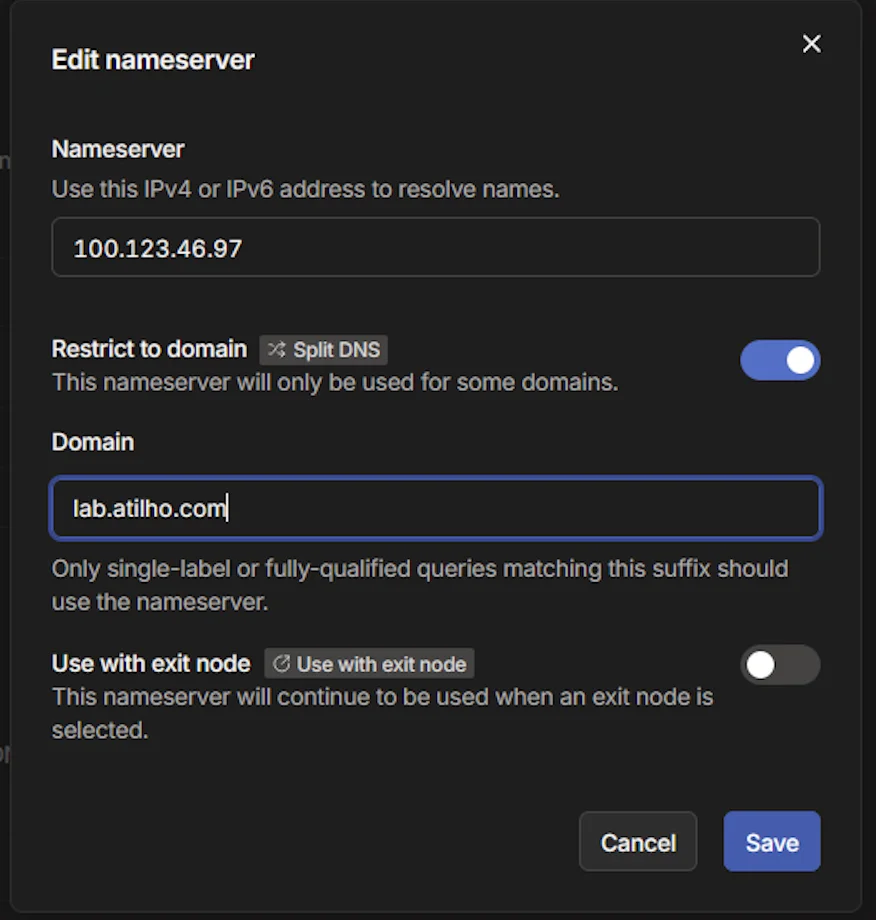
In the Tailscale admin console:
- Under Nameservers, click Add nameserver → Custom
- Enter AdGuard’s Tailscale IP (e.g.,
100.123.46.97— not the LAN IP) - Toggle Restrict to domain (Split DNS) → enter
lab.atilho.com - Leave Use with exit node OFF
- Click Save
Why the Tailscale IP? Using AdGuard’s Tailscale IP (
100.x.x.x) instead of its LAN IP (192.168.4.3) ensures DNS resolution works from any device on your tailnet, regardless of physical network.
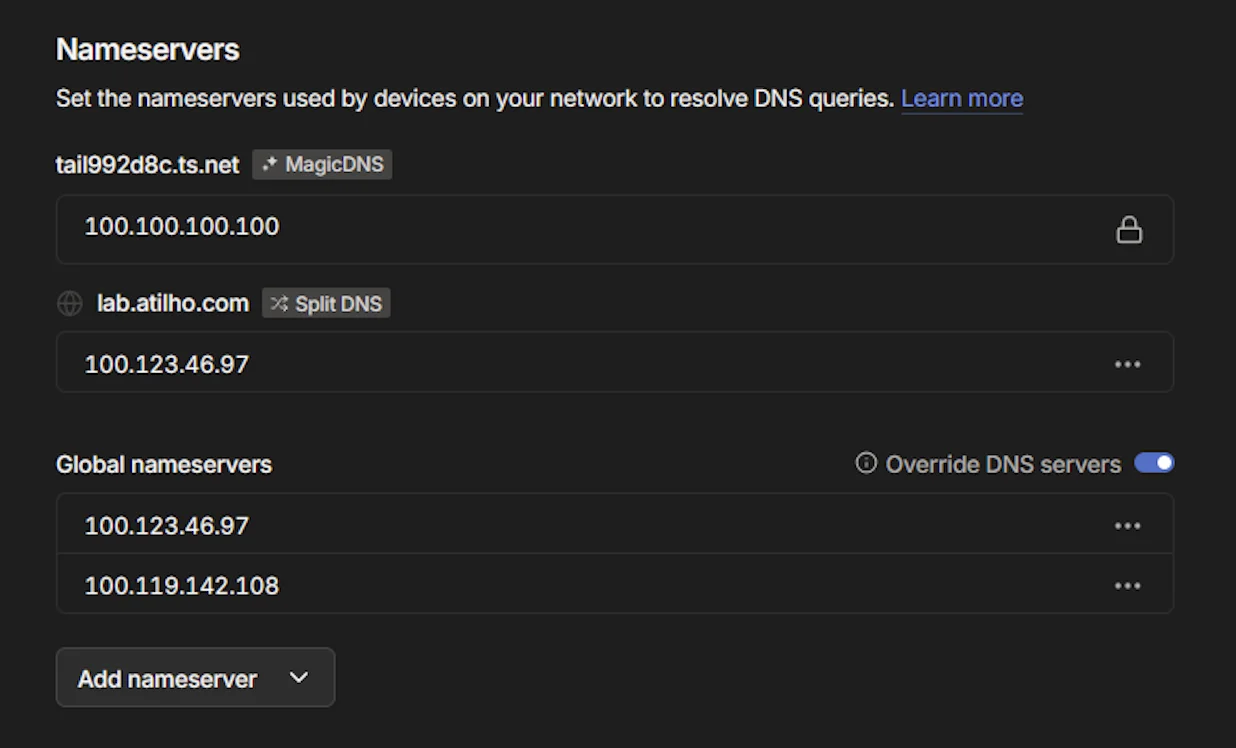
Already have AdGuard as a global nameserver? If you’ve added AdGuard’s Tailscale IP to your global nameservers list (which handles all DNS for all Tailscale devices), Split DNS is technically redundant — AdGuard already resolves
*.lab.atilho.comfor every query. Split DNS becomes a safety net: if you ever change your global nameserver config, lab resolution still works.
10.3 — How It All Connects
Here’s the full chain when you’re off-network:
- You open
https://adguard.lab.atilho.comon your phone (cellular, Tailscale active) - Tailscale sees
lab.atilho.com→ Split DNS → forwards query to AdGuard (100.123.46.97) - AdGuard’s DNS rewrite returns
192.168.4.4(the LAN IP of NPM) - Tailscale’s subnet route on pve01 makes
192.168.4.4reachable over the encrypted tunnel - NPM terminates TLS with the wildcard cert, proxies to the backend service
- You see a valid HTTPS page with a padlock — same as on your home network
Without subnet routing, step 4 fails and you get a timeout. Without Split DNS (or a global nameserver), step 2 fails and the hostname doesn’t resolve.
10.4 — Add to Home Screen (Optional)
Since these are regular HTTPS URLs with valid certificates, you can add them as web apps on your phone:
- iOS: Open the URL in Safari → Share → Add to Home Screen
- Android: Open in Chrome → three-dot menu → Add to Home screen
They’ll launch as standalone web apps with no browser chrome — a clean shortcut to your lab services from anywhere.
Part 11: Adding Future Services
This is where the investment pays off. Every new service you spin up follows the same 3-step pattern:
- Deploy the service in a new LXC or in Docker on an existing one
- Add a DNS rewrite in AdGuard (if you didn’t use the wildcard) — e.g.,
vault.lab.atilho.com → 192.168.4.4 - Add a proxy host in NPM pointing to the service’s internal IP and port
That’s it. Real HTTPS cert, clean URL, no port numbers, done in under a minute.
| Future Service | Hostname | Backend |
|---|---|---|
| Vaultwarden | vault.lab.atilho.com |
192.168.4.x:8080 |
| Uptime Kuma | status.lab.atilho.com |
192.168.4.x:3001 |
| Grafana | grafana.lab.atilho.com |
192.168.4.x:3000 |
| Portainer | portainer.lab.atilho.com |
192.168.4.x:9443 |
| Homepage | home.lab.atilho.com |
192.168.4.x:3000 |
Part 12: Container Housekeeping
Before moving on, there are a couple of Proxmox settings worth configuring so your reverse proxy survives reboots and you have a rollback point.
12.1 — Start at Boot with Ordering
If pve01 reboots (power outage, kernel update, etc.), you want your containers to come back up automatically — and in the right order. AdGuard needs to be running before NPM starts, since NPM depends on DNS for certificate validation and general connectivity.
For each container, go to Options → double-click Start at boot → check it ON. Then set the Start/Shutdown order:
| Container | Start Order | Startup Delay |
|---|---|---|
| CT 100 (adguard) | 1 |
0 (default) |
| CT 101 (npm) | 2 |
10 seconds |
The 10-second delay gives AdGuard time to initialize before NPM’s Docker containers start making DNS requests.
12.2 — Take a Snapshot
Everything is working — DNS, TLS, reverse proxy, remote access. This is a good time to snapshot both containers so you have a known-good state to roll back to.
In Proxmox, select each container → Snapshots → Take Snapshot:
- CT 100:
fresh-adguard-setup - CT 101:
fresh-npm-setup
Watch your disk space. The Wyse 5070’s SSD is limited and snapshots grow over time as container data changes. Run
lvson the Proxmox host to check actual thin pool usage vs. allocated space. Delete old snapshots once you’ve confirmed things are stable — they silently eat space.
Troubleshooting
NPM won’t issue the certificate?
Check the NPM logs:
cd /opt/npm
docker compose logs -f
Look for Cloudflare API errors. The most common fix is regenerating the API token with the correct zone permissions.
Browser still shows a security warning?
You might be hitting the service directly on its IP instead of through the proxy. Make sure you’re accessing via https://adguard.lab.atilho.com not https://192.168.4.3. The cert is only valid for *.lab.atilho.com.
DNS rewrites aren’t resolving?
nslookup adguard.lab.atilho.com 192.168.4.3
If this works but your device doesn’t resolve it, the device isn’t using AdGuard for DNS. Check your router’s DNS settings or the device’s manual DNS config.
Proxmox GUI is a blank white page through the proxy?
Make sure Websockets Support is enabled on the proxy host. Proxmox’s noVNC console relies on WebSockets.
502 Bad Gateway?
NPM can reach the proxy host but the backend isn’t responding. Check that the backend service is actually running and the port is correct:
curl -k https://192.168.4.2:8006  # Test Proxmox directly
curl http://192.168.4.3:80         # Test AdGuard directly
Docker won’t start inside the LXC?
Verify the container config on the Proxmox host:
cat /etc/pve/lxc/101.conf
You should see features: nesting=1 and the apparmor/cgroup lines from Part 3. If you edited the config while the container was running, stop and start it (not restart):
pct stop 101 && pct start 101
What’s Running Now
| Layer | Service | Internal Access | HTTPS Access |
|---|---|---|---|
| Hypervisor | Proxmox VE | 192.168.4.2:8006 |
https://pve01.lab.atilho.com |
| CT 100 | AdGuard + Unbound | 192.168.4.3:80 |
https://adguard.lab.atilho.com |
| CT 101 | Nginx Proxy Manager | 192.168.4.4:81 |
https://npm.lab.atilho.com |
| Raspberry Pi | Pi-hole + Unbound | 192.168.4.118:80 |
https://pihole.lab.atilho.com |
| Tailscale | All services on tailnet | 100.x.x.x |
Same HTTPS URLs remotely |
The Wyse is still cruising. AdGuard + Unbound use maybe 150 MB. Docker + NPM adds another 200–300 MB. Out of 8 GB, there’s still 7+ GB free. Plenty of room to keep stacking services.
What’s next: Monitoring. Uptime Kuma to know when something goes down, and maybe Grafana + Prometheus to actually visualize what the homelab is doing. That’s Part 3.